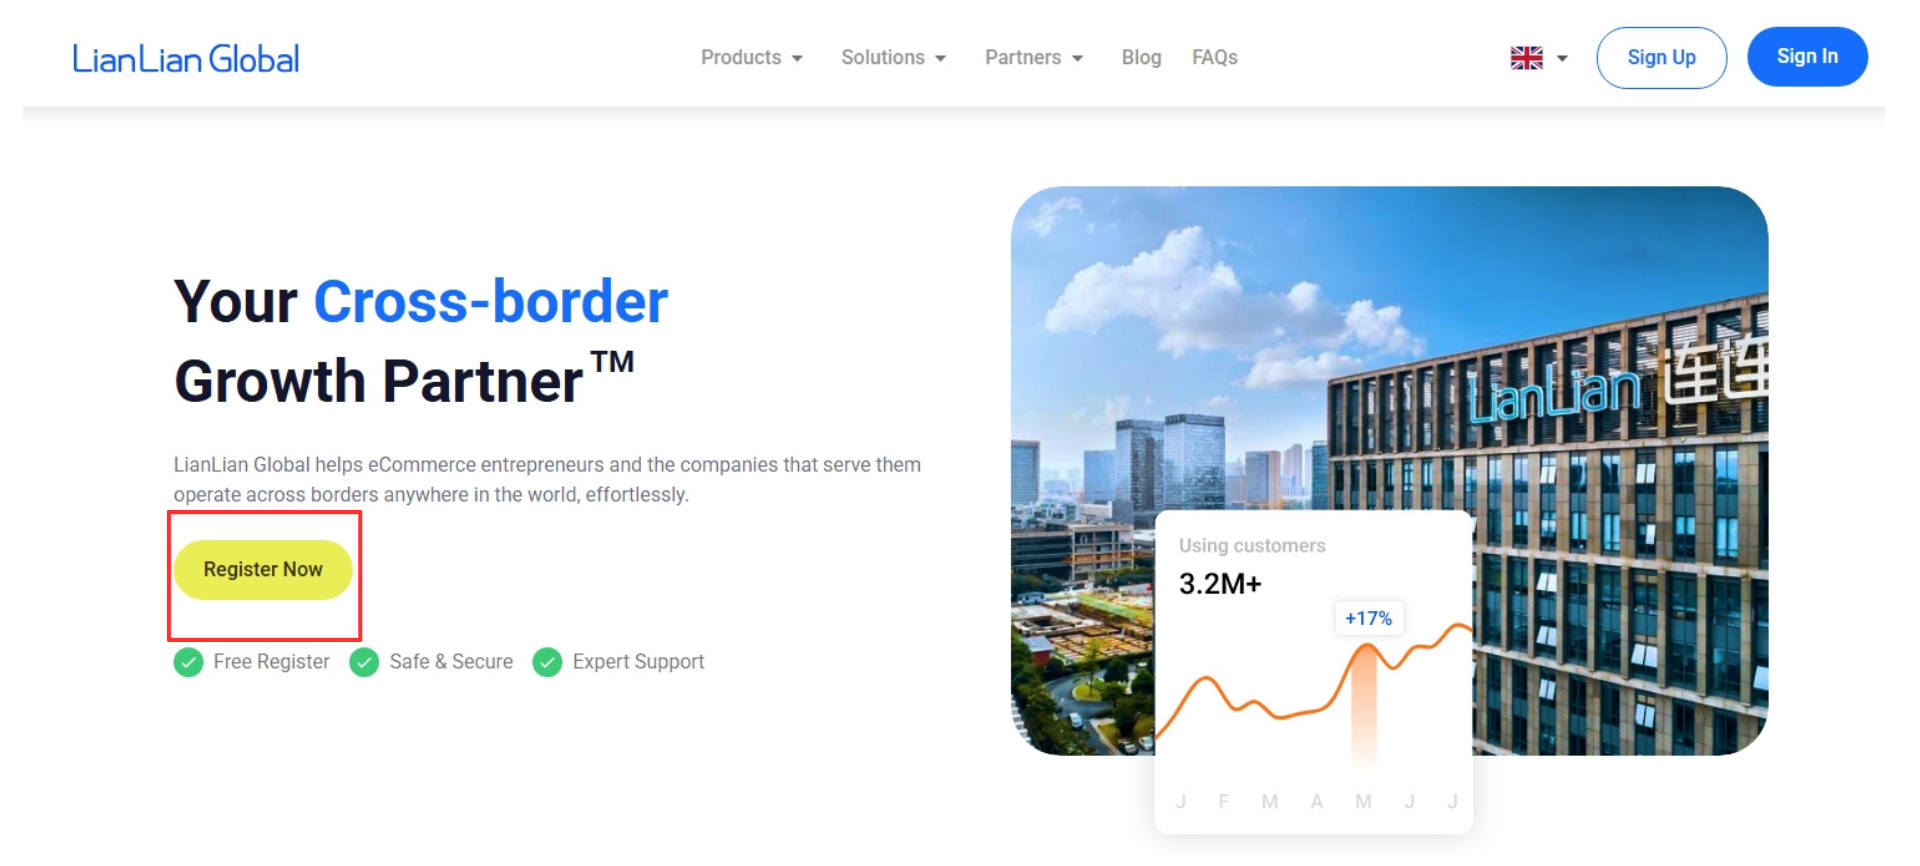
Step 1: Register via THIS LINK
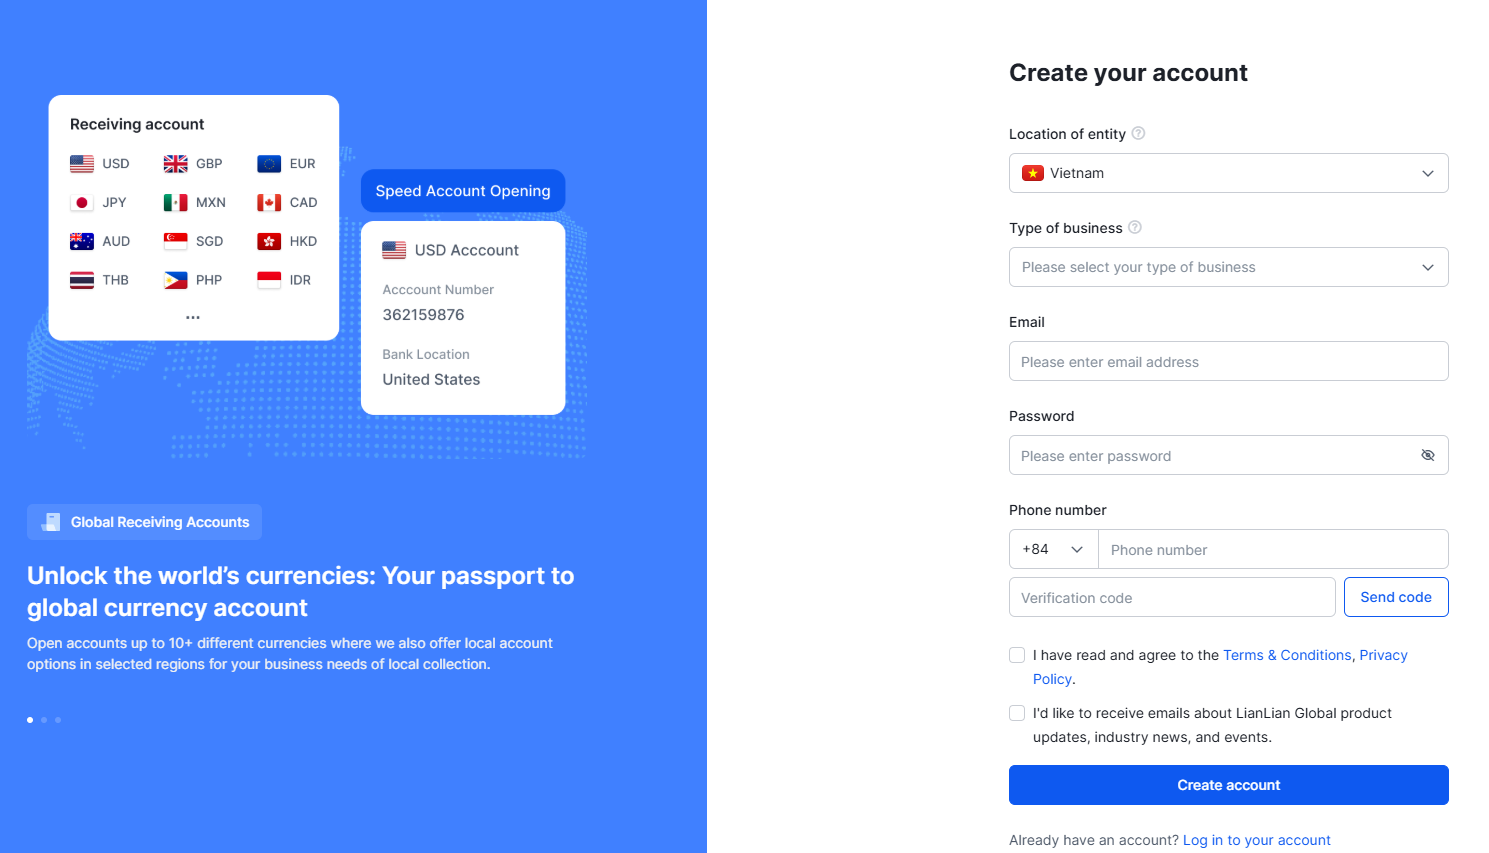
Step 2: Select "Individual" as the type of registered business.
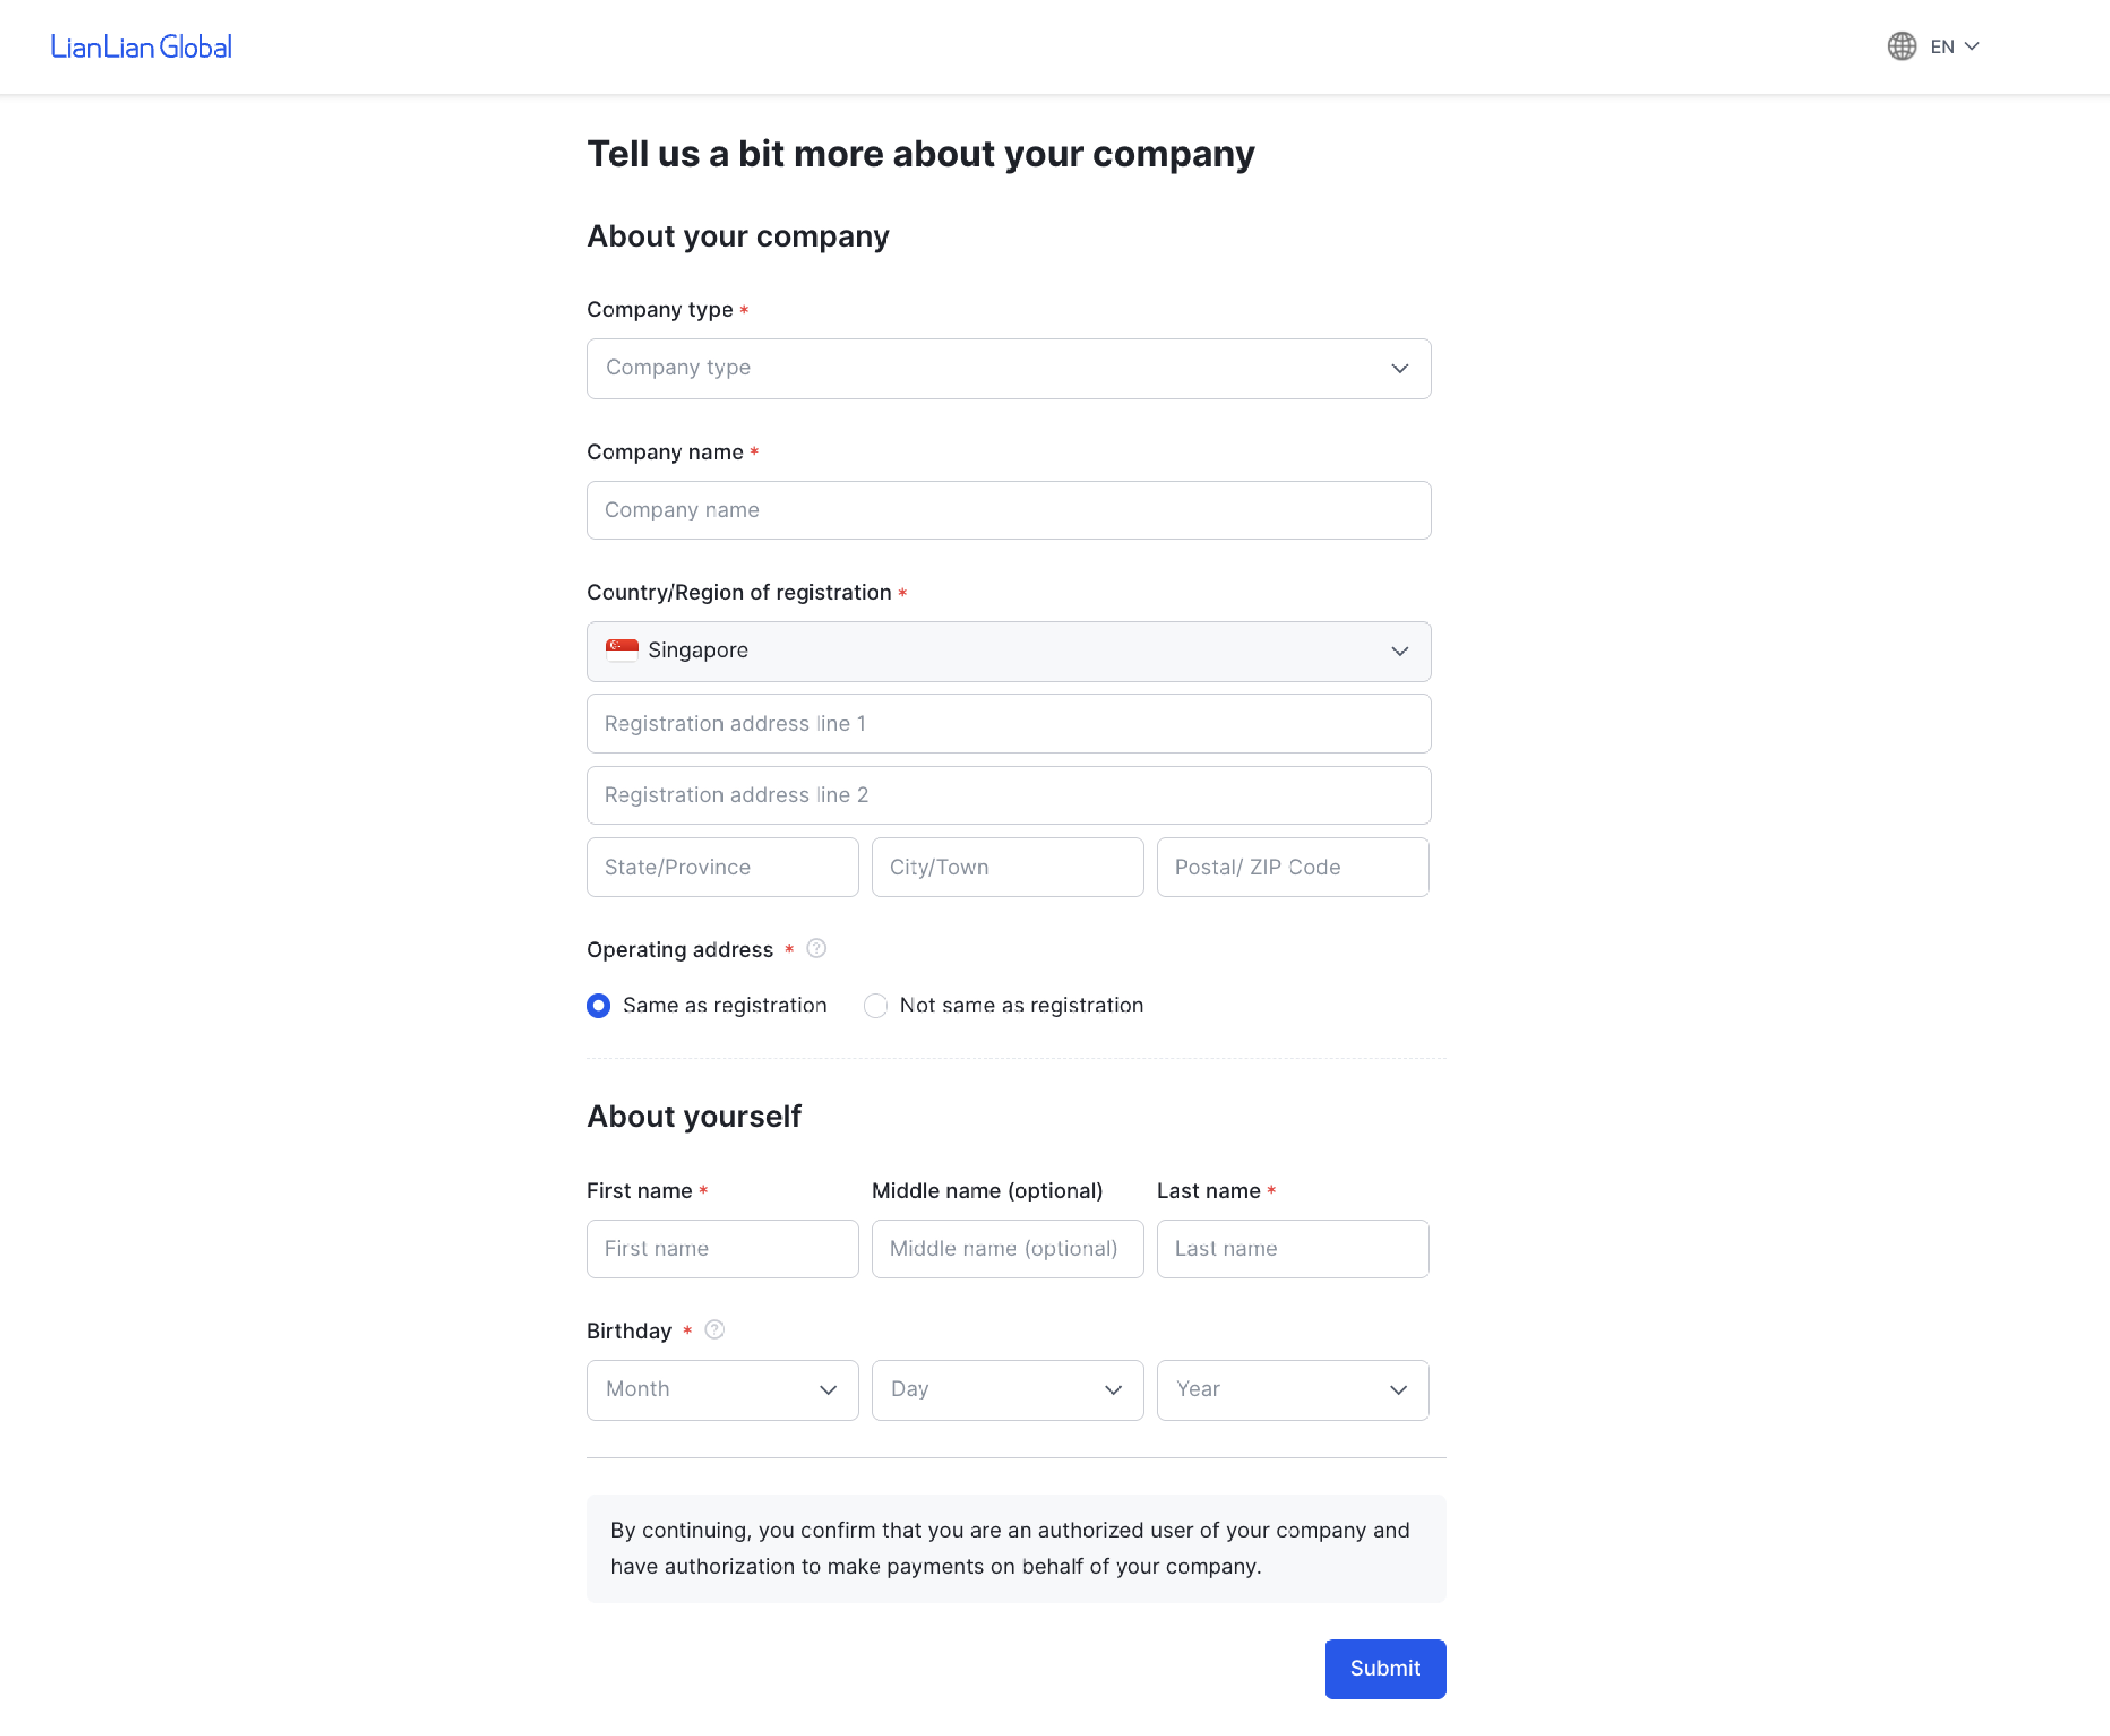
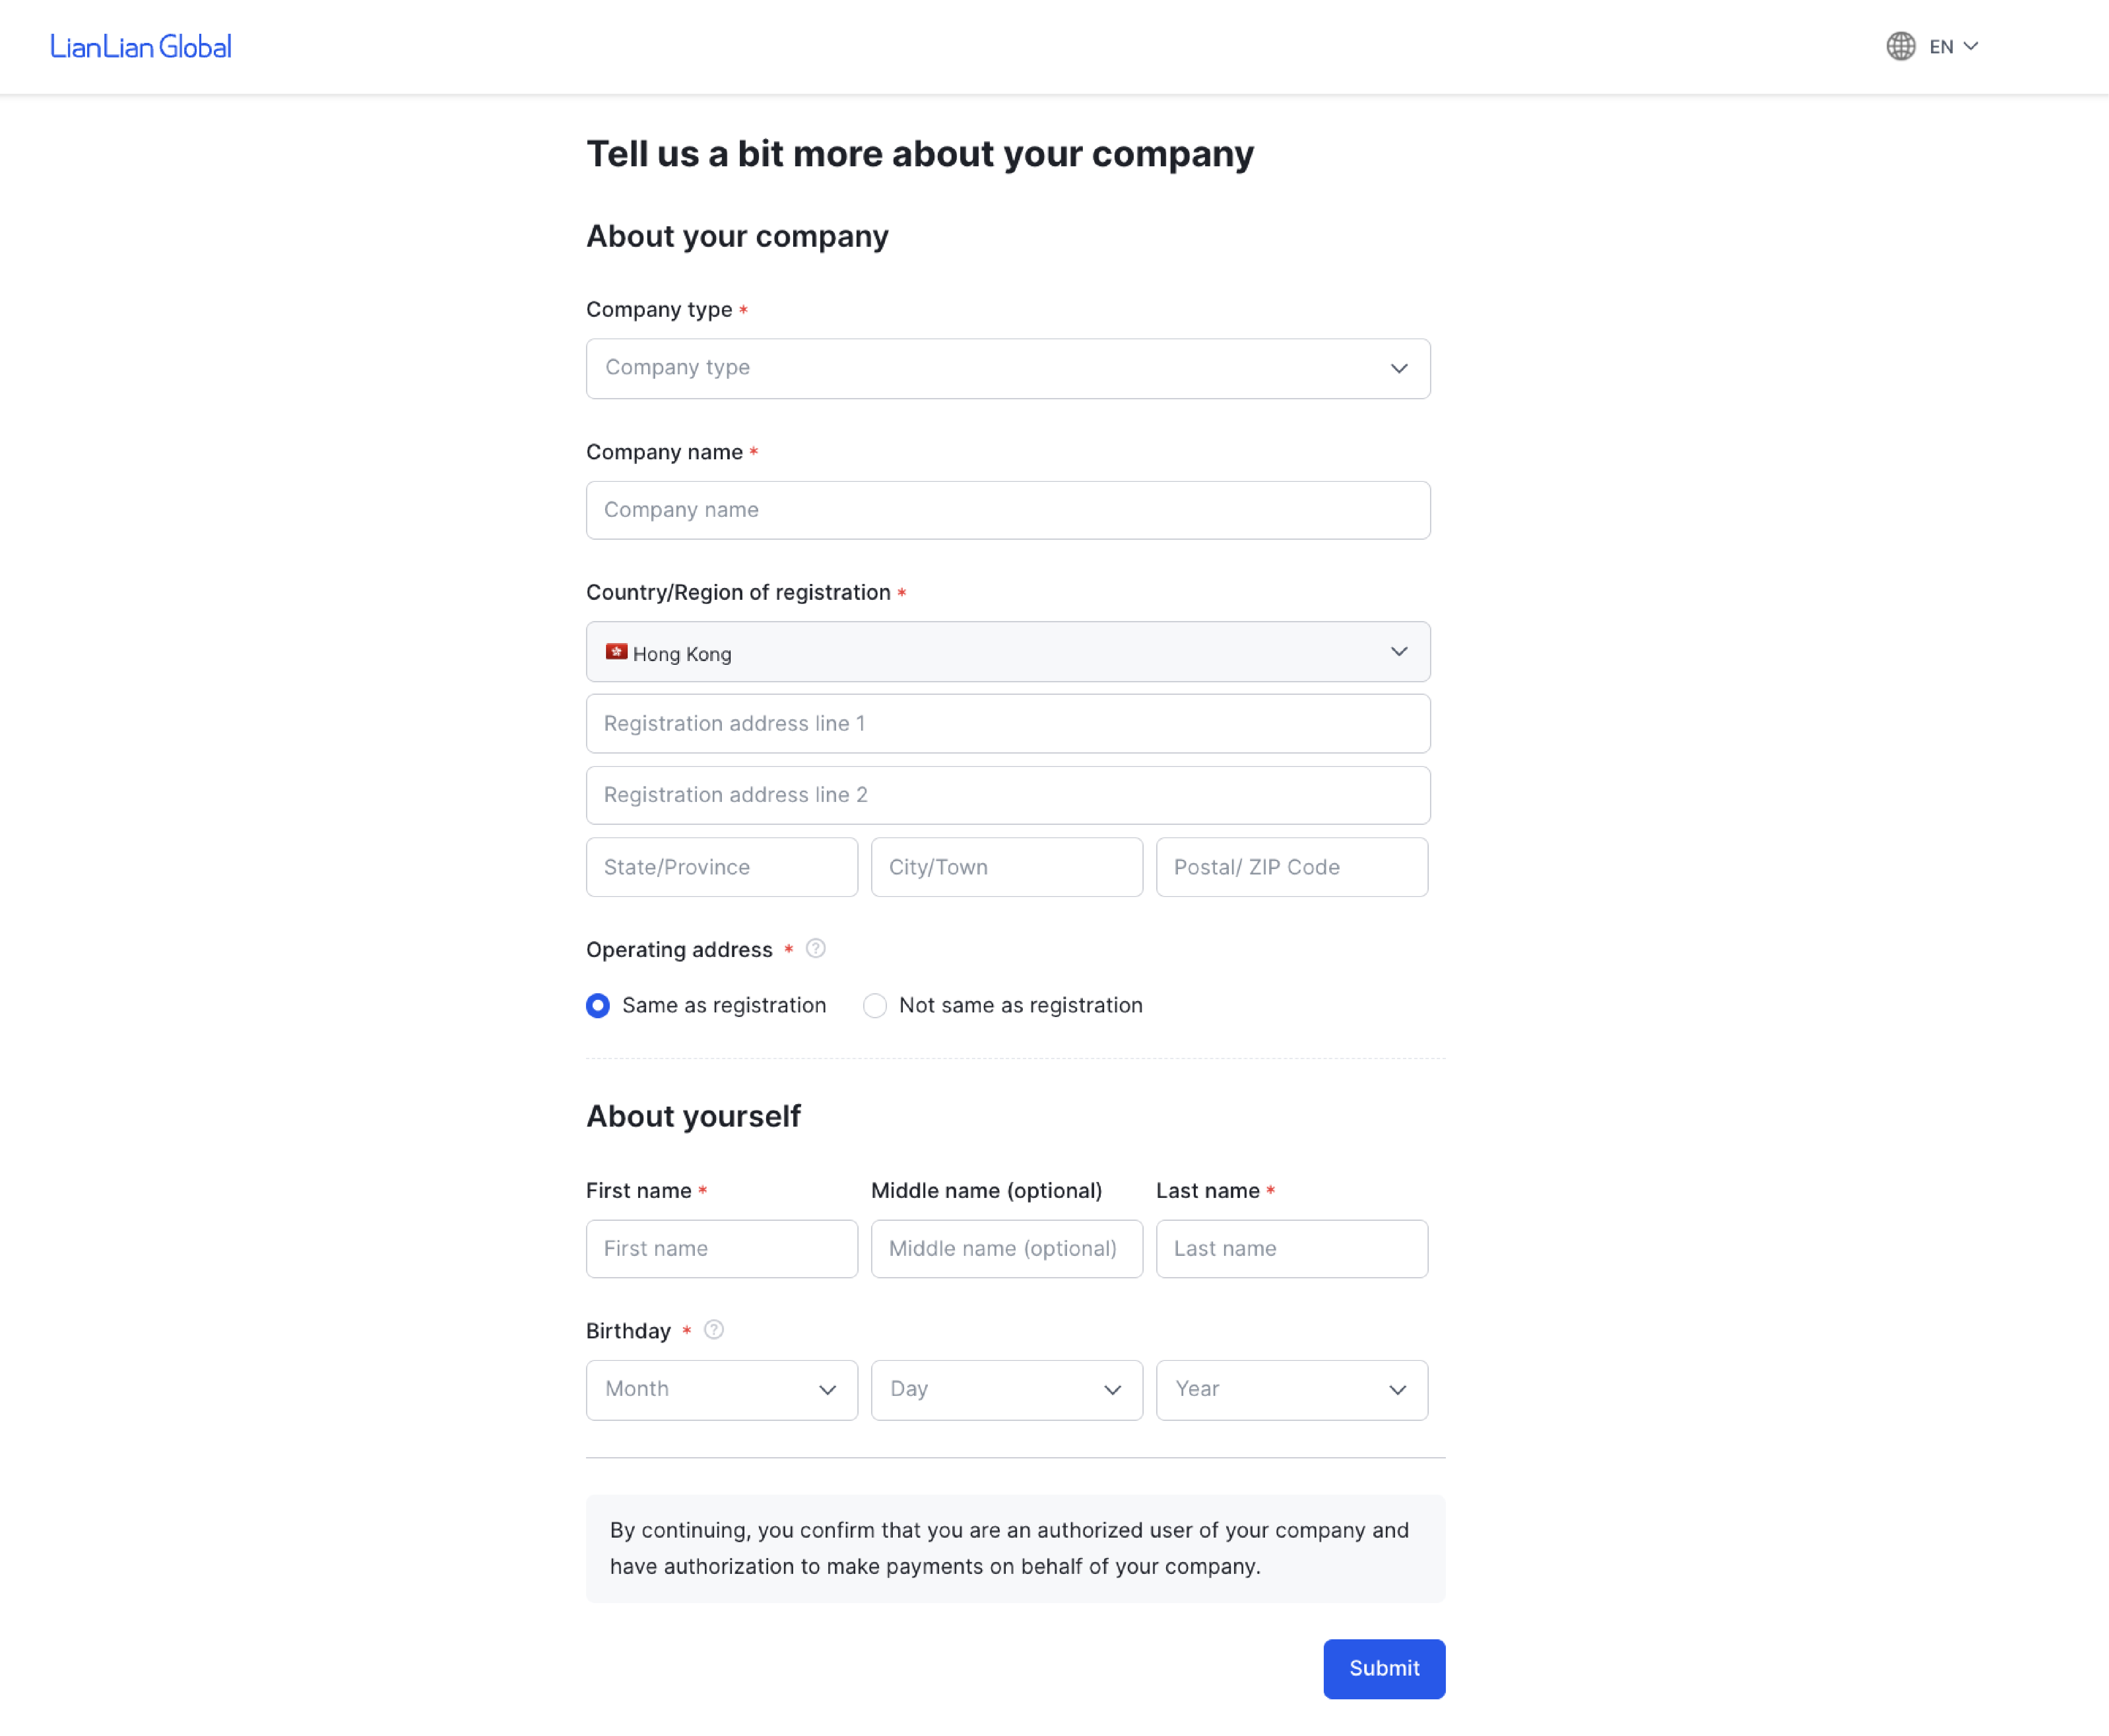
Step 3: Fill in the details and select "Submit" to proceed.
Step 4:
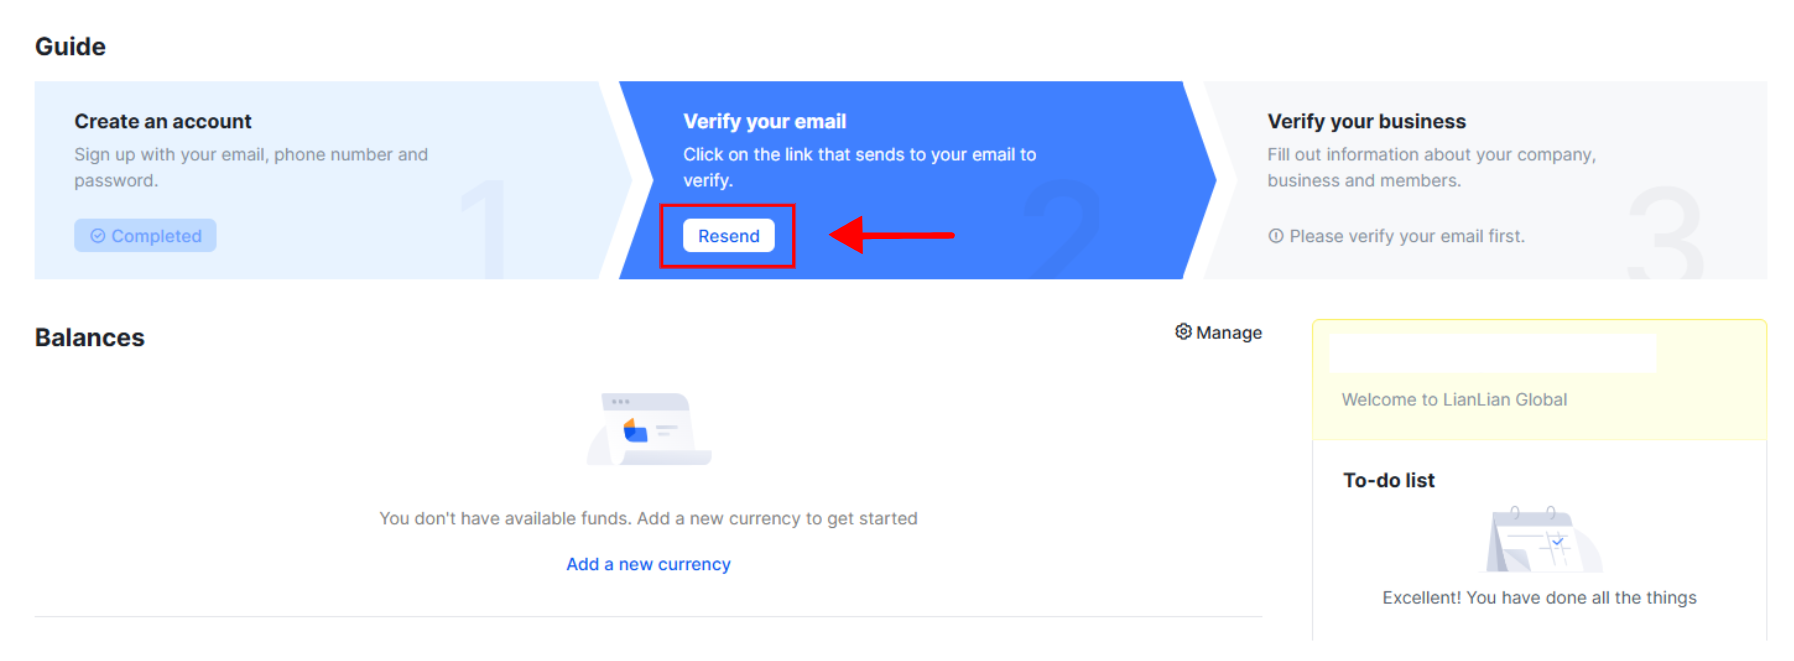
The system will immediately send a verification email to the address you have registered.
Select "Confirm email" to authenticate.
If you don't see the email on your home screen, please check your spam mailbox.
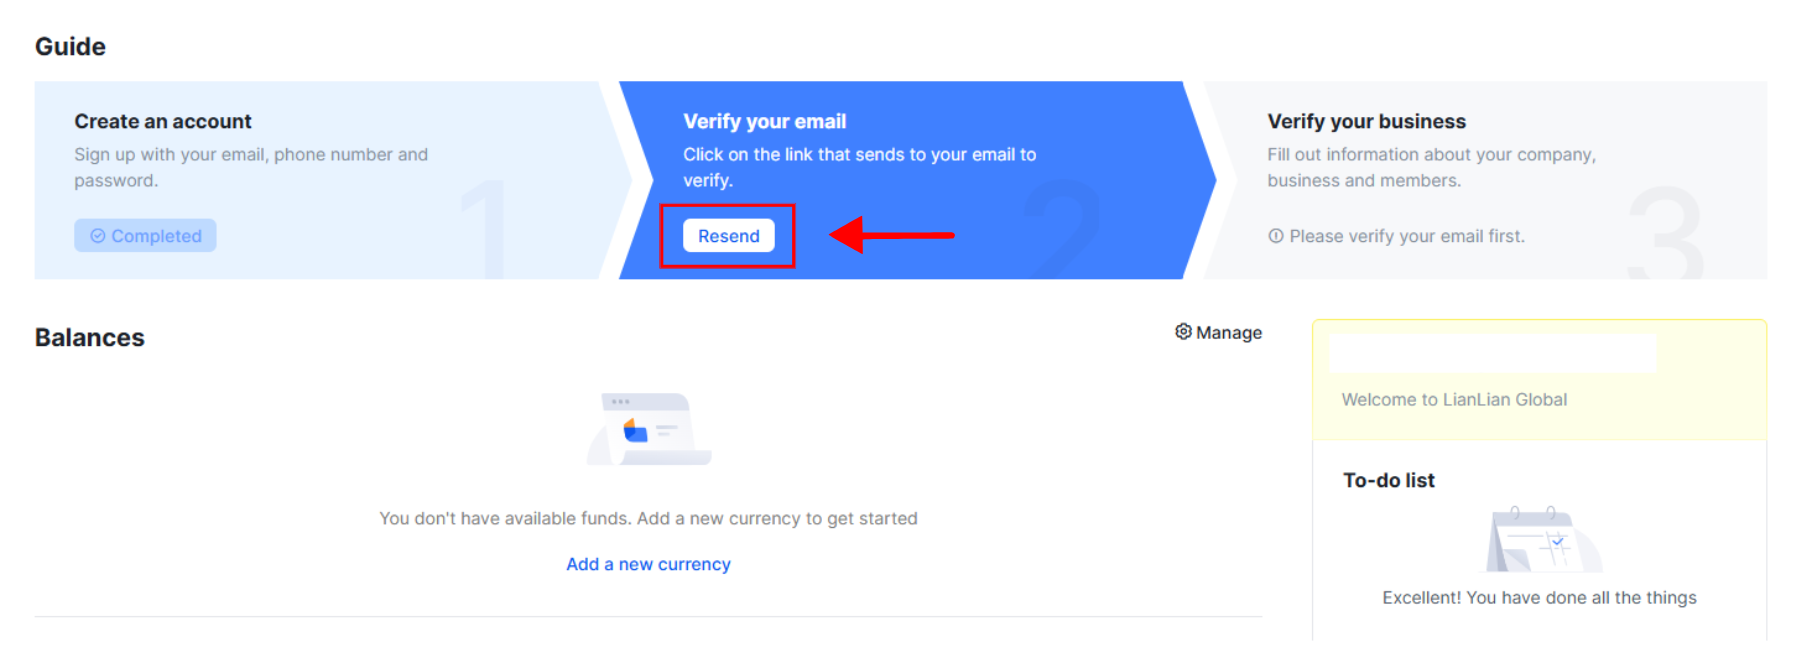
If the email is not received, select "Resend" on the main operation screen.
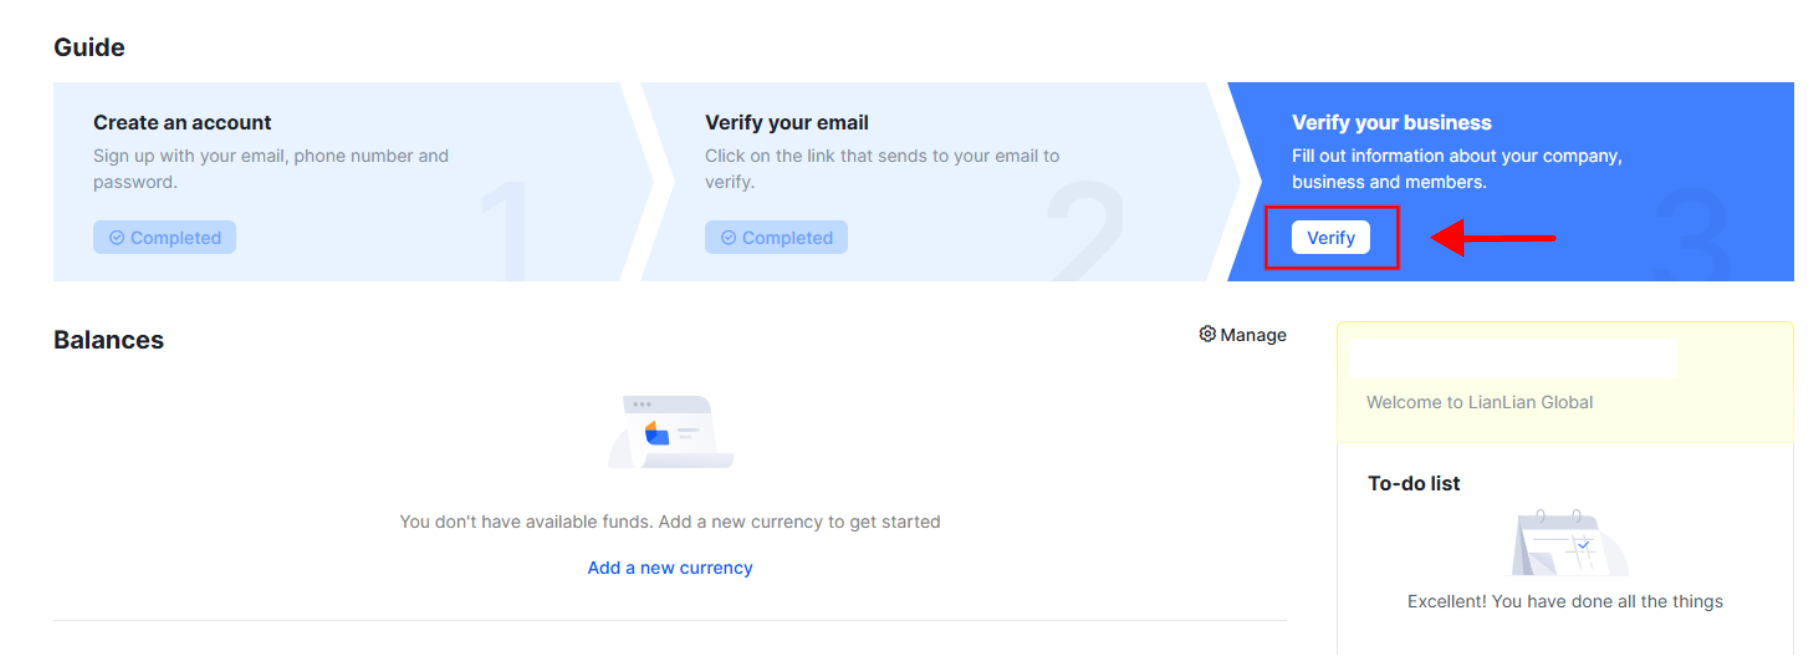
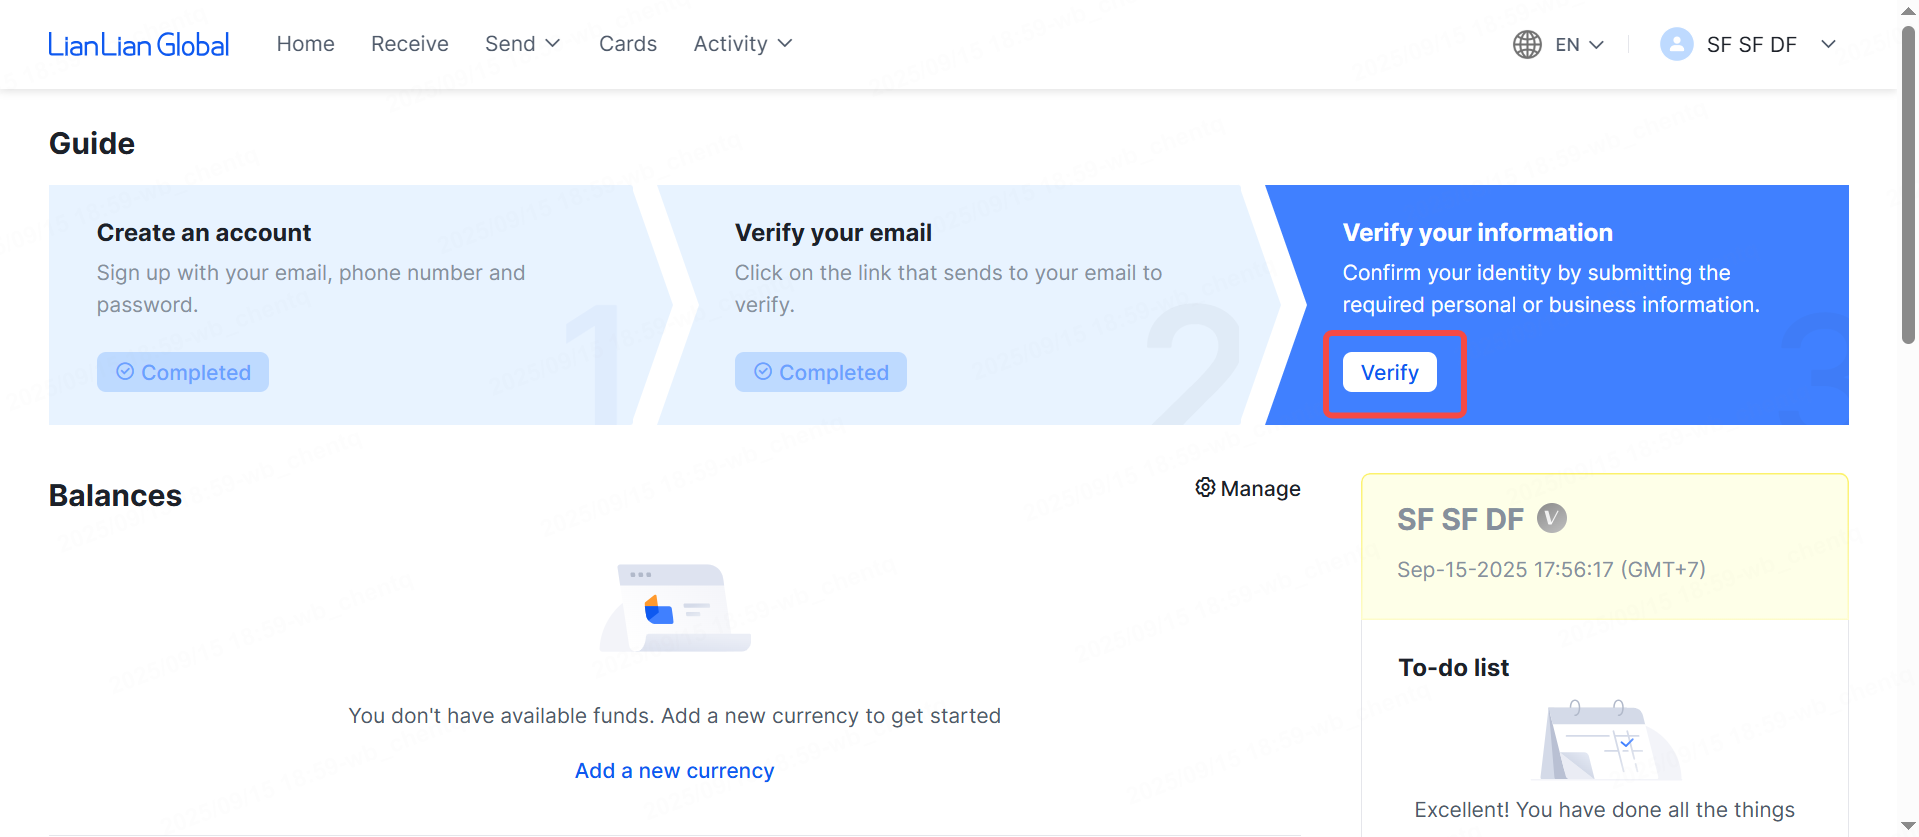
Step 5: After completing email authentication, on the home screen, go to the "Verify now" button to verify your account.
Step 6: Check the personal information that has been registered. Then select "Click to start verification".
Step 7: Prepare passport/ ID with chip.
If you are using your mobile phone to register, you can use your phone's camera to scan the QR code that appears on the screen and proceed to the next step.
Step 8: Perform the verification operations as instructed on the screen.
Note:
• The sheet should be clearly photographed, not blurred, flashy, or out of corner.
• Frontal shots also need to be in well-lit conditions, without hair covering the face.
Step 9: Fill in the Permanent Residence Address information.
Note: Fill in the Permanent Residence Address information that matches the information on the provided ID.
Step 10: Upload Proof of Address information.
Choose to upload one of the following documents:
• Bank statement (with current address, with the bank's red mark)
• Electricity and water bills (online or offline, with current address)
• Other documents (lease agreement, temporary residence certificate, temporary residence letter,...)
Documents must be made within the last 6 months.
Note: The current address information in the document does not have to match the permanent address information in the ID.
Step 11: Provide information about business activities. Select "Submit" to finish.
– Company type (Select from the below)
– Sole-Proprietorship
– Partnership
– Limited Partnership
– Limited Liability Company
– Company
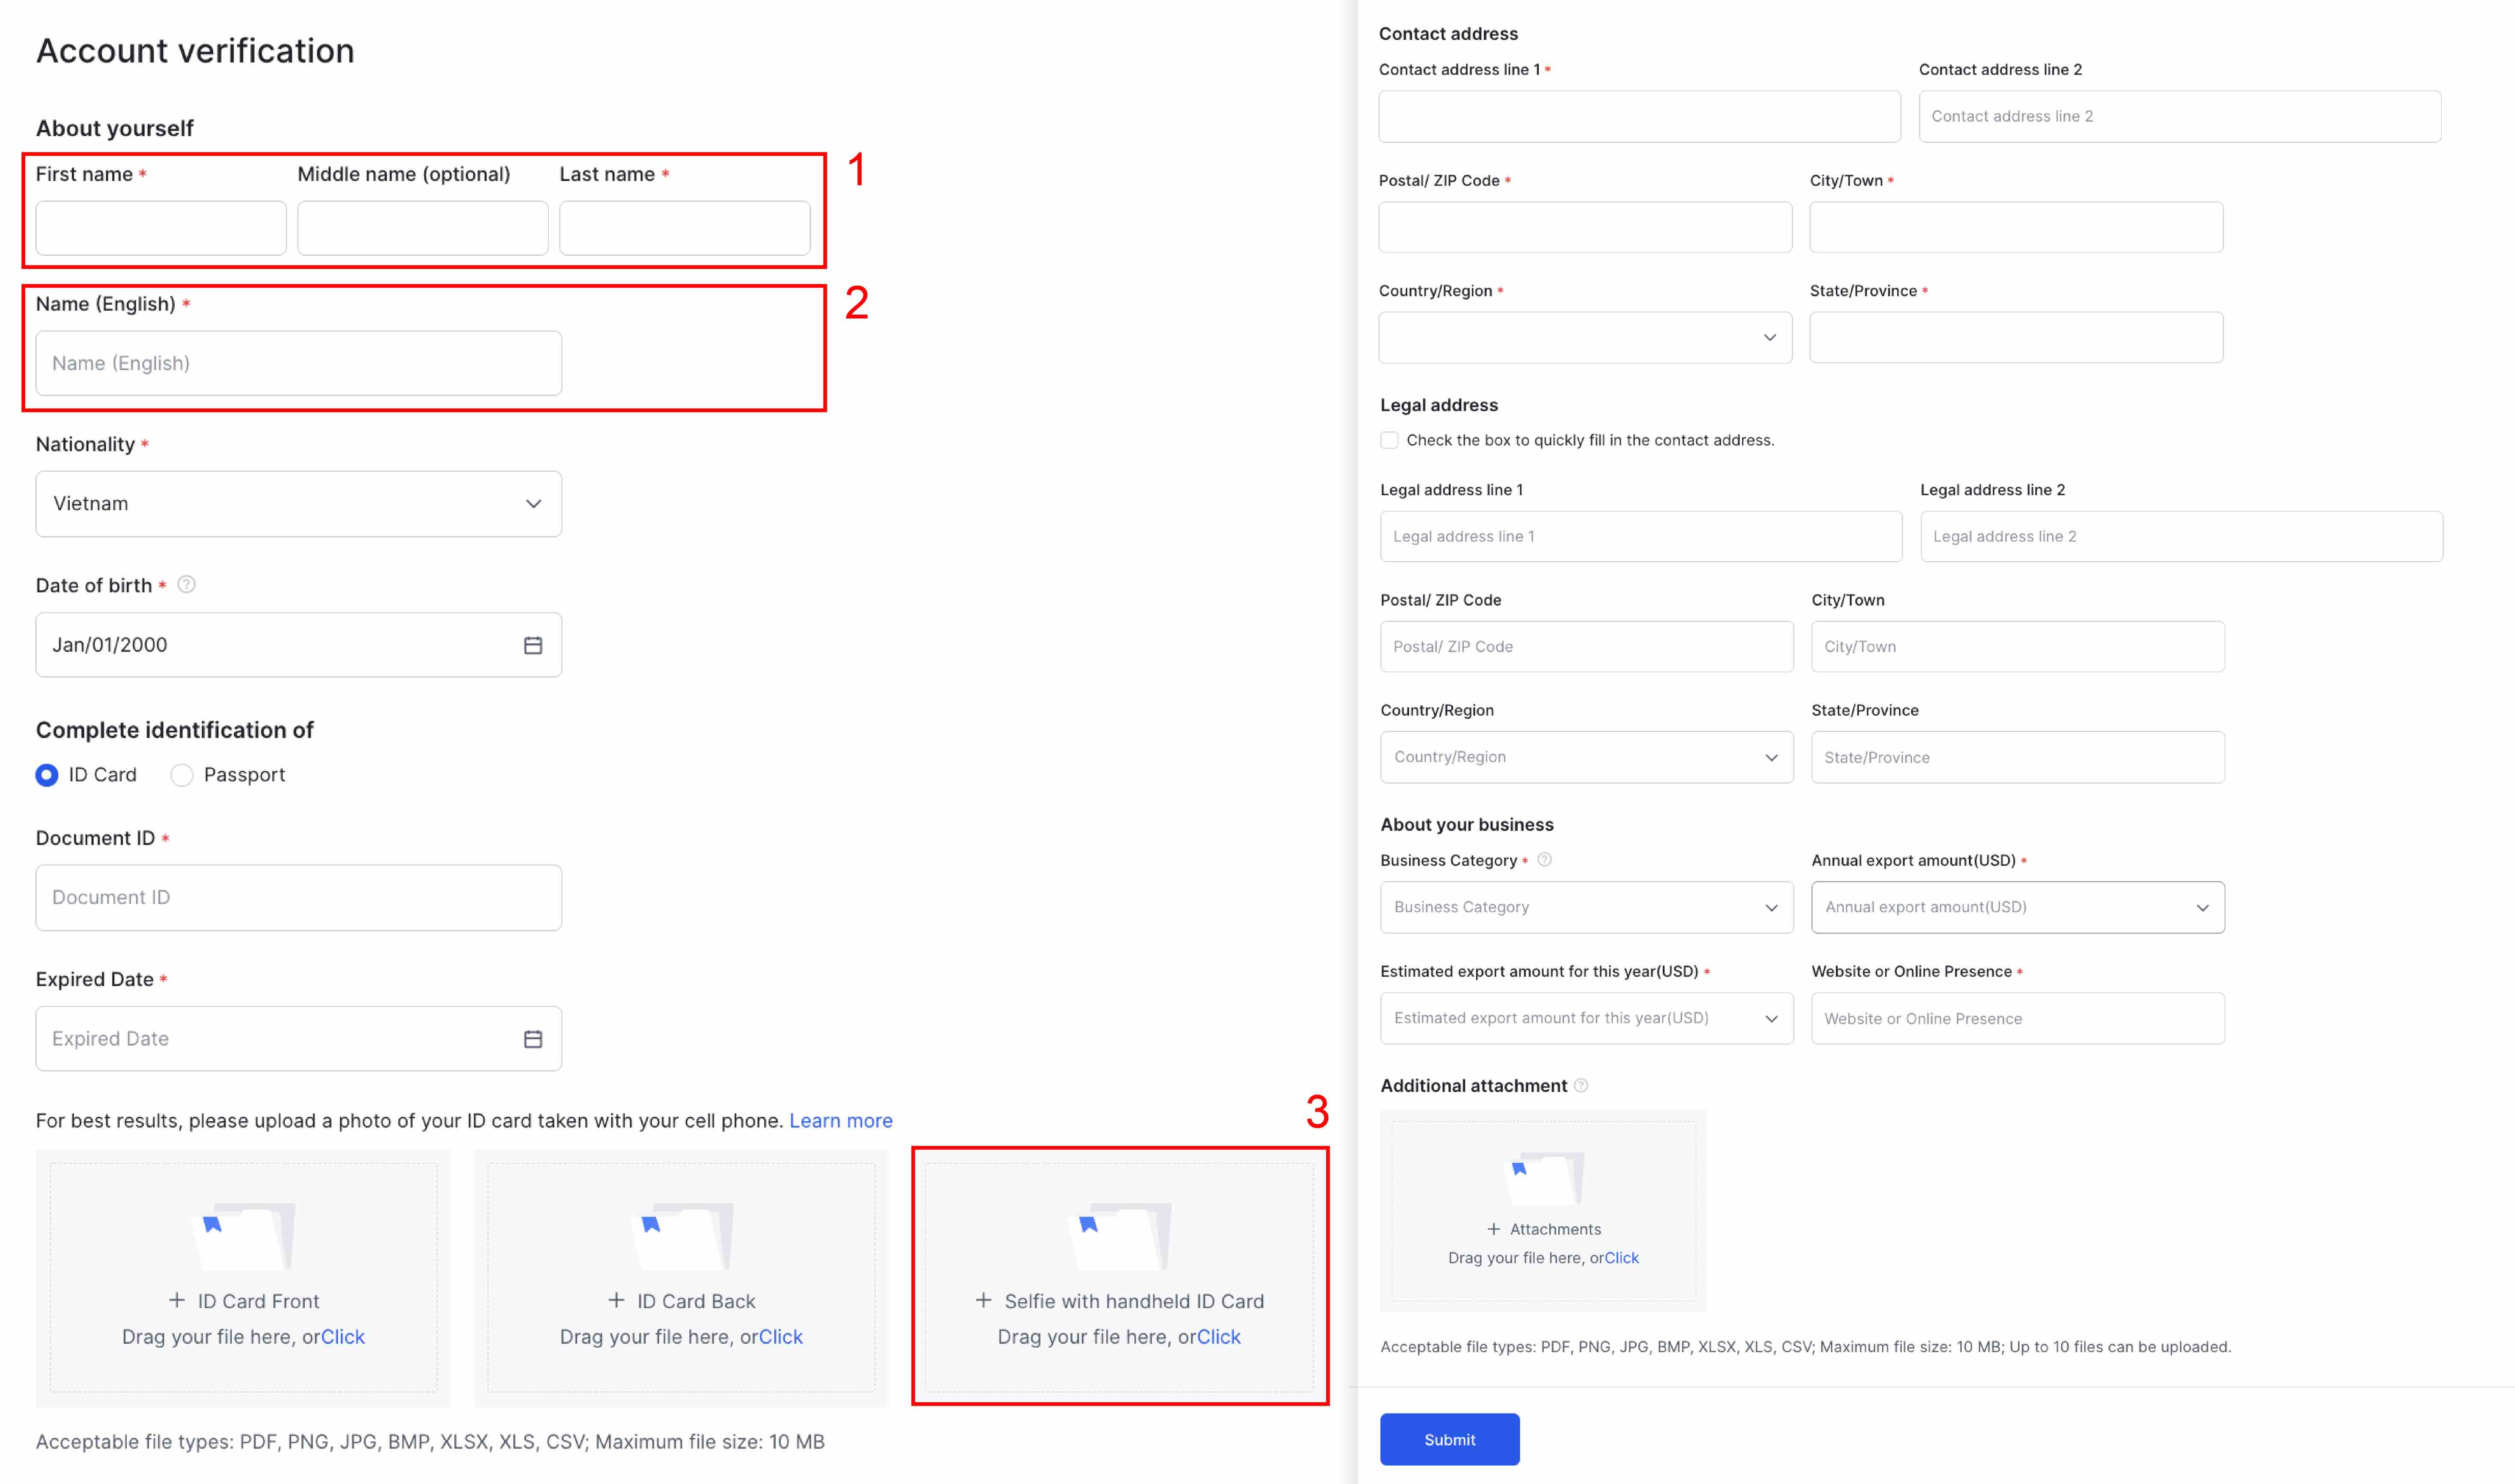
About yourself: input your name and birthday on your identify document
Select “Submit”
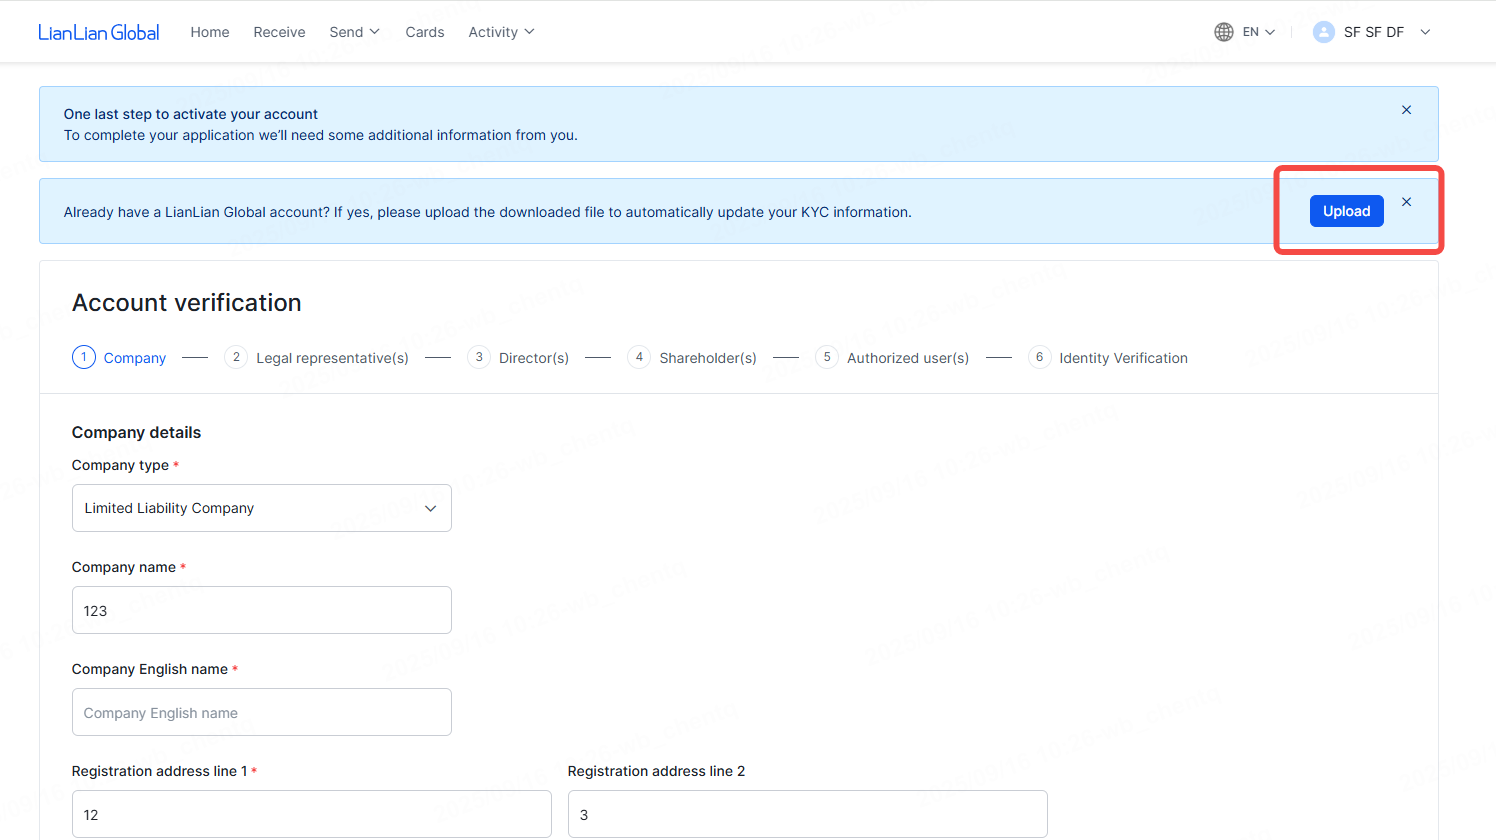
Here you will see a screen that asks for Email Verification and Account Verification.
Check your email and select “Verify email” to complete
Select “Verify now” to start verify account
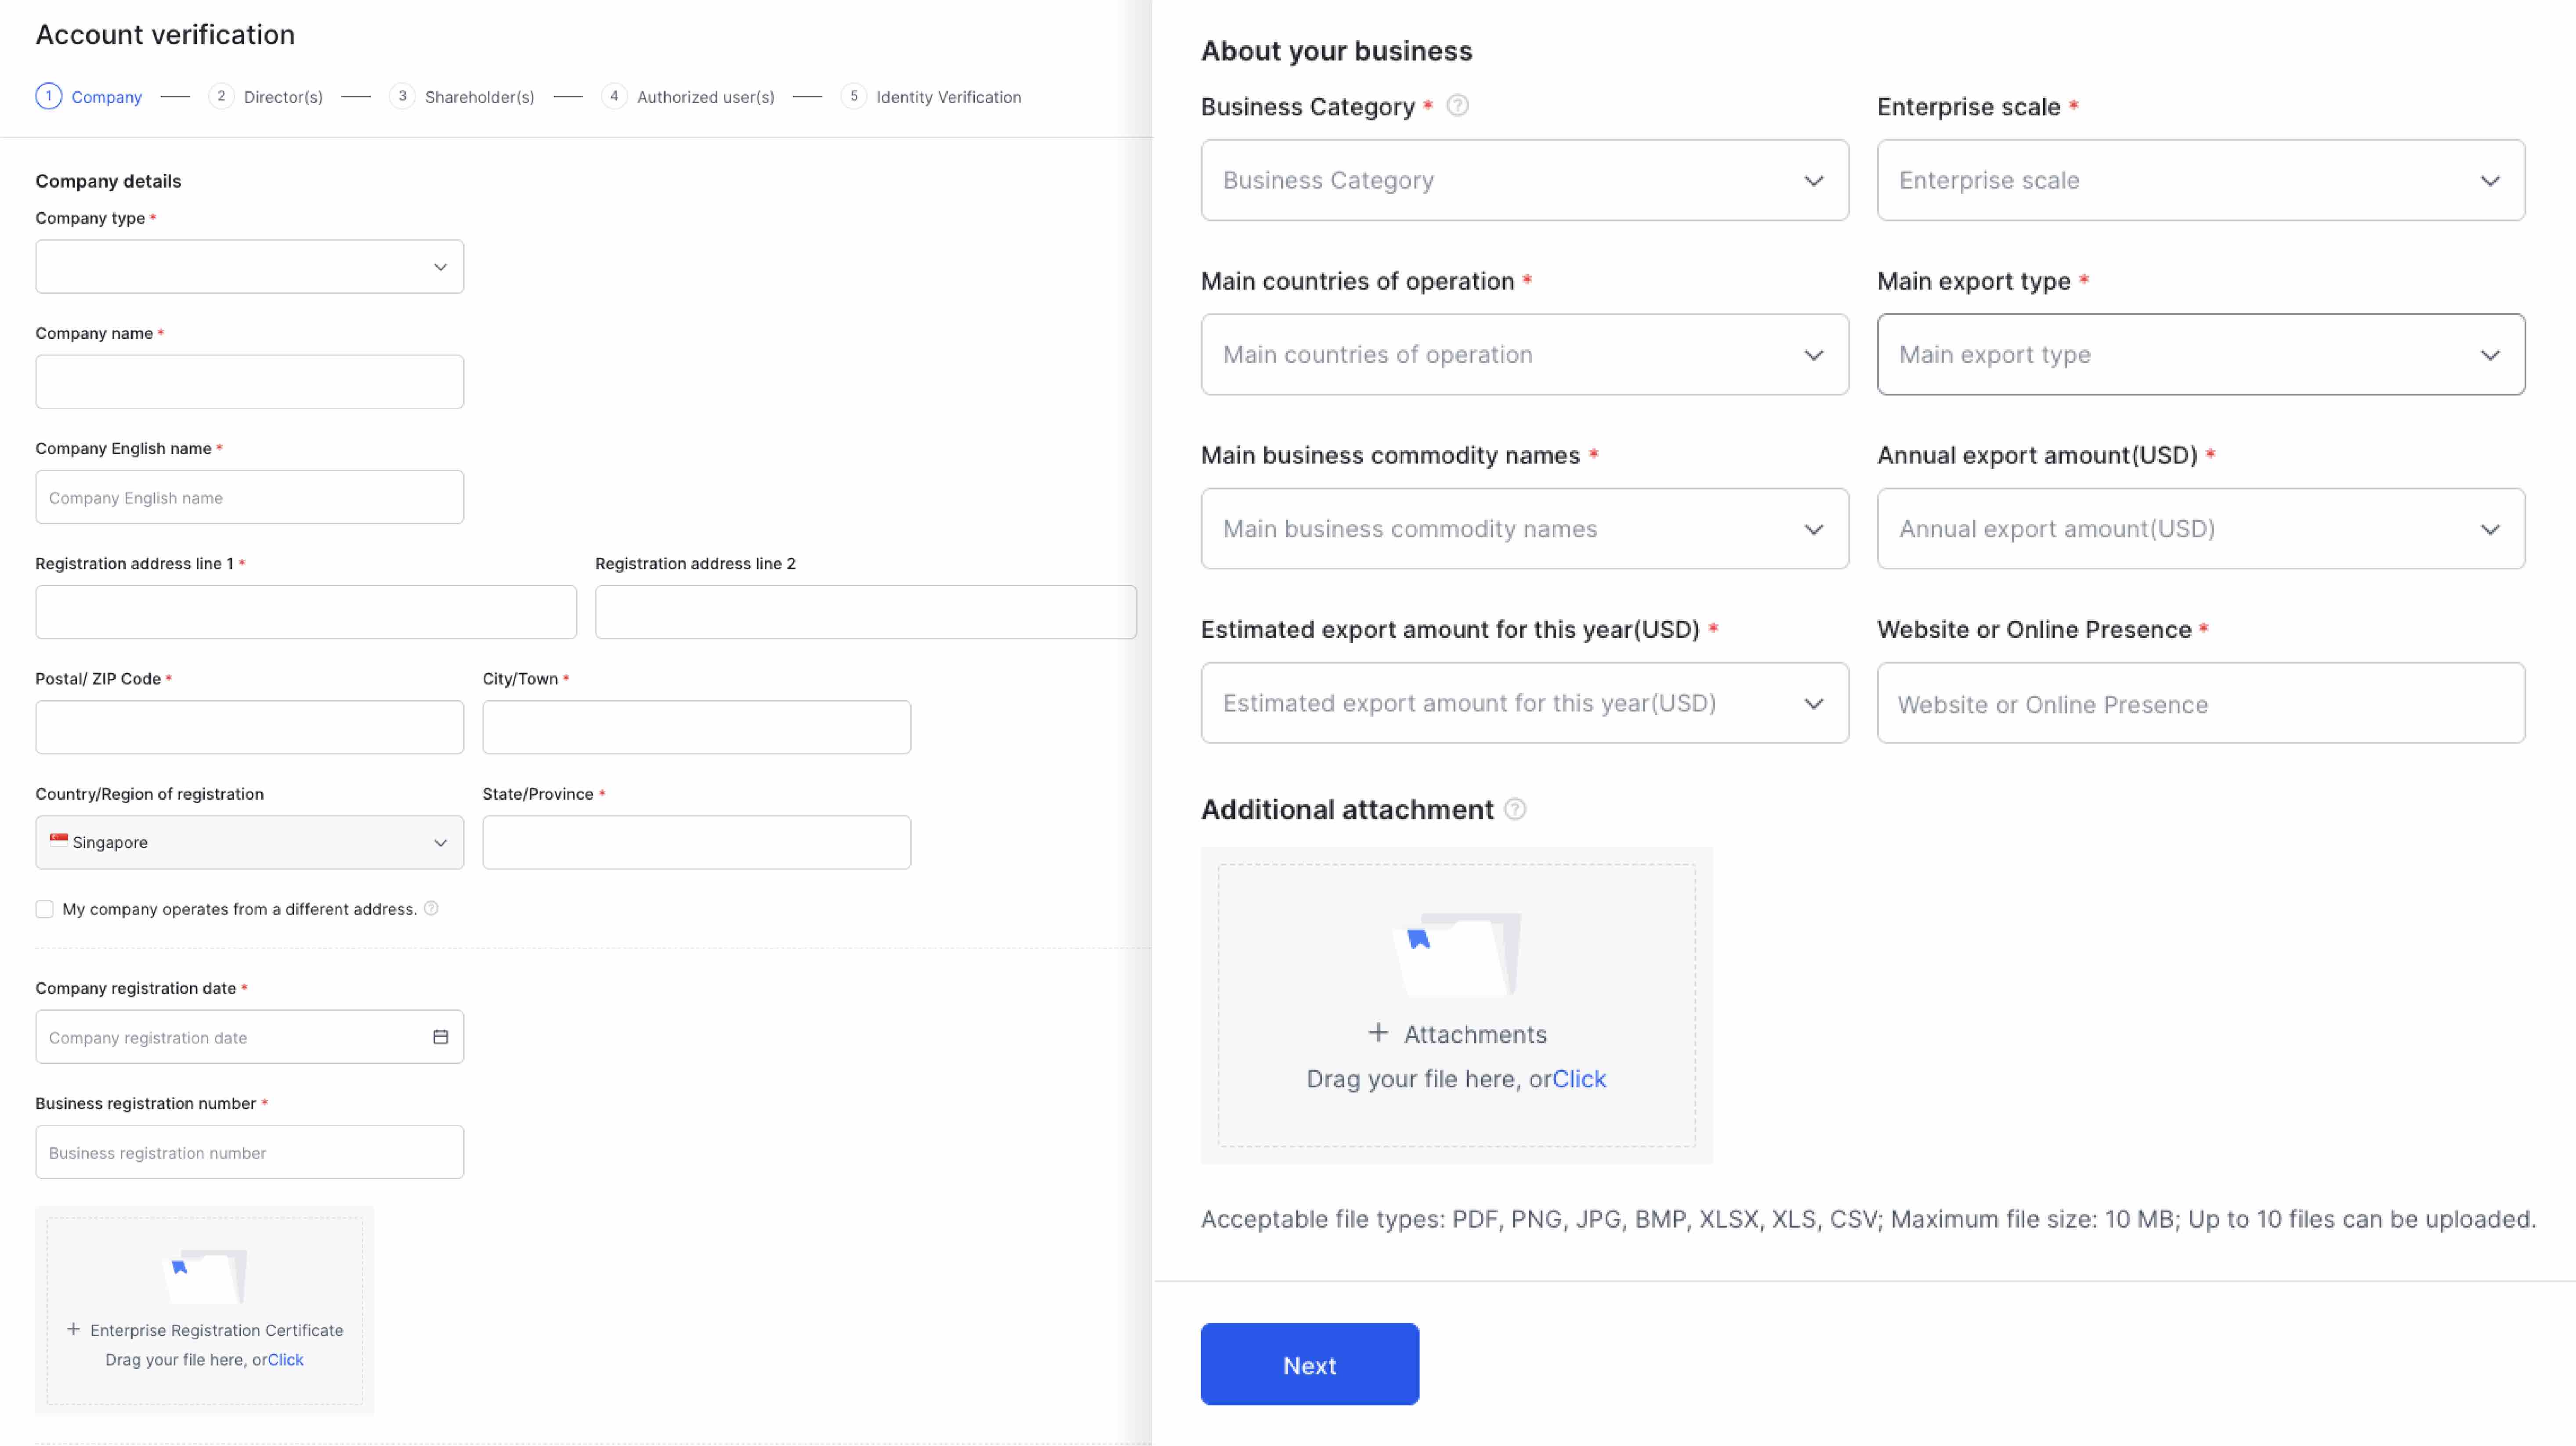
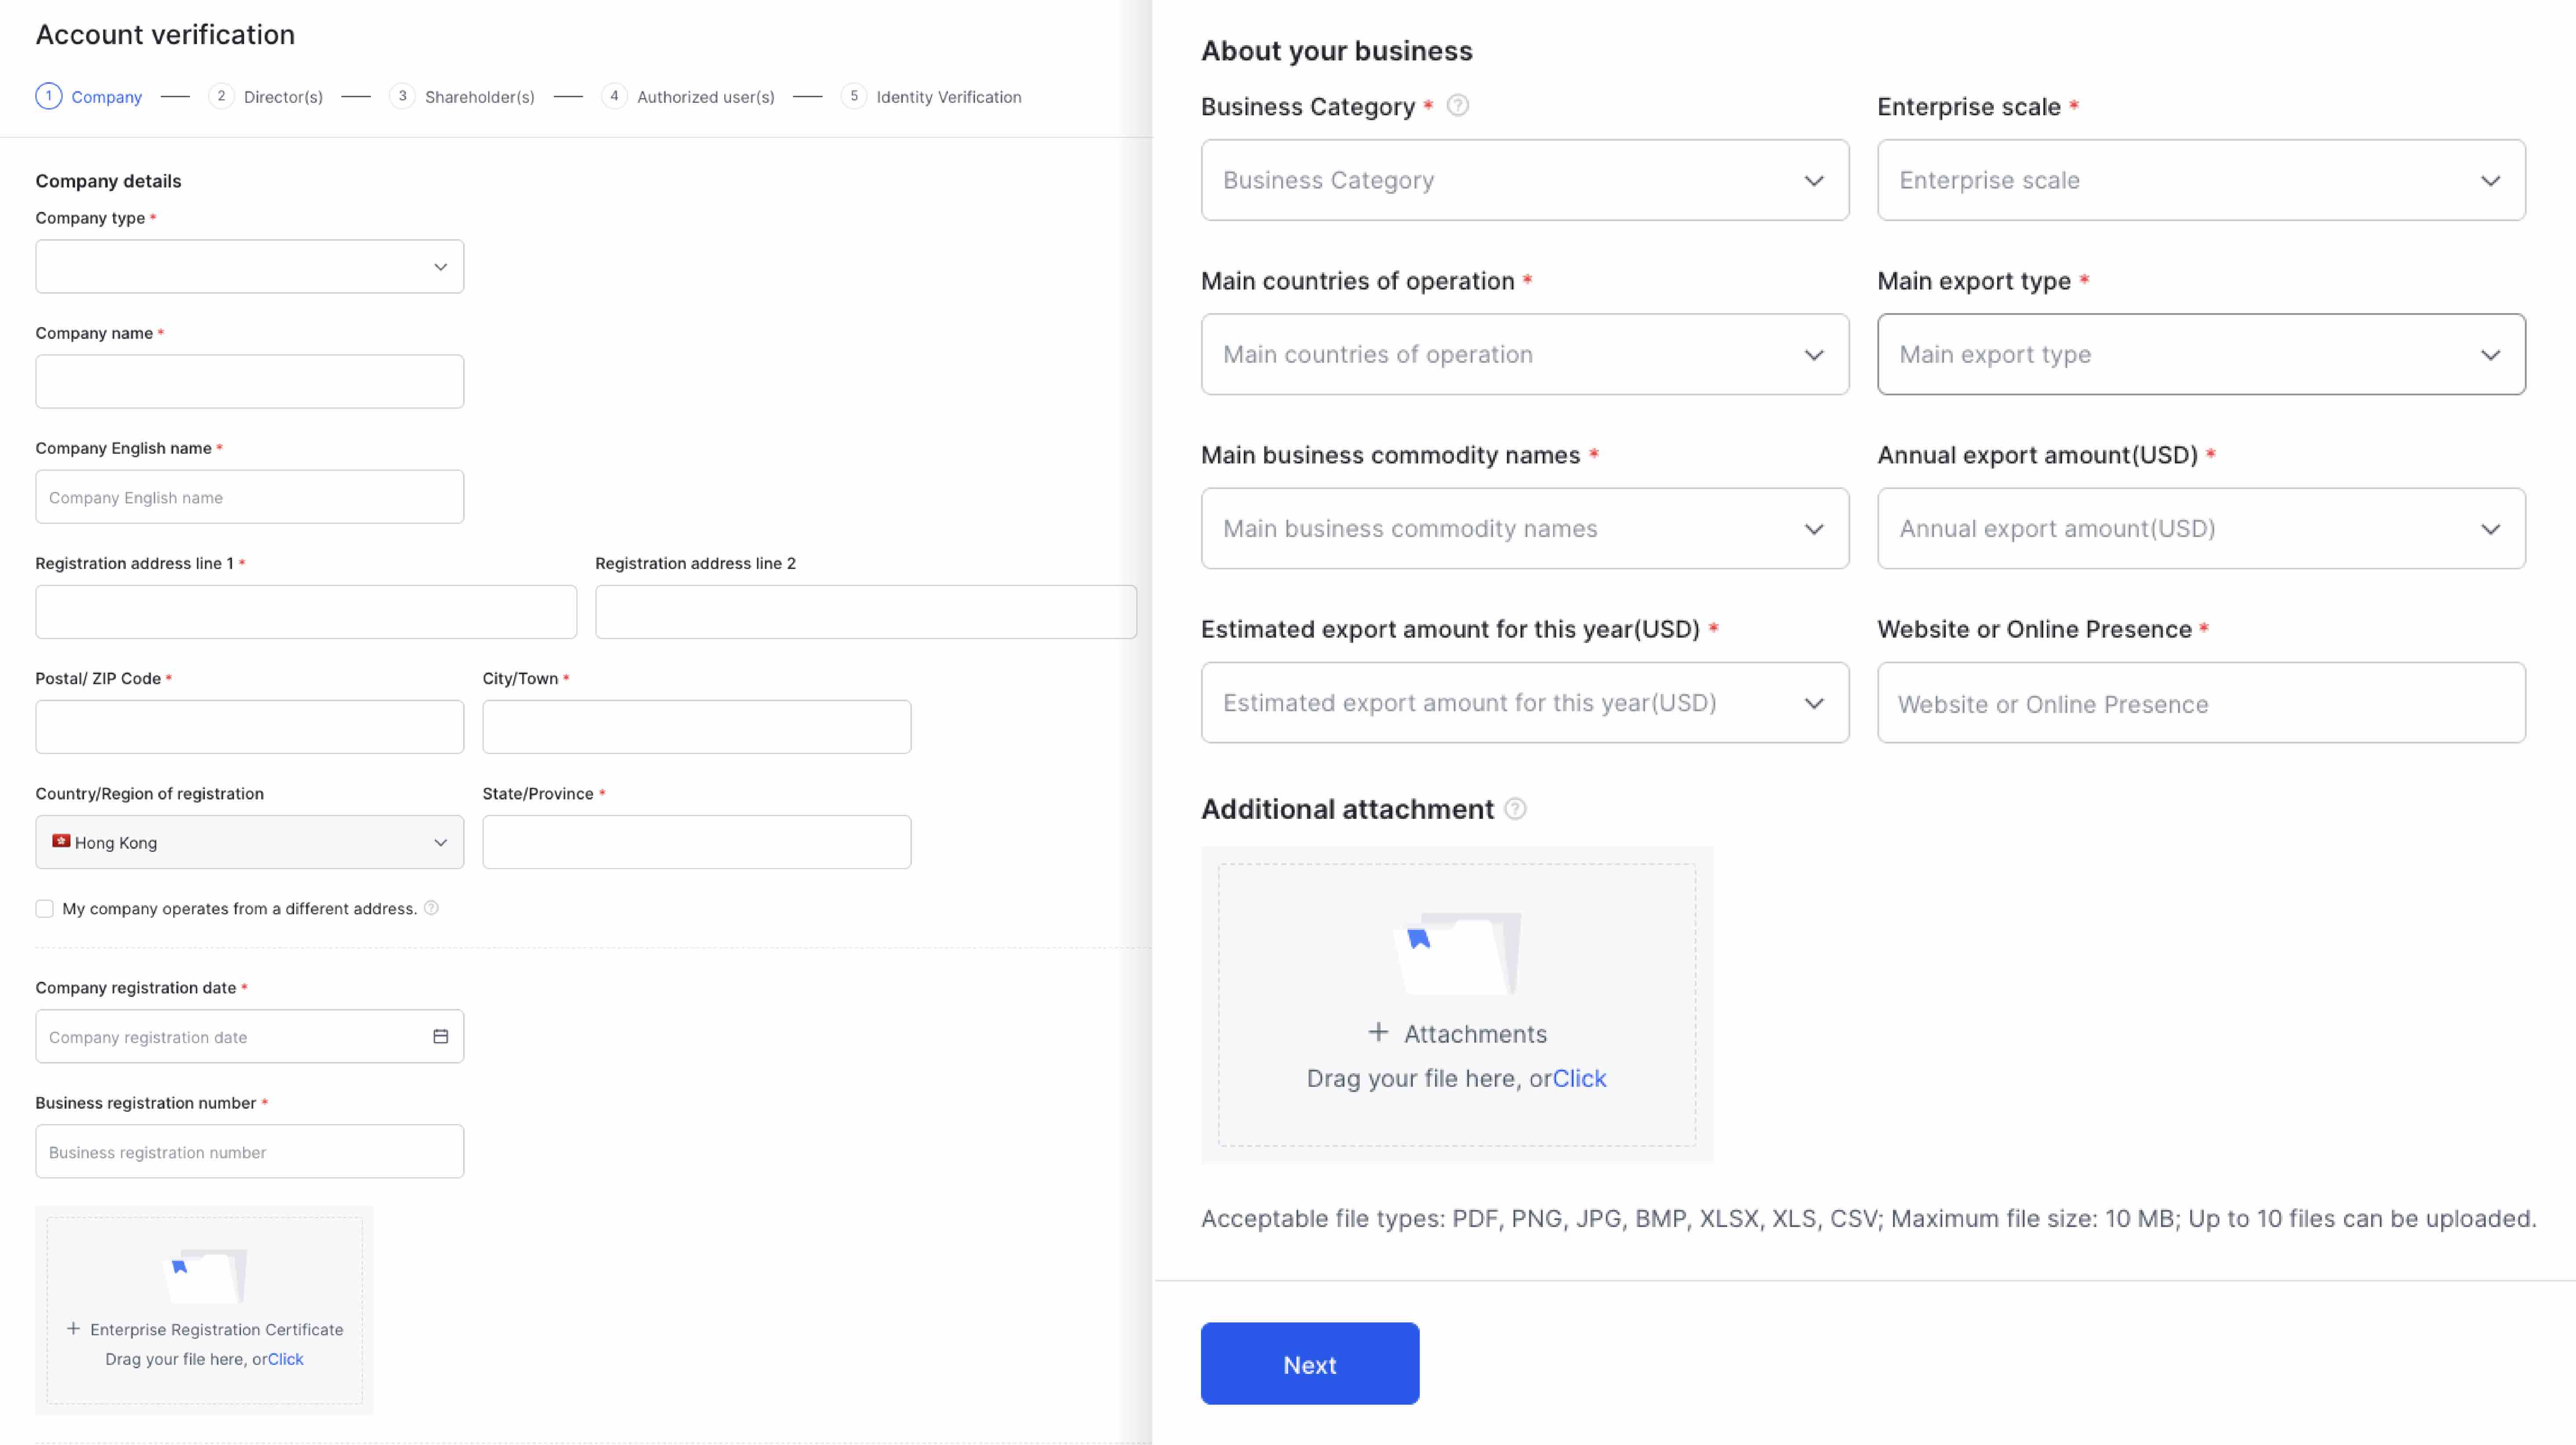
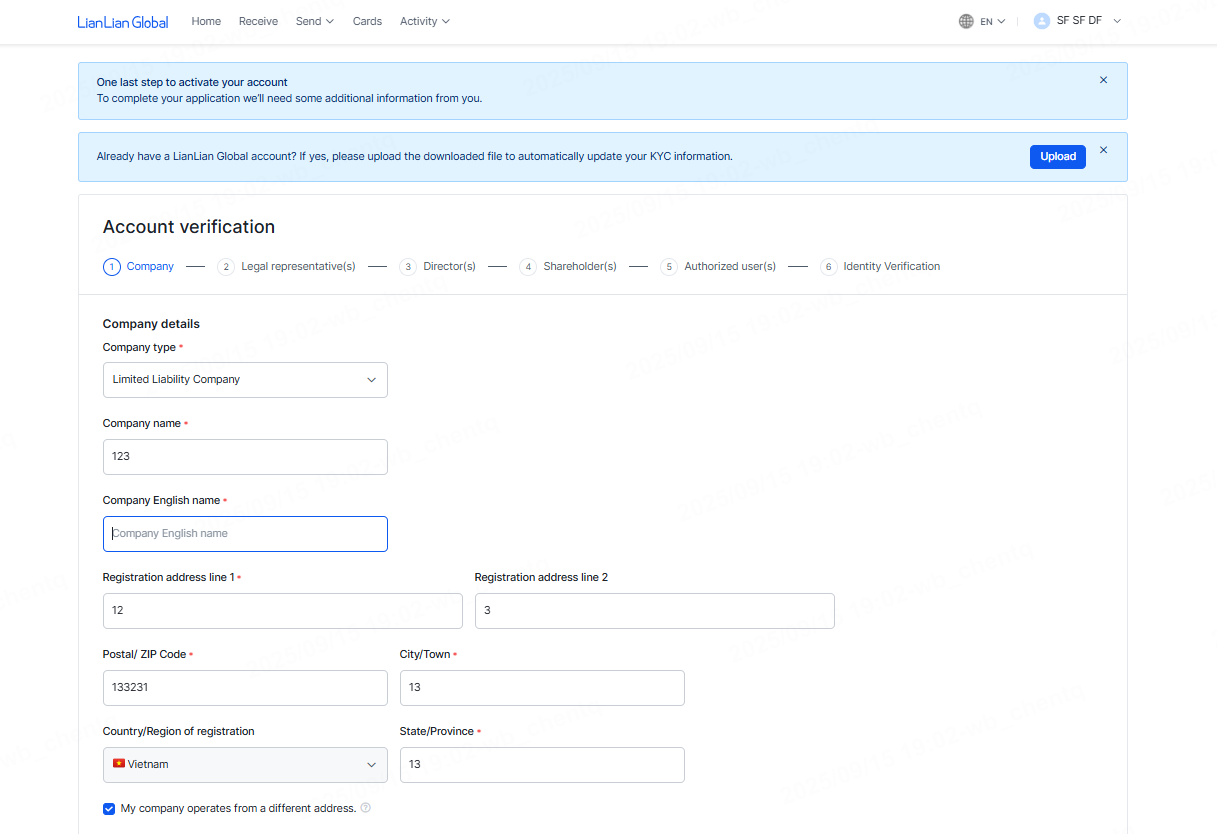
Input information about company like step 3
Proof of address: you can use one of the following document to submit
You can upload a photo of an e-invoice instead of a paper invoice, but you still need to make sure the image is unedited and clear, so that the system can recognize and check it.
Business certificate:
– Memorandum or Articles of Association (please upload all pages) and ANNUAL RETURN (please merge with Articles of Association)
Select “Next” to continue
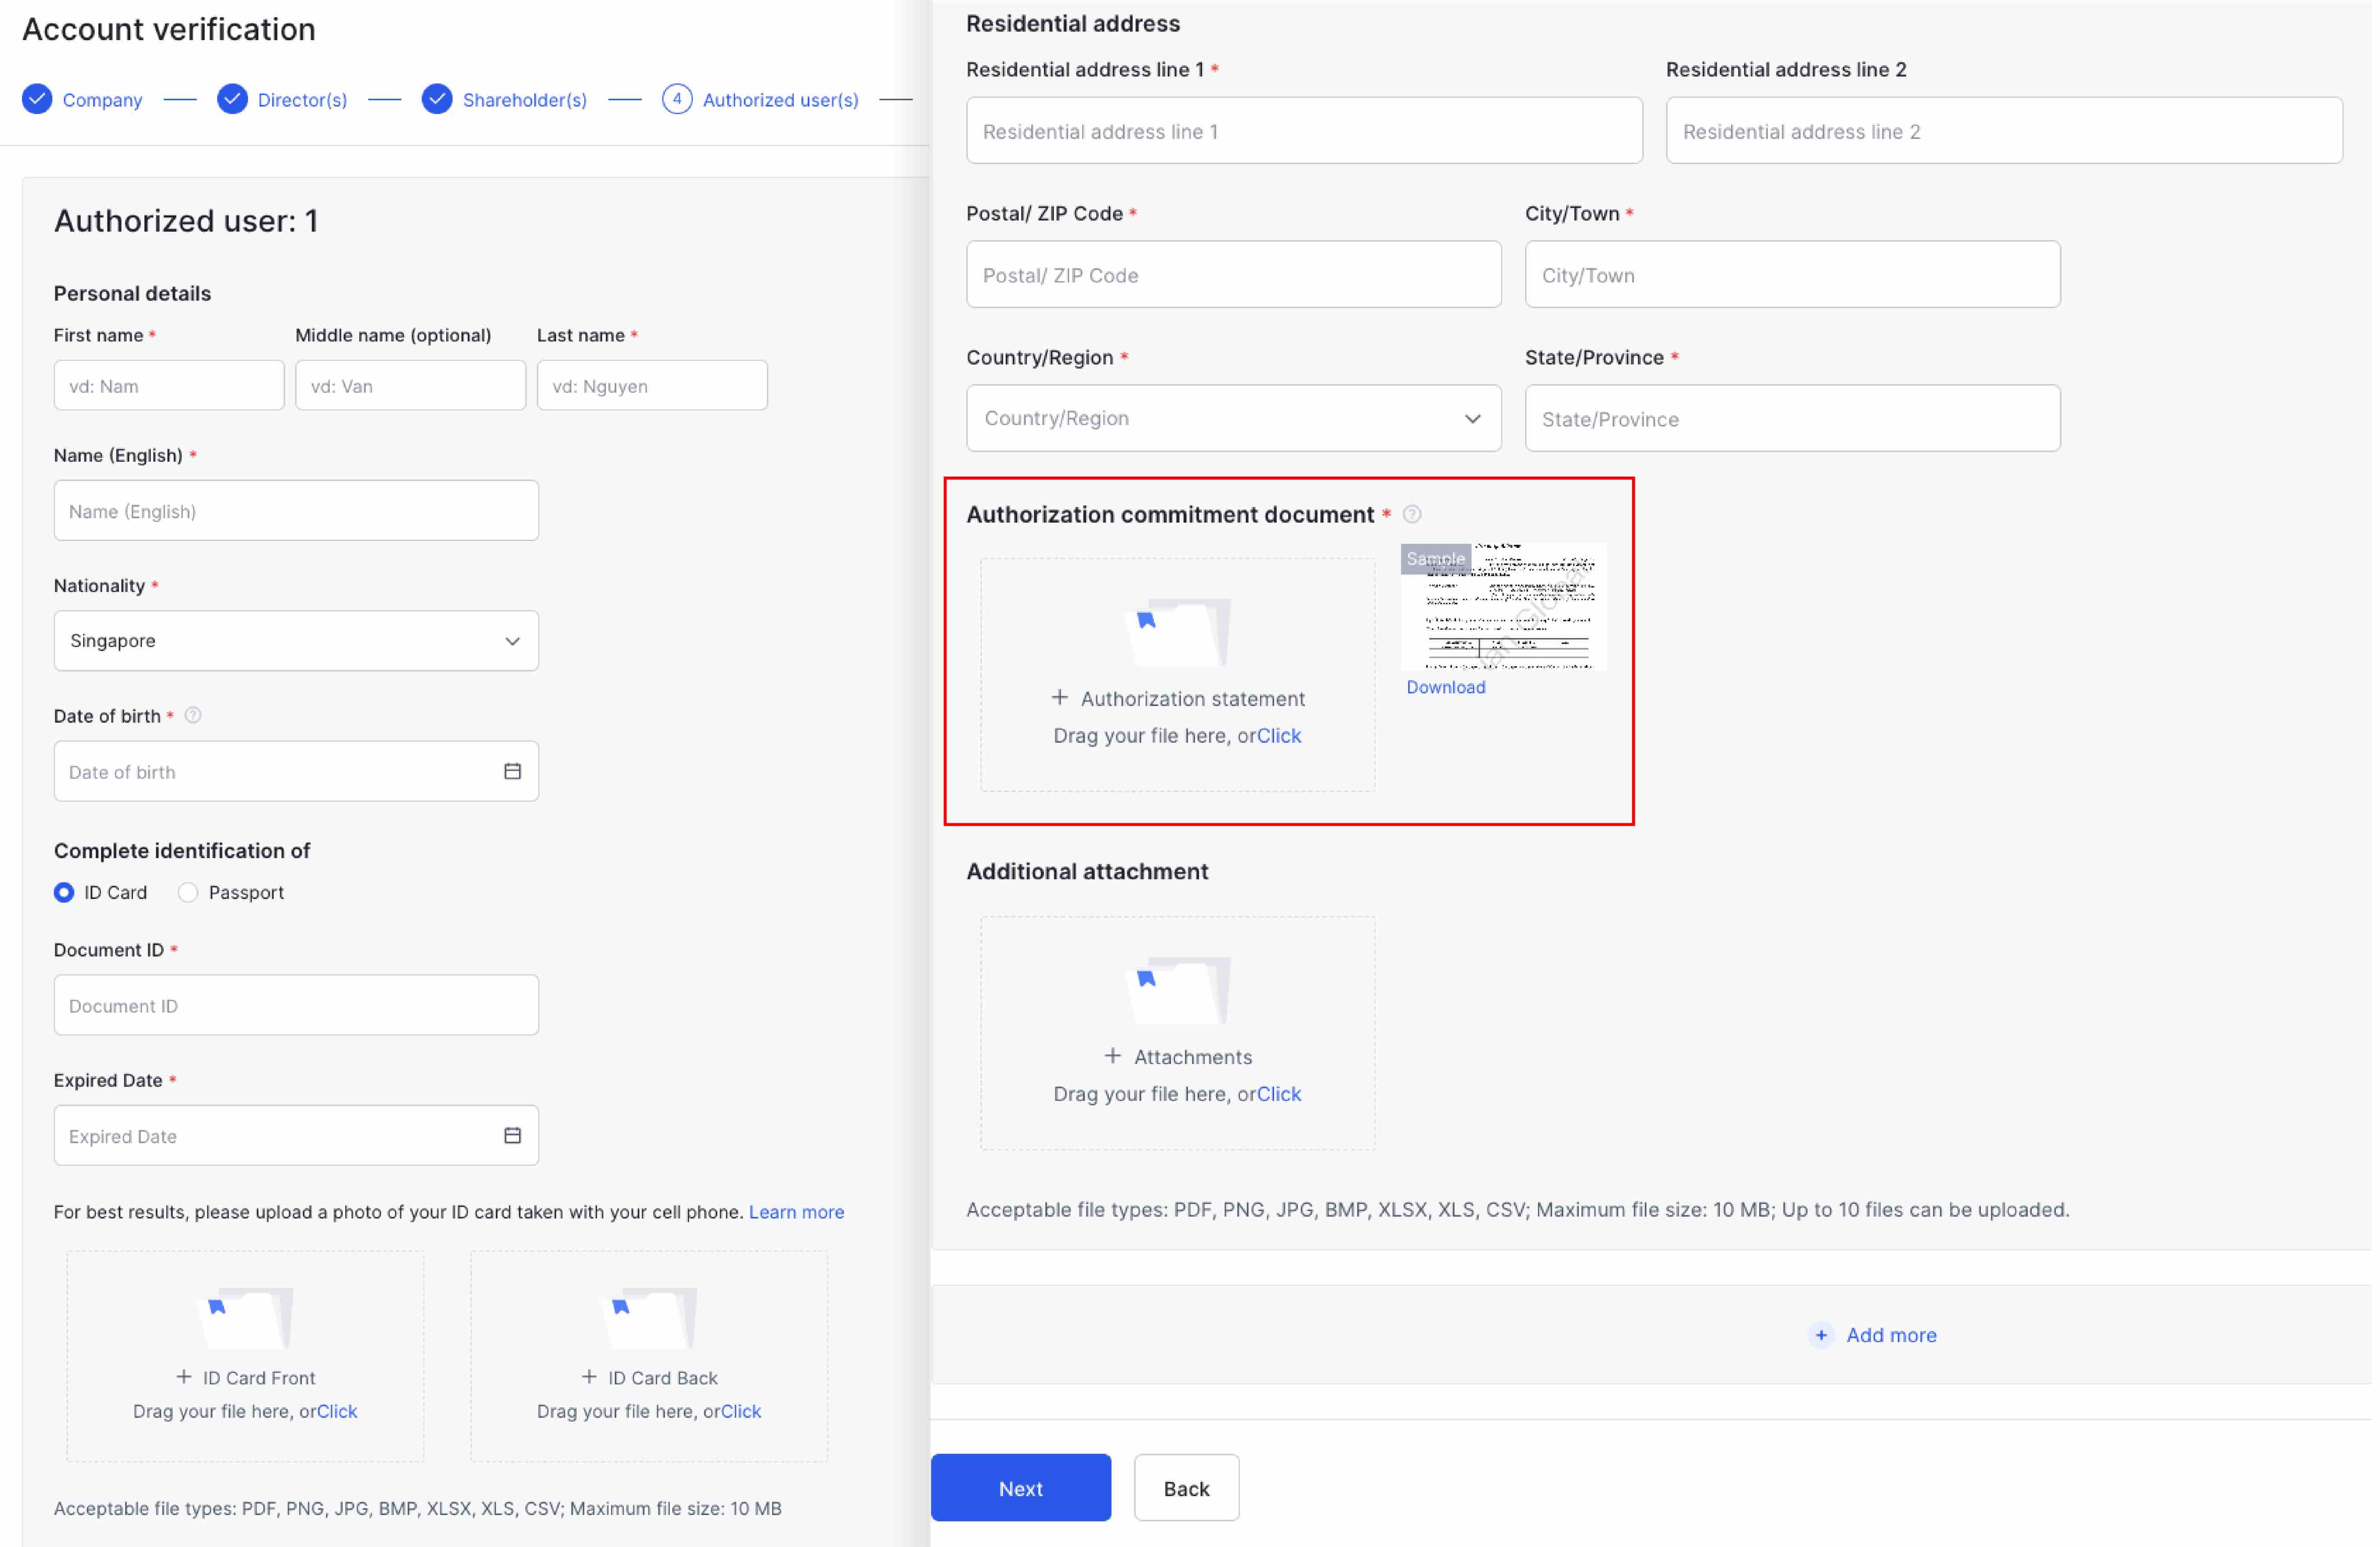
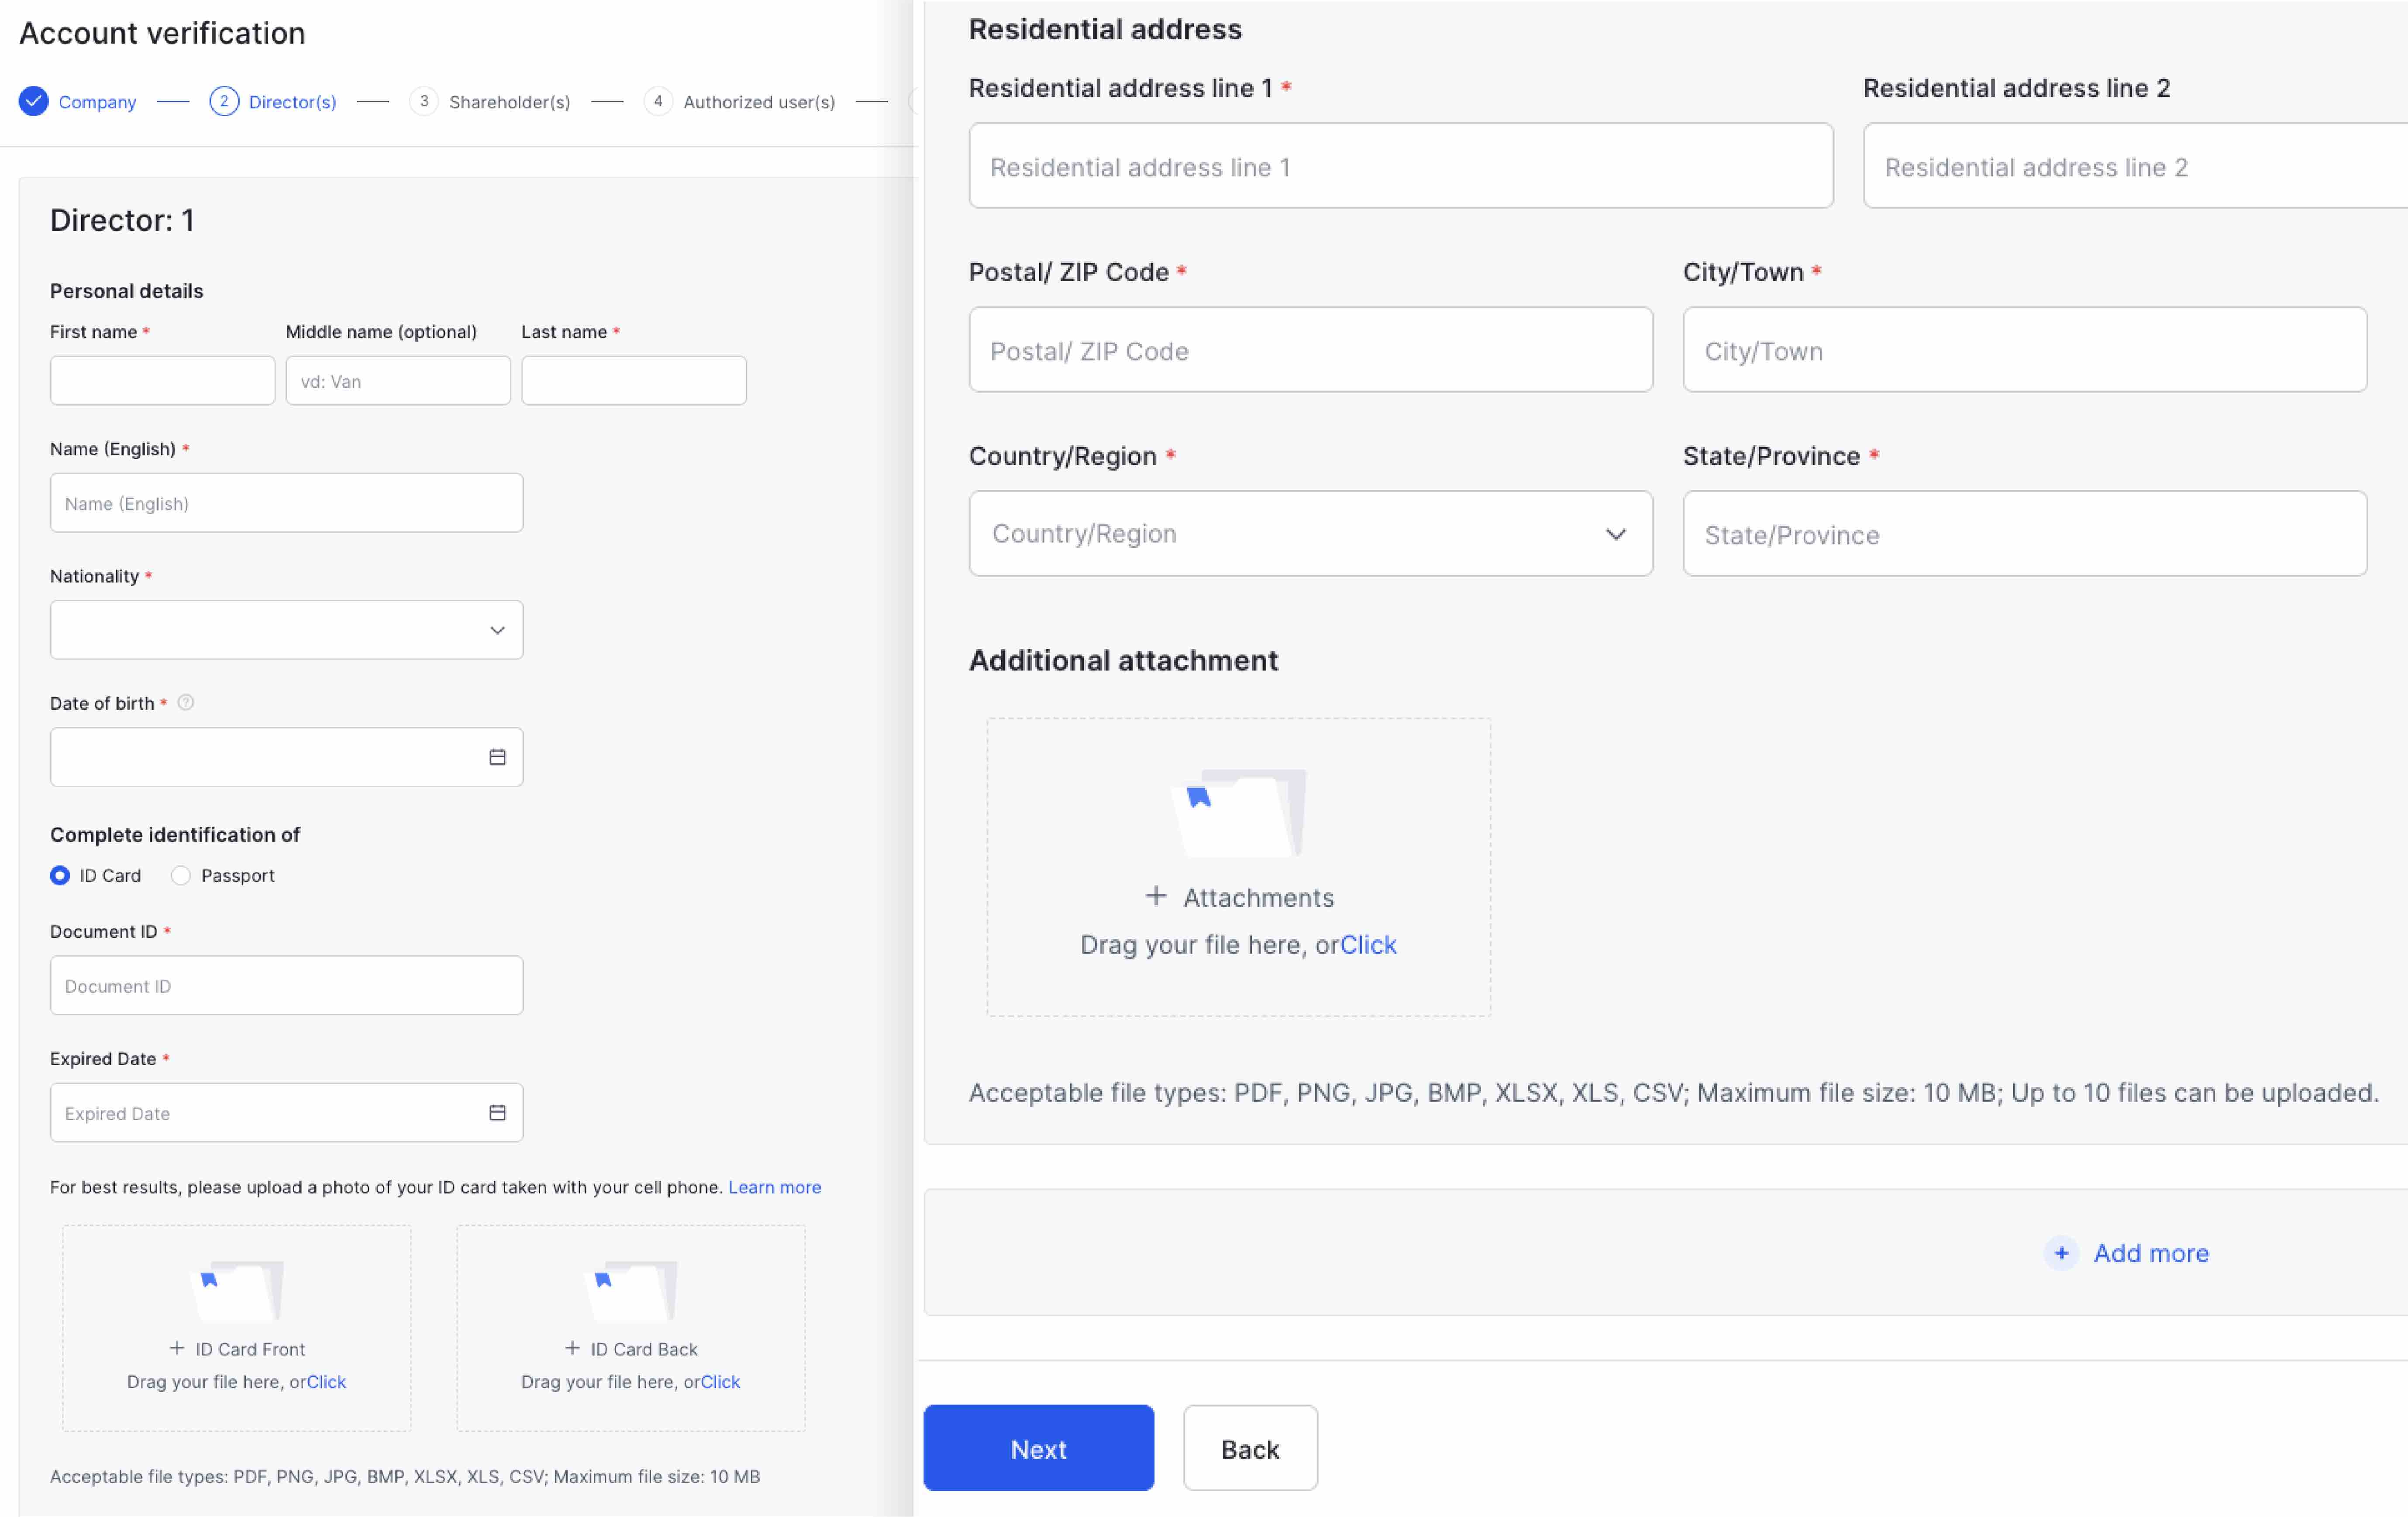
Input Legal representative information:
Passport)
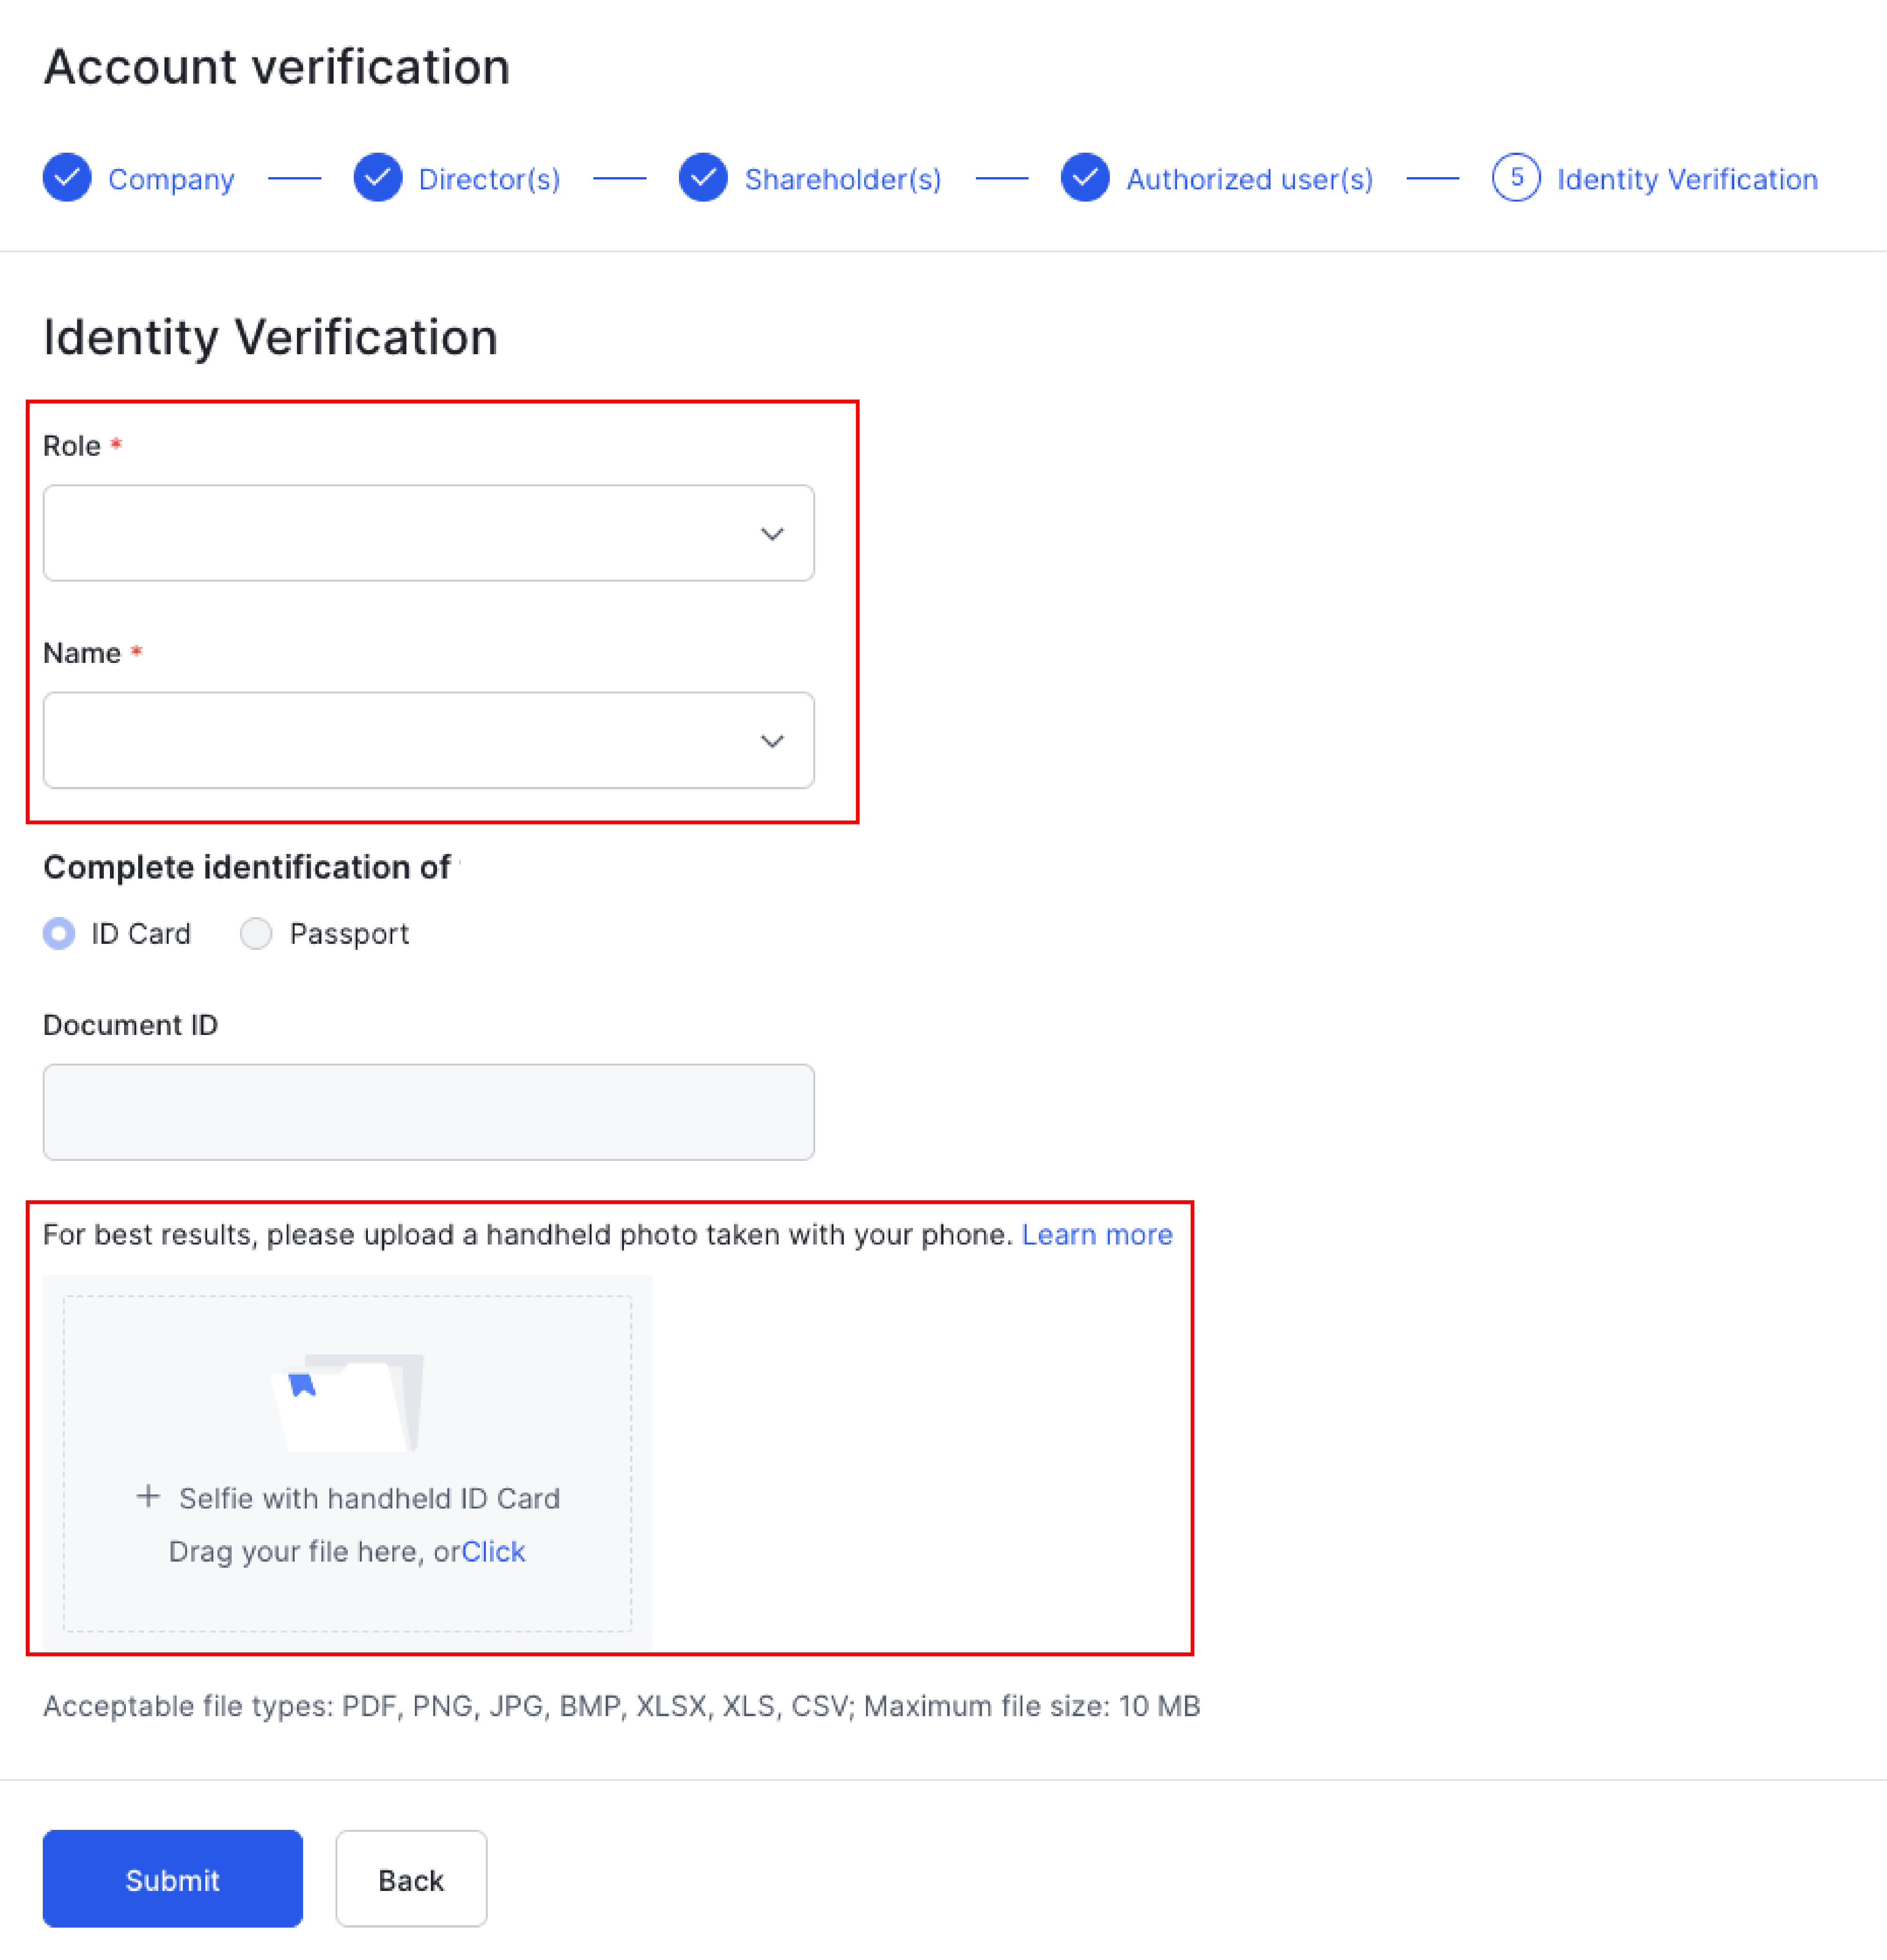
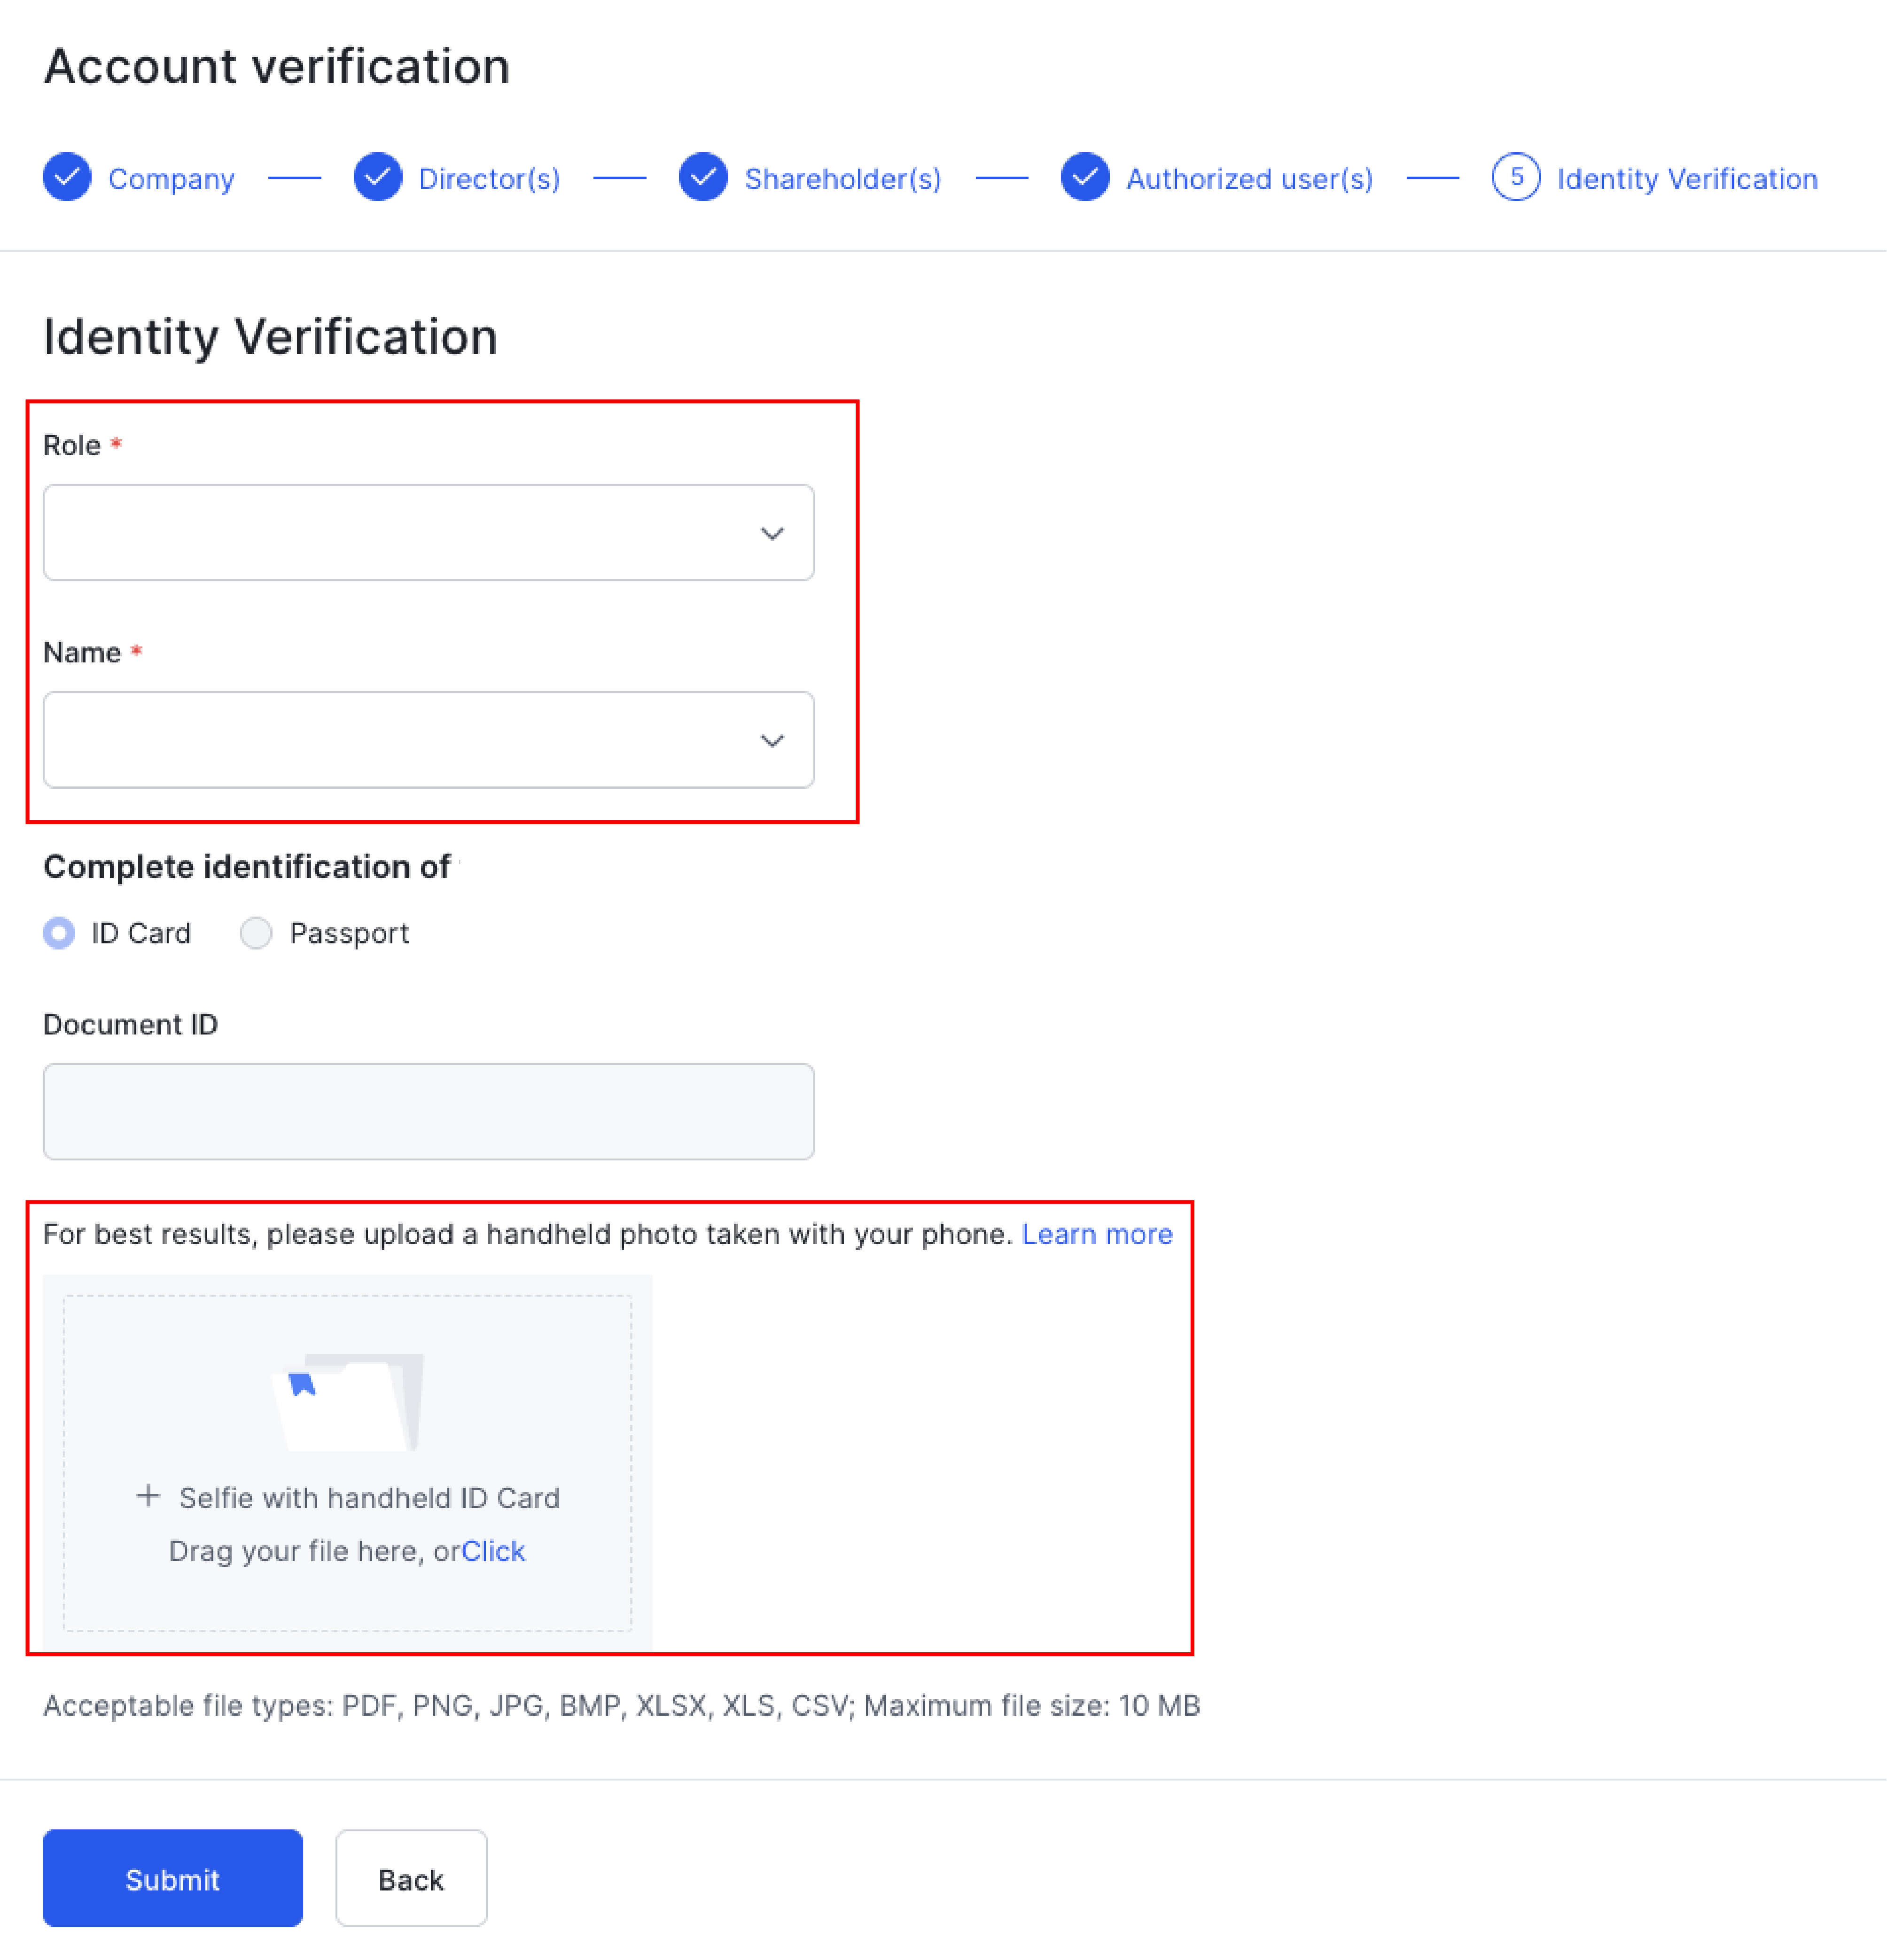
Upload photos of all kinds of documents in turn as required (Must be front and back)
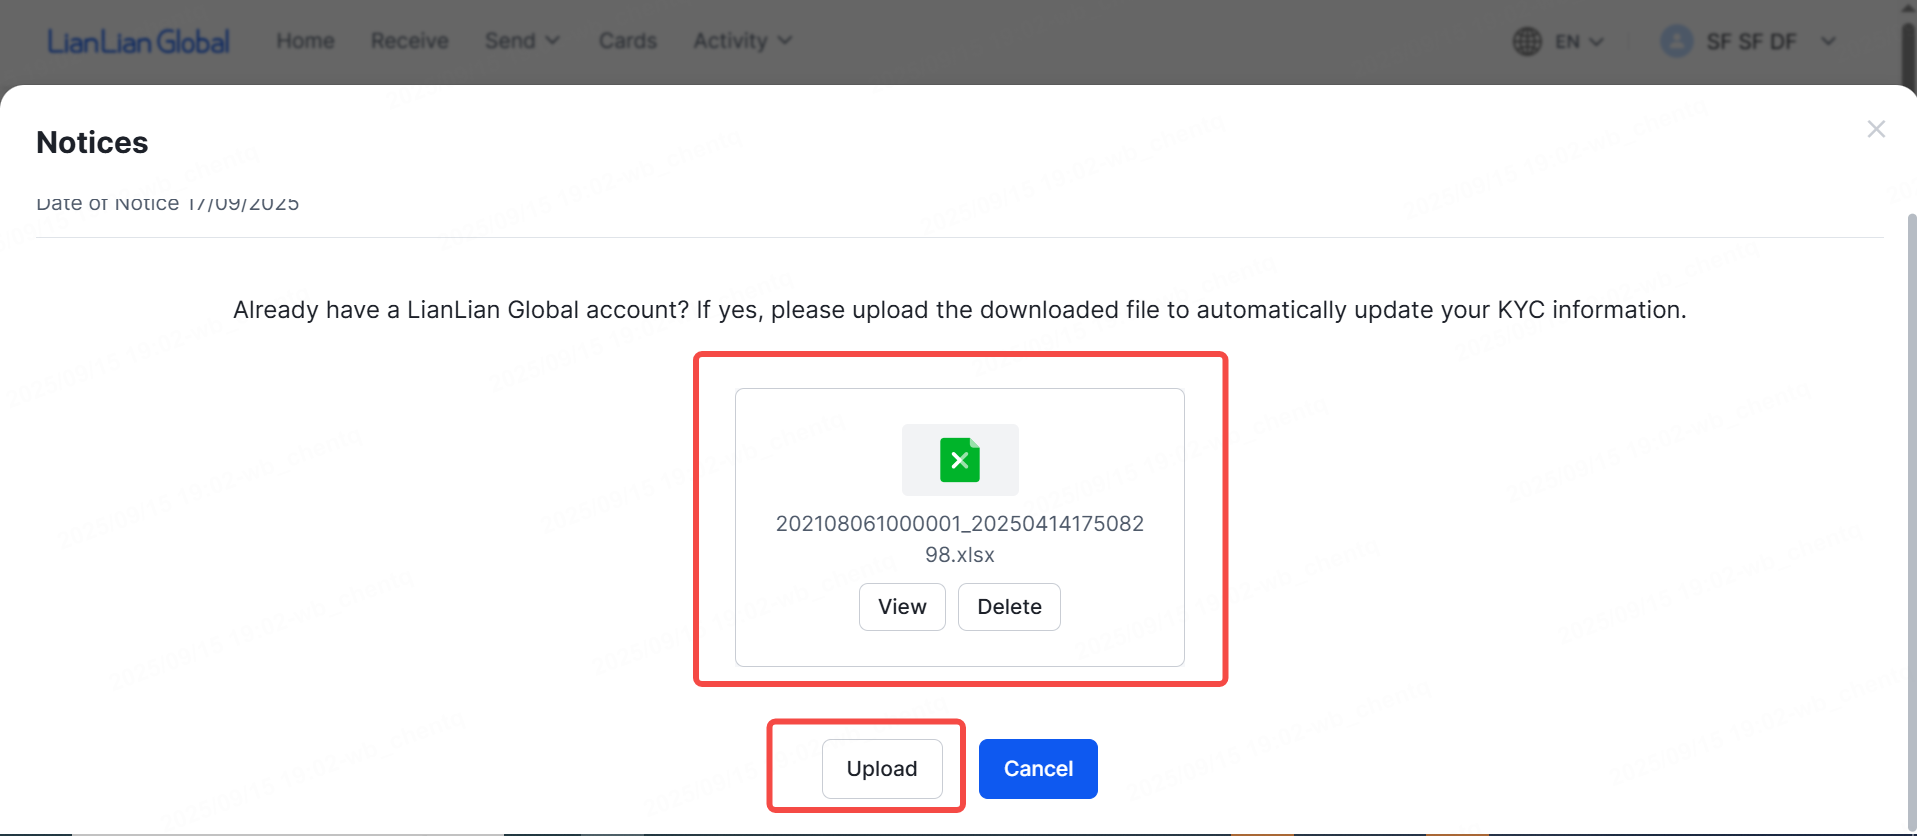
Note: LianLian accept file types: PDF, PNG, JPG, XLSX, XLS, CSV and maximum file size is 10MB
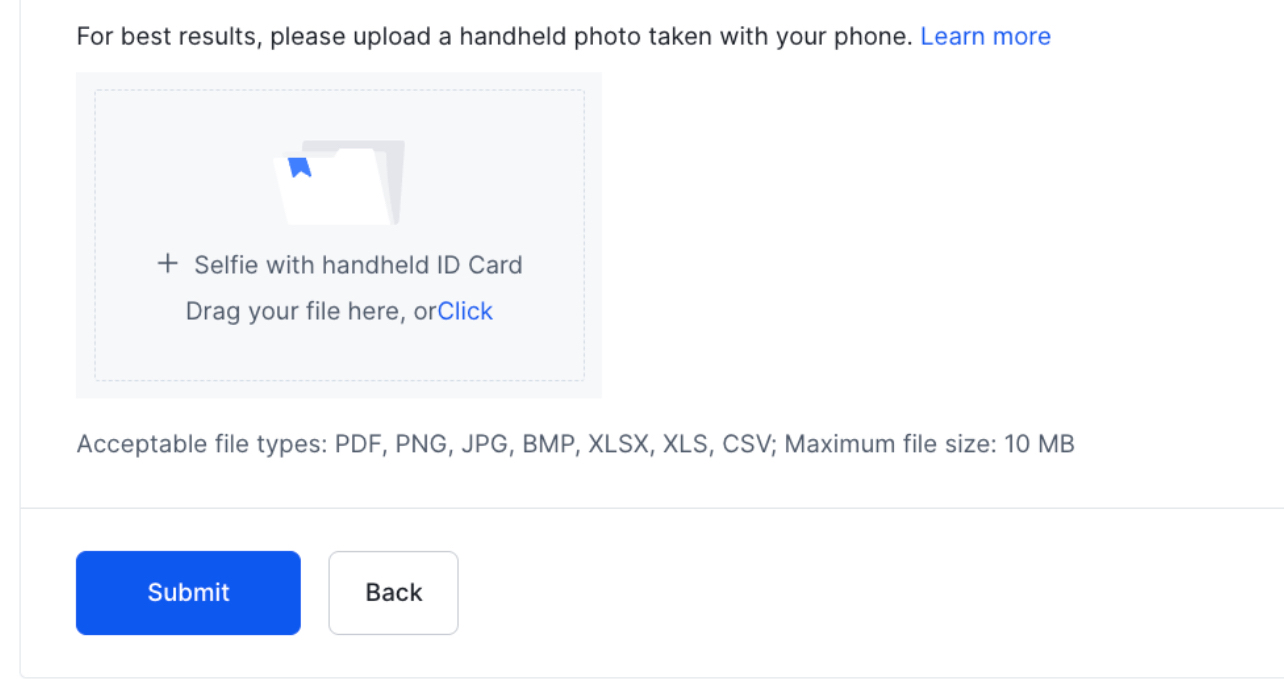
Some note for uploading valid selfie documents:
+ Utility Bill: please upload a photo of the front of the entire invoice in a clear, un-angled, unedited, and low-light condition.
You can upload a photo of an e-invoice instead of a paper invoice, but you still need to make sure the image is unedited and clear, so that the system can recognize and check it.
+ Bank Statement: if you choose a bank statement, please take a photo of all bank statement documents in full, clear, unedited, two-sided, and then save all the pictures in a PDF file for uploading.
Select “Next” to continue
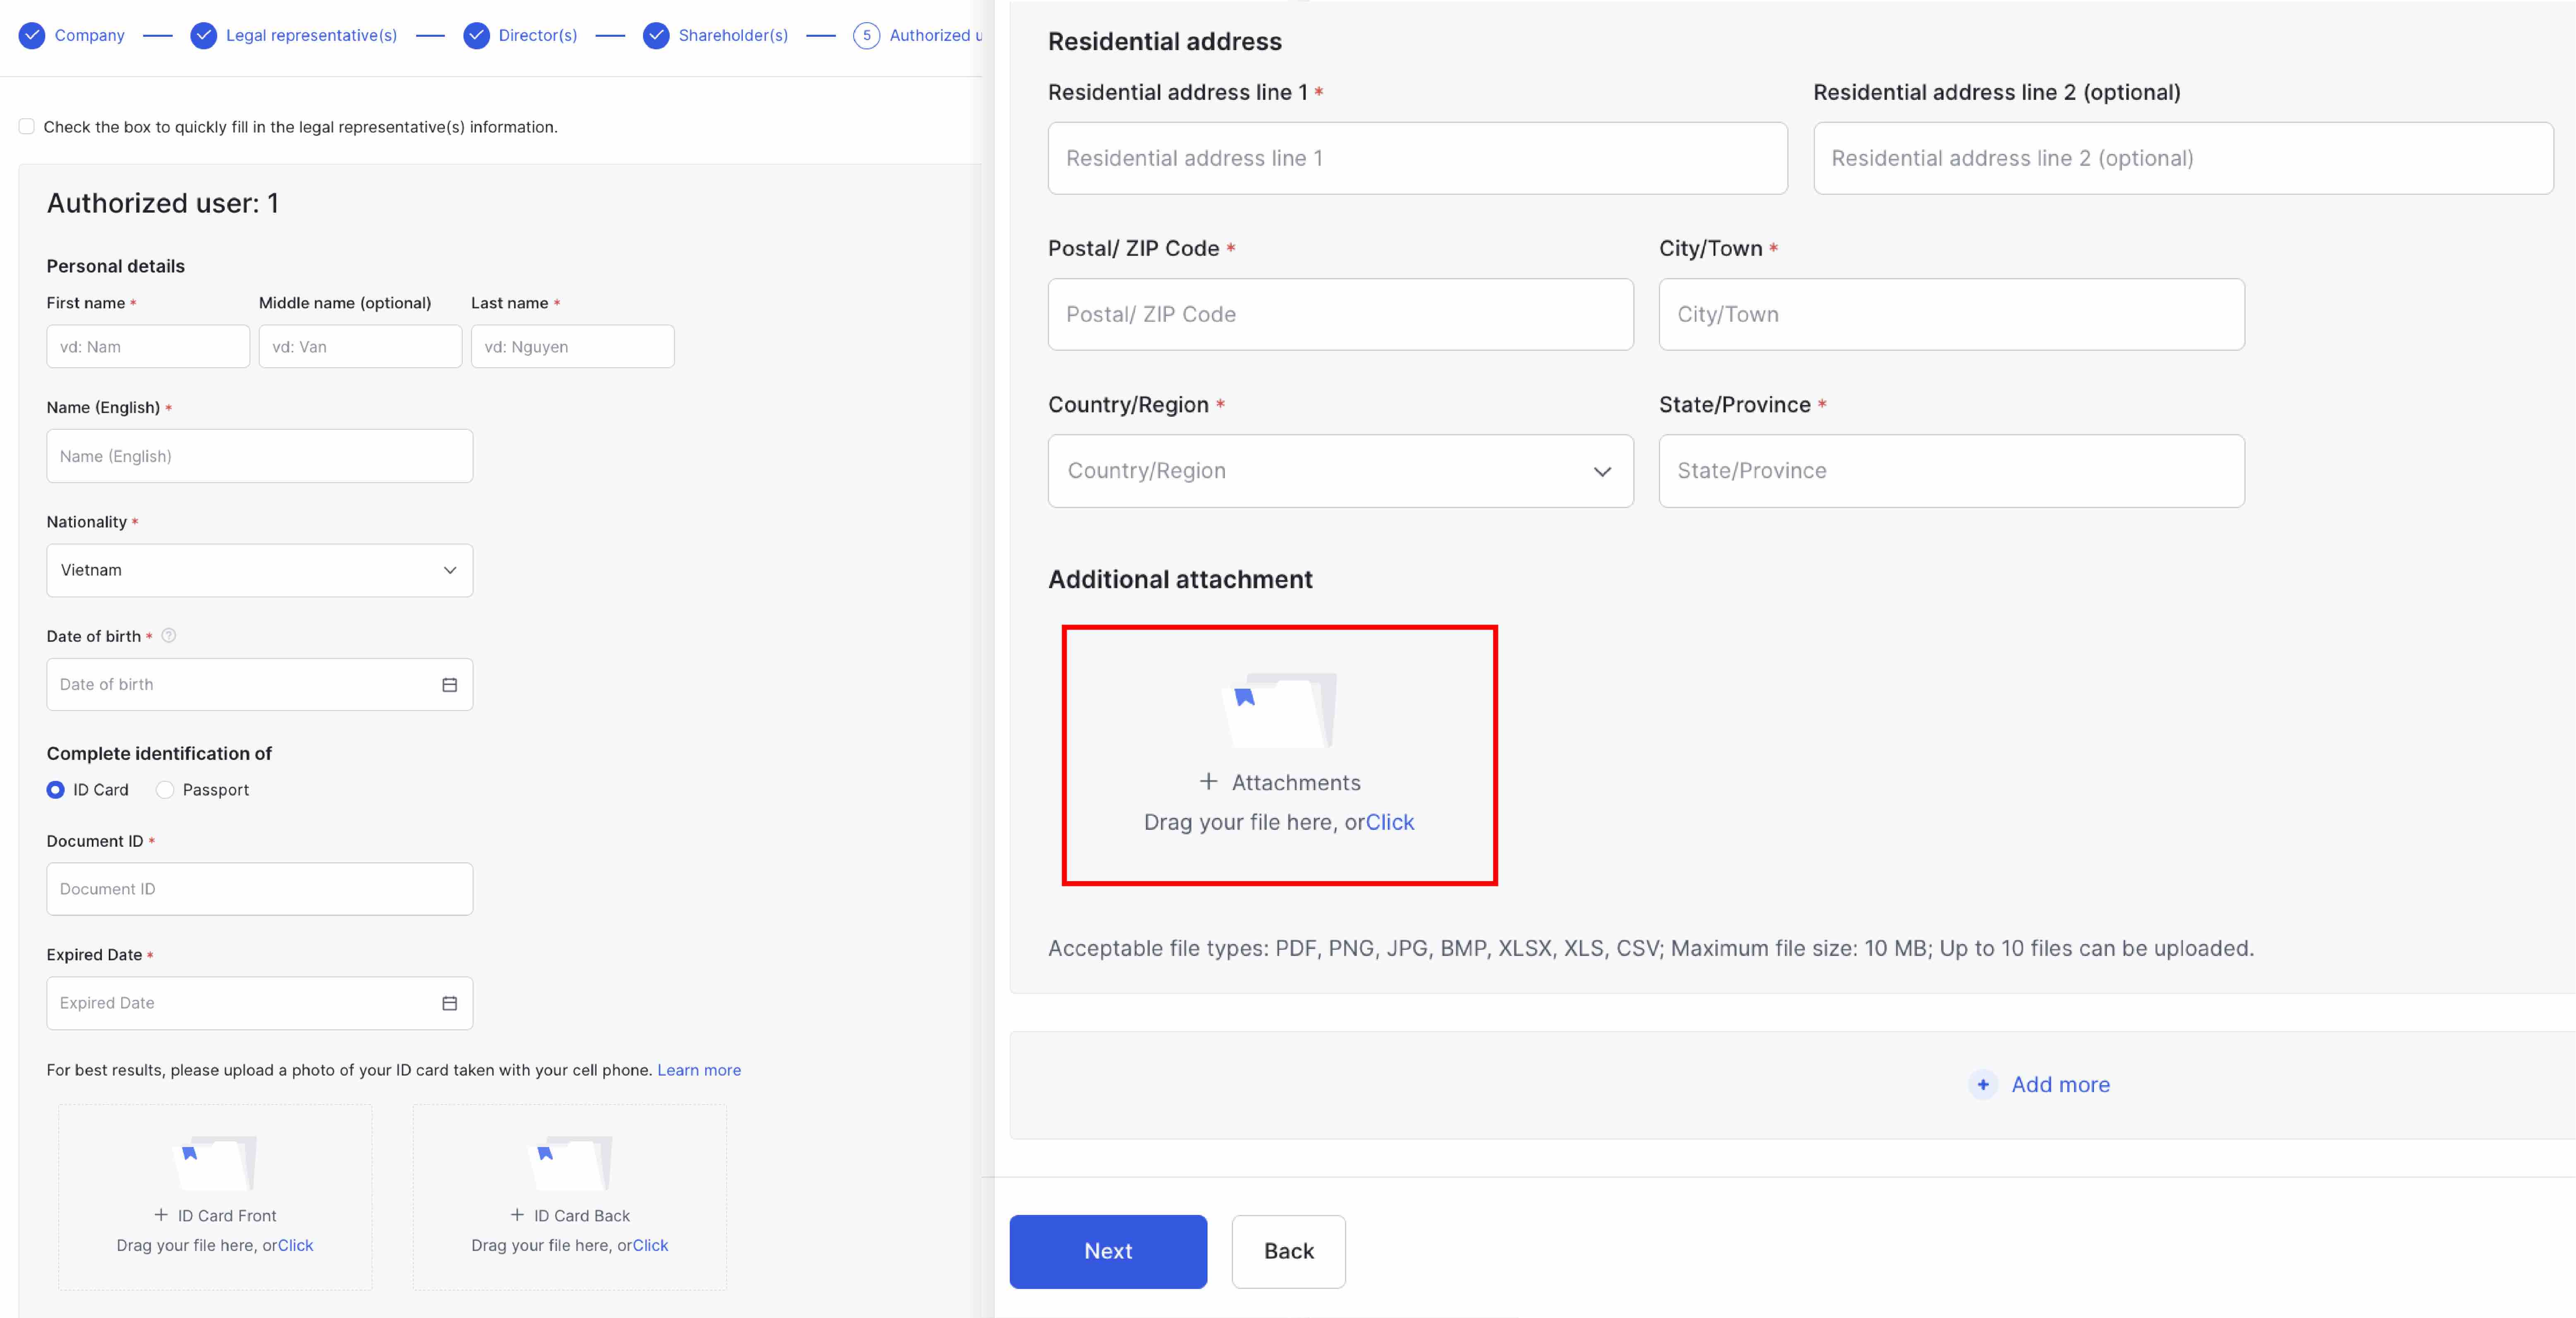
Input personal information of directors
Upload document about directors like step 5.2 (verify legal representative)
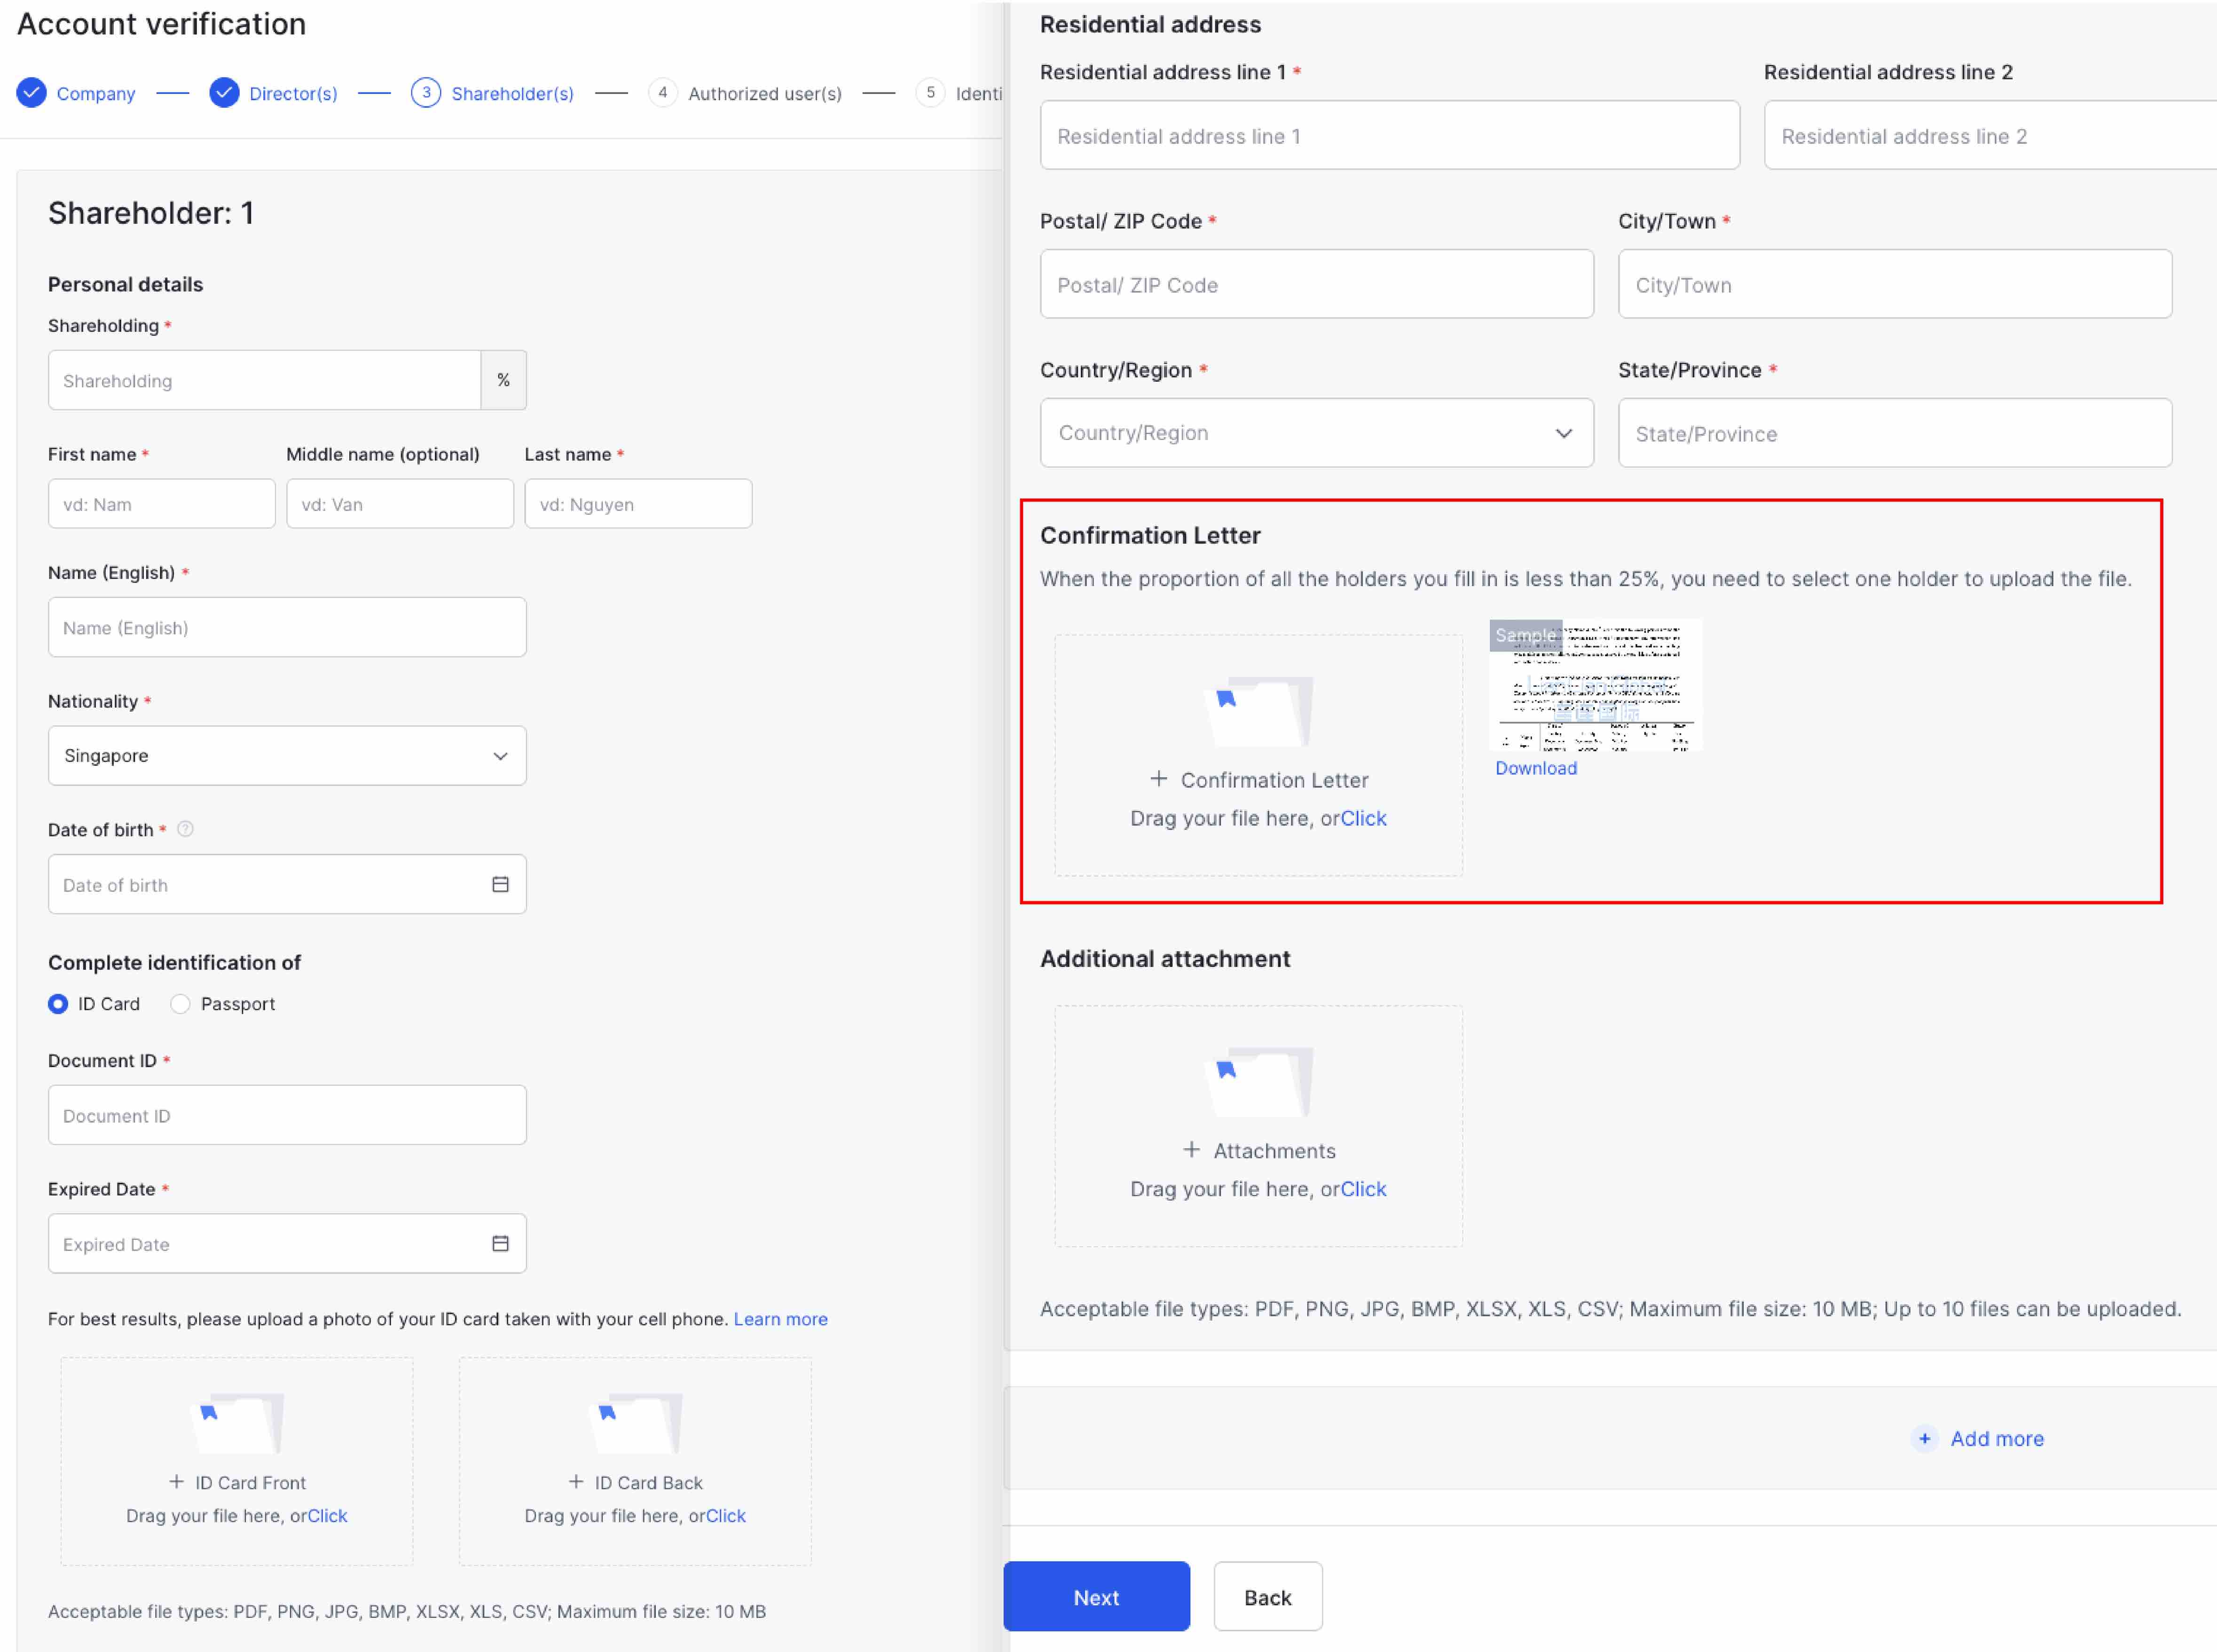
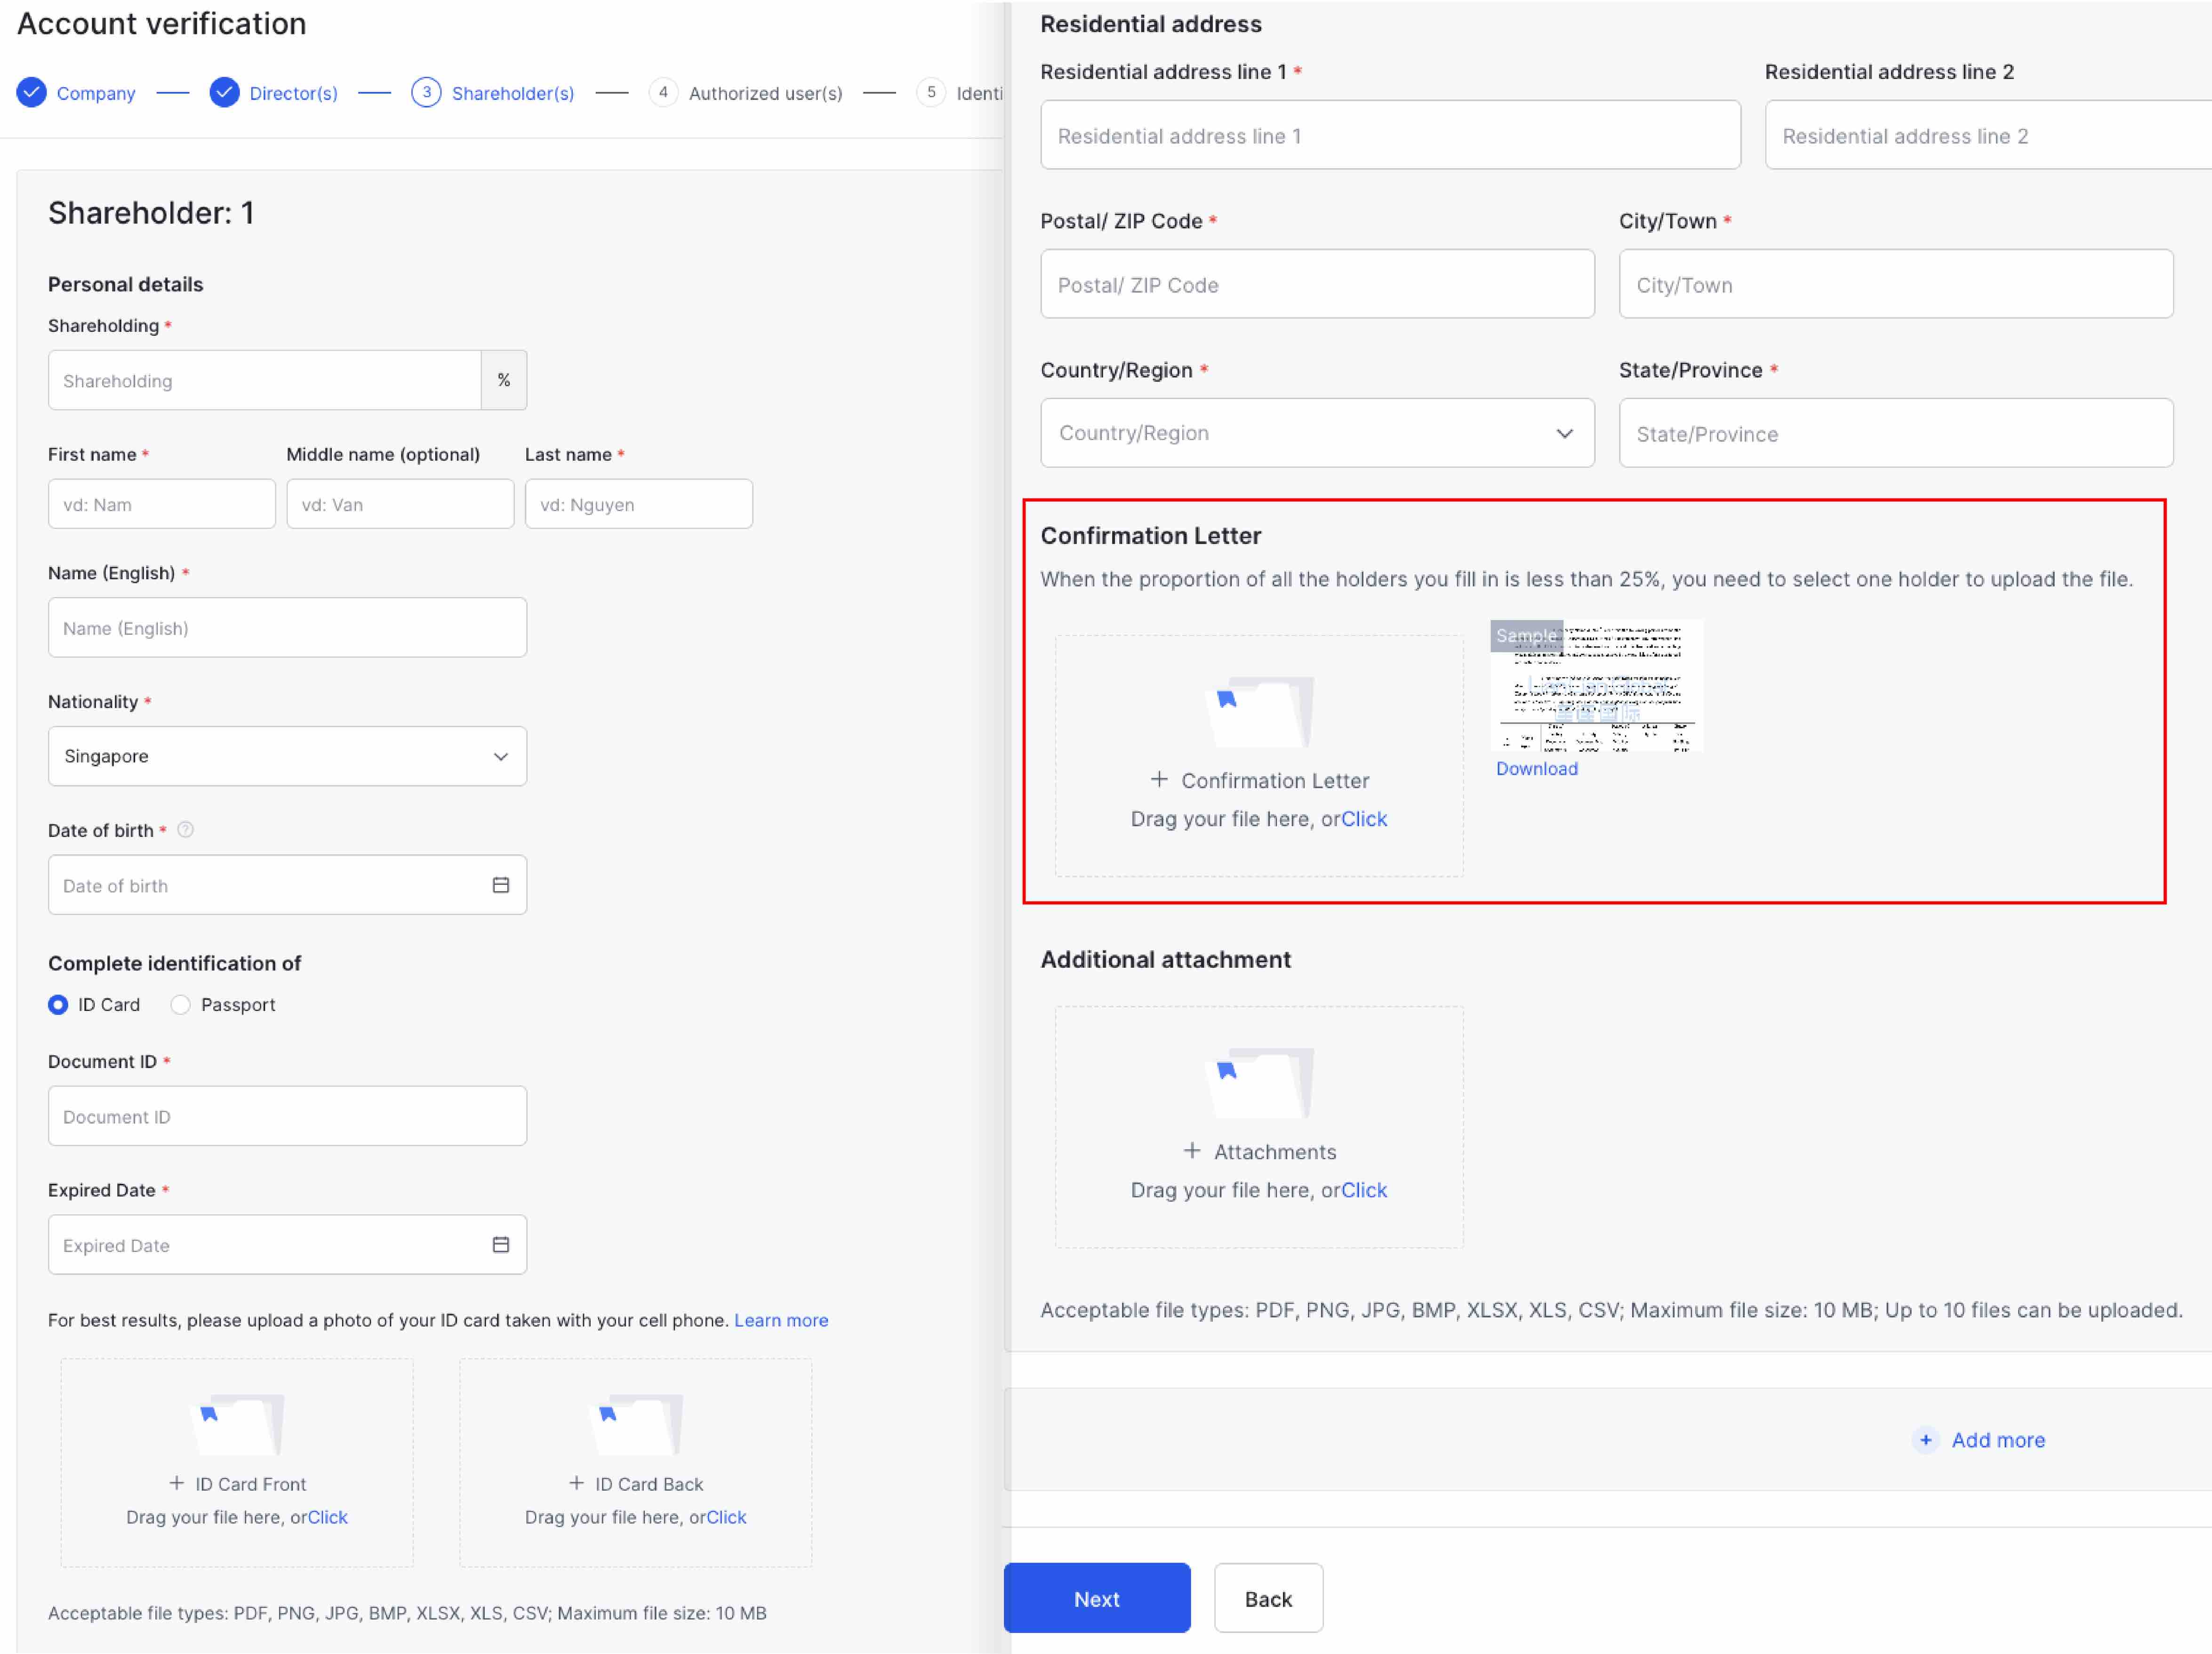
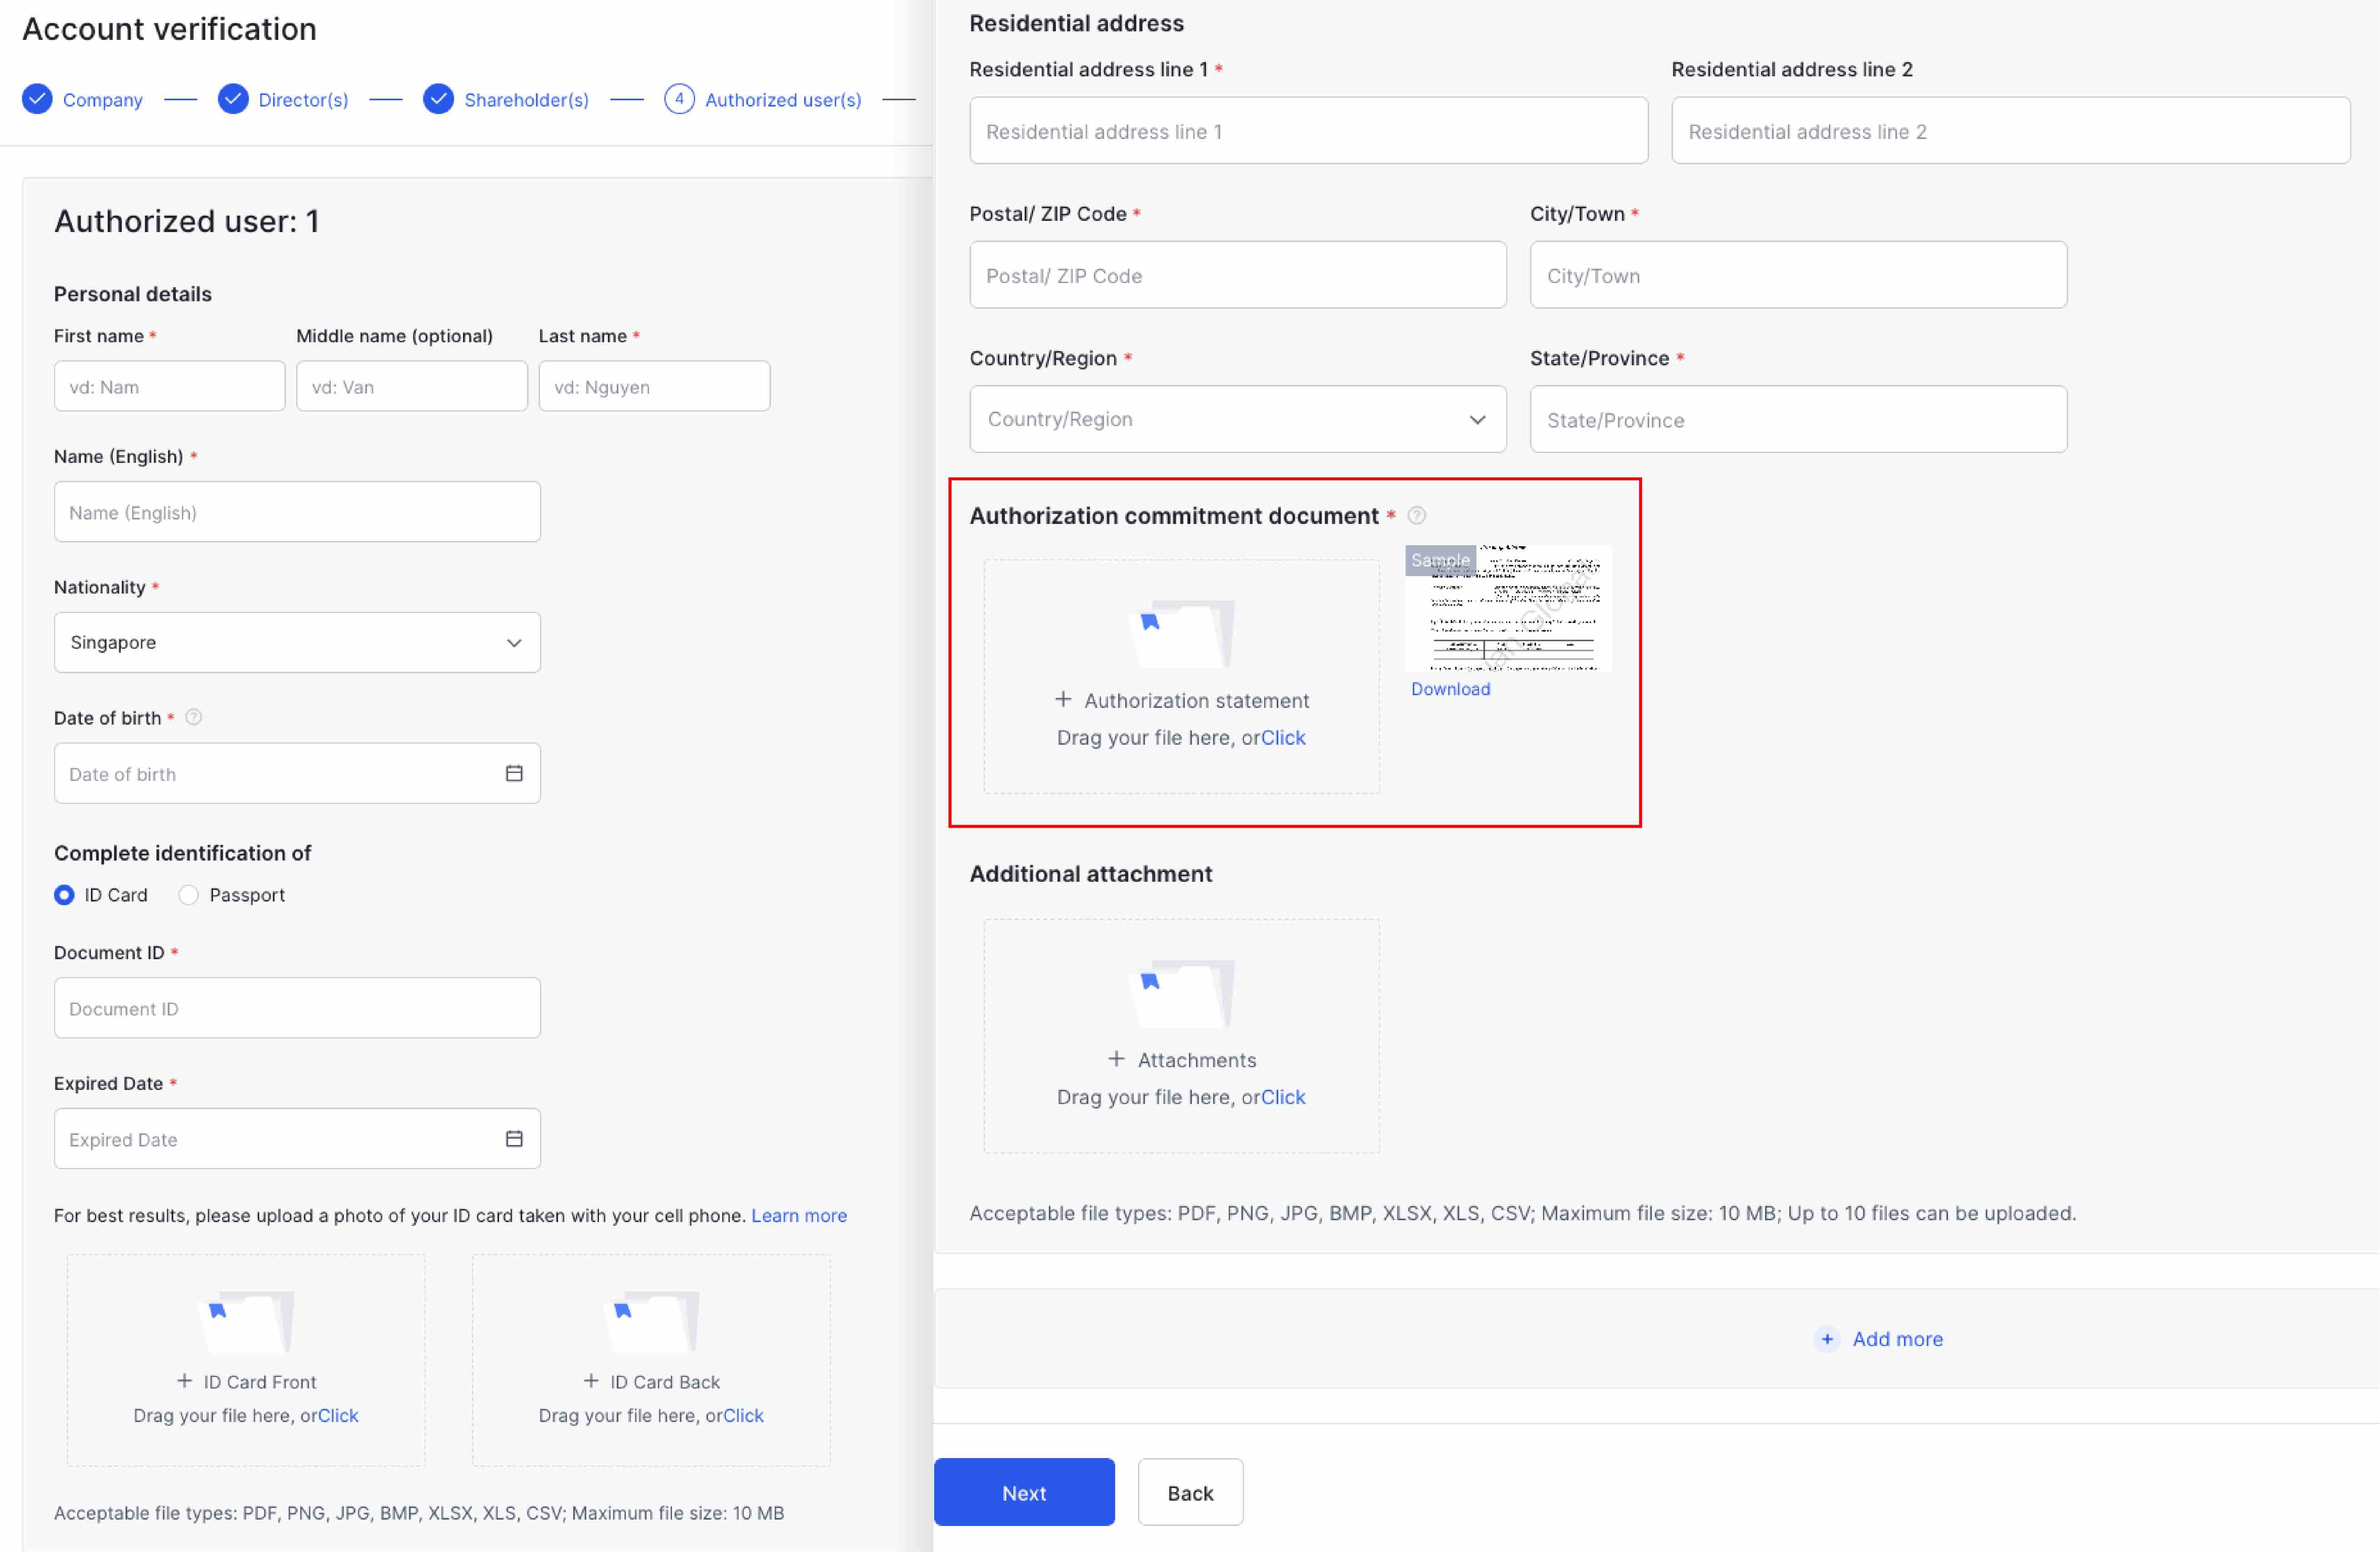
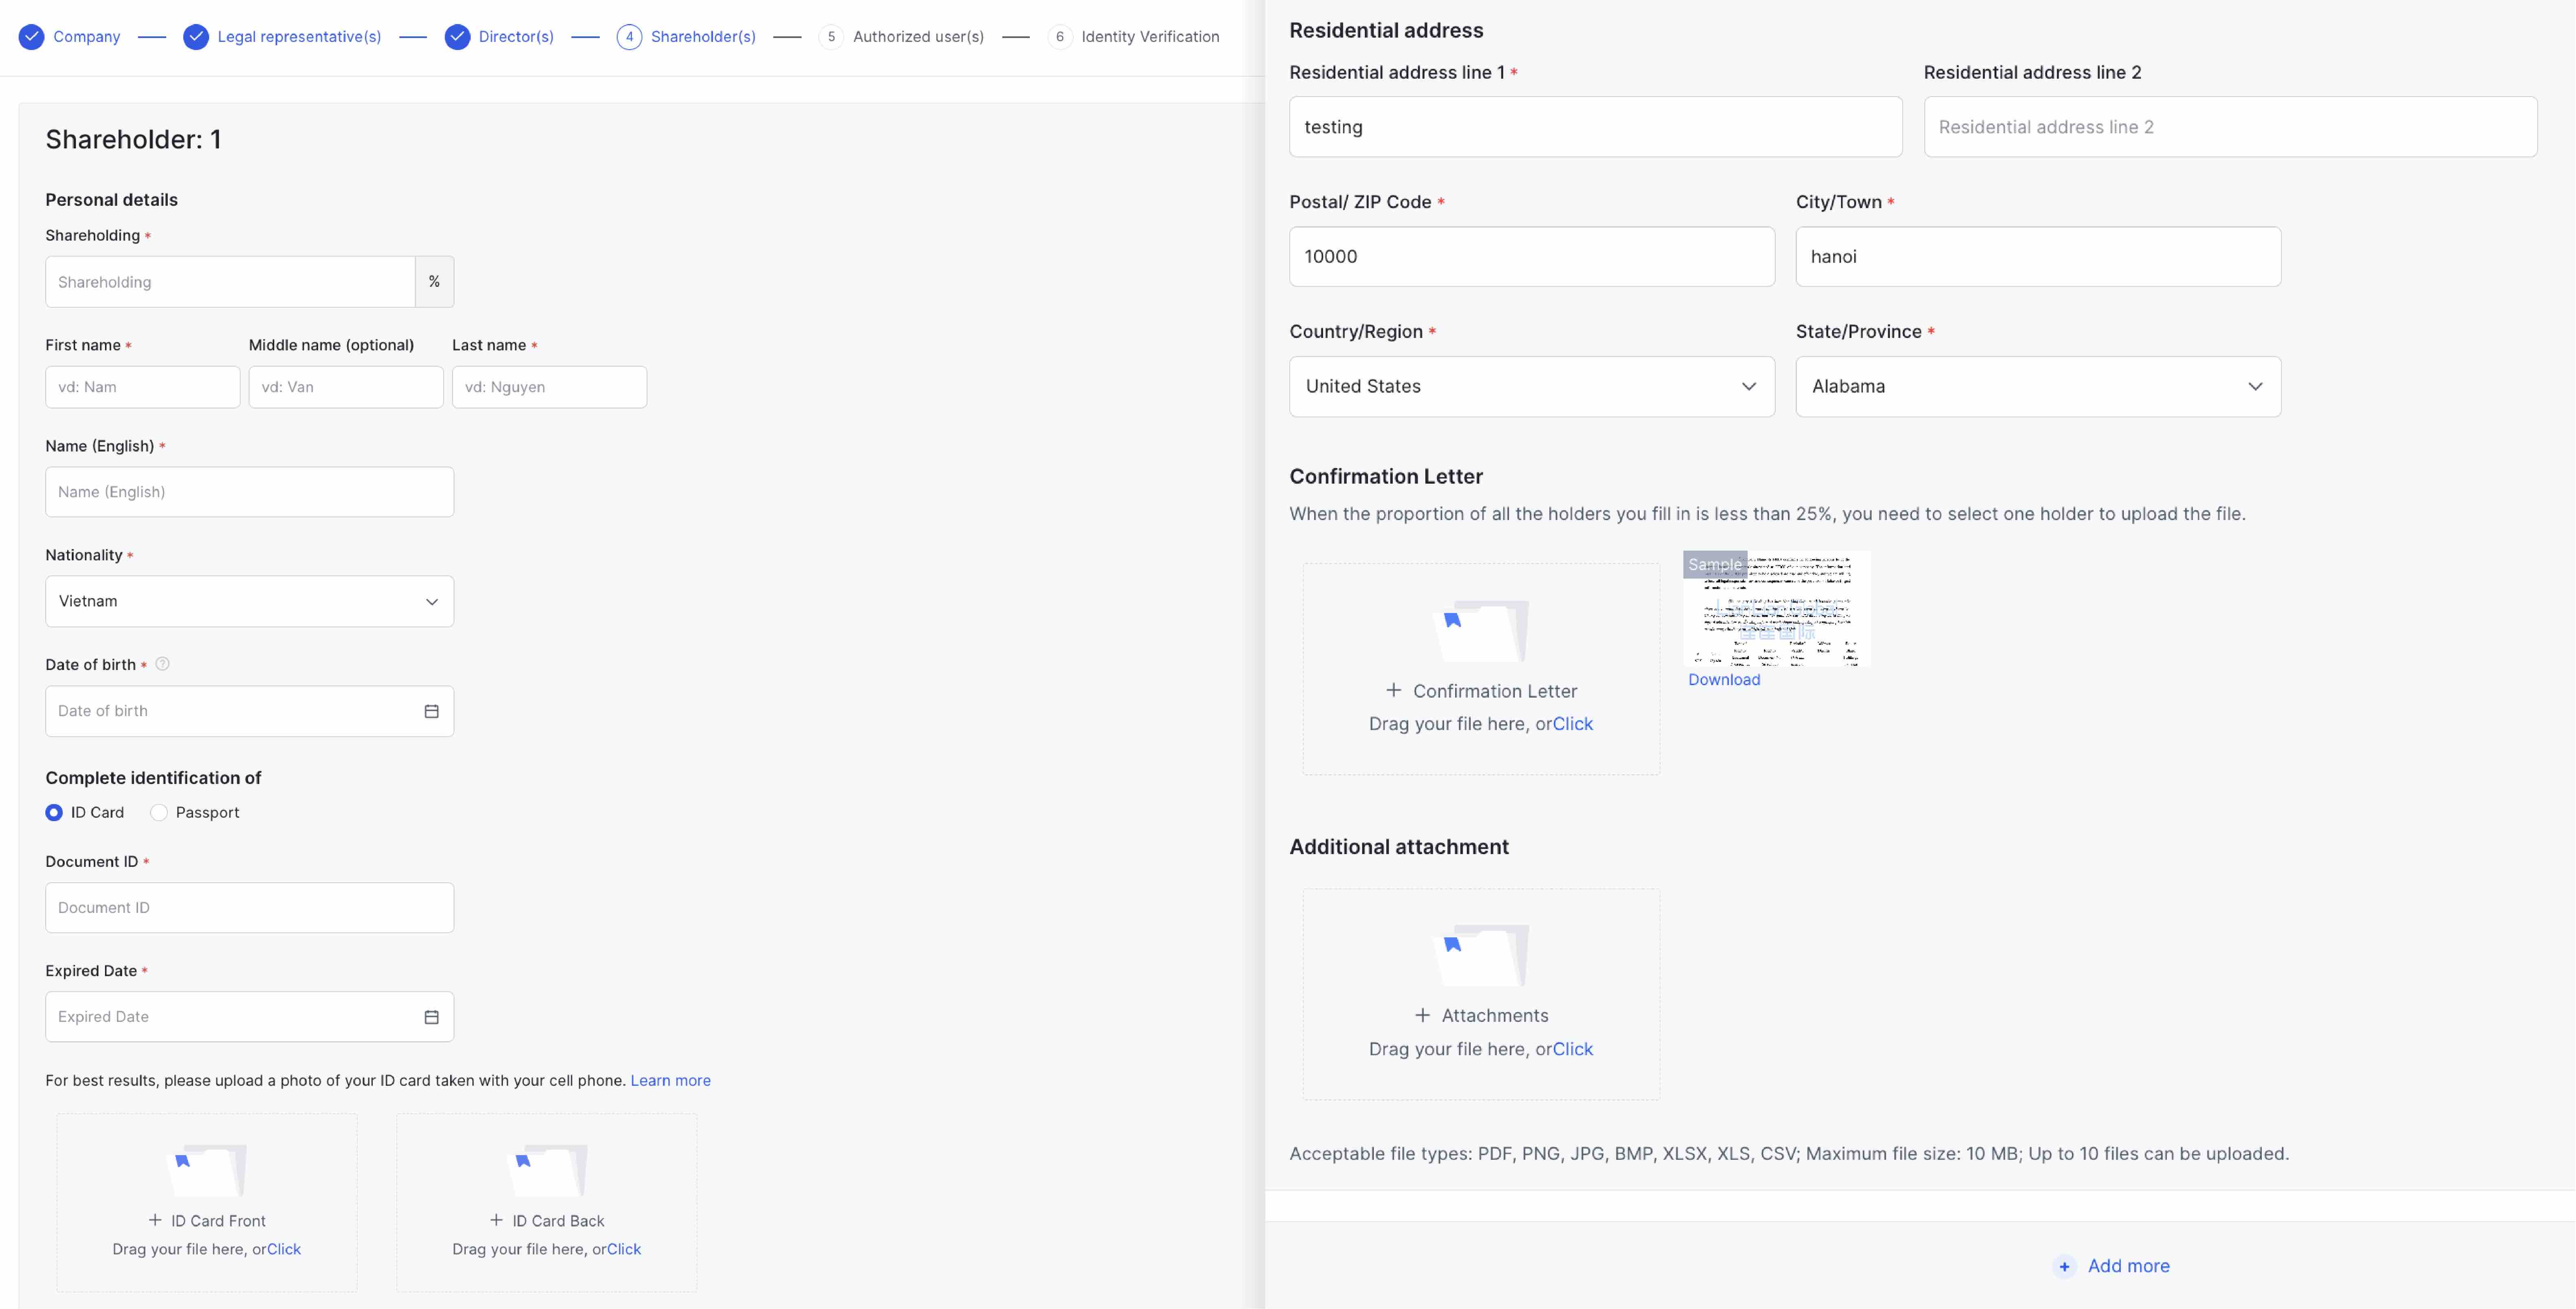
If there are any additional shareholders (own shares>25%), please provide the same documents as the legal representative.
Select “Submit” to complete
Select “Done” to complete to verify the account.
Step 1: Register via THIS LINK
Step 2: Select "Individual" as the type of registered business.
Step 3: Fill in the details and select "Submit" to proceed.
Step 4:
The system will immediately send a verification email to the address you have registered.
Select "Confirm email" to authenticate.
If you don't see the email on your home screen, please check your spam mailbox.
If the email is not received, select "Resend" on the main operation screen.
Step 5: After completing email authentication, on the home screen, go to the "Verify now" button to verify your account.
Step 6: Check the personal information that has been registered. Then select "Click to start verification".
Step 7: Prepare passport/ ID with chip.
If you are using your mobile phone to register, you can use your phone's camera to scan the QR code that appears on the screen and proceed to the next step.
Step 8: Perform the verification operations as instructed on the screen.
Note:
• The sheet should be clearly photographed, not blurred, flashy, or out of corner.
• Frontal shots also need to be in well-lit conditions, without hair covering the face.
Step 9: Fill in the Permanent Residence Address information.
Note: Fill in the Permanent Residence Address information that matches the information on the provided ID.
Step 10: Upload Proof of Address information.
Choose to upload one of the following documents:
• Bank statement (with current address, with the bank's red mark)
• Electricity and water bills (online or offline, with current address)
• Other documents (lease agreement, temporary residence certificate, temporary residence letter,...)
Documents must be made within the last 6 months.
Note: The current address information in the document does not have to match the permanent address information in the ID.
Step 11: Provide information about business activities. Select "Submit" to finish.
Step 1: Select the "Cards" section on the navigation bar.
Step 2: Click the three-dot button next to the card you want to obtain a statement for, and select "Add."
Step 3: Choose "Card Statement" > "Create Card Statement."
Step 4: Select the date range for the statement (maximum of 30 days). Click "Create" to submit the statement request.
Step 5: Click "Download" to download the statement for the selected card.
Step 1: Access HERE to register or CONTACT LianLian Global Account Managers
Step 2: Select the nationality of the legal entity (business) and the method of registering an account (email/phone number)
Step 3: Click "Edit" and complete the required items one by one:
3.1: Complete the "Basic info" section
3.2: Complete the "Merchant info" section
3.3: Complete the "Director info" section
3.4: Complete the "UBO info" section
3.5: Upload the required documents in the "Upload relevant materials" section
3.6: Complete the "Operating site information" section
Step 4: Check the information again and click "Submit", the status of the application will be notified via email and the system
Step 1: Visit the LianLian Global website and select "Register Now" or register via this link
Step 2: Choose "Individual" as the account type.
Step 3: Fill in the detailed information and press "Submit" to proceed.
Step 4: The system will immediately send a verification email to the address you registered. Click “Confirm Email” to verify your email.
If you don’t receive the email, choose “Resend” on the main screen. Please check your spam folder as well.
Step 5: After email verification, on the main screen, find the "Verify" button to verify your account.
Step 6: Review the personal information you have registered. Click "Click to start verification" to begin verifying your identity.
Step 7: Prepare your identification document (passport/ID card with chip) for registration. If registering on a computer, you can verify directly using your camera or use a smartphone camera (by scanning the code displayed on the screen) for the best image quality.
Step 8: Follow the verification steps as instructed on the screen. For successful verification, the document should be clear, without blurring, glare, or missing edges. Your front-facing photo should also be well-lit, with no hair covering your face.
Step 9: Select the type of document to prove your address, such as utility bills (electricity/water bills showing your residence address), bank statements (showing your residence address), or other documents (rental agreements, etc.) issued within the last 6 months, and upload clear images as required.
Step 10: Provide information about your business
Step 11: Select "Submit"
Select "Done" to complete to verify the account. The screen shows your account is under review.
Step 1: Access the LianLian Global website and select "Register Now" or register via this link
Step 2: Select "Company" as the type of business.
Step 3: Fill in the detailed information
Step 4: The system will immediately send a verification email to the address you registered. Click "Confirm Email" to verify your email.
Step 5: After verifying your email, go to the main screen and find the "Verify" button to verify your account.
Step 6: Review the company information you registered and continue providing additional information.
Step 7: Review the registered legal representative’s information. Click "Click to start verification" to begin verifying the company’s legal representative.
Step 8: Prepare identification documents (passport/chip-based ID) for registration. If using a computer, you can verify directly using your camera, or scan the QR code with a smartphone for the best image quality.
Step 9: Follow the verification steps as instructed on the screen. To ensure successful verification, documents must be clear, not blurry, overexposed, or cropped. The frontal photo should be well-lit with no hair covering the face.
Step 10: Enter the legal representative's information.
Step 11: Enter the personal information of the company's Director. Click "Next" after completing the information to proceed.
Step 12: Enter the information of other shareholders with 25% or more shares or re-enter the legal representative’s information.
Step 13: Upload identification documents as required on the screen and proof of address as instructed in Step 10. Click "Submit" to complete the information submission.
Select “Done” to complete to verify the account.
The screen will display a message that your account is under review.
Step 1: Register via THIS LINK
Step 2: Select "Individual" as the type of registered business.
Step 3: Fill in the details and select "Submit" to proceed.
Step 4:
The system will immediately send a verification email to the address you have registered.
Select "Confirm email" to authenticate.
If you don't see the email on your home screen, please check your spam mailbox.
If the email is not received, select "Resend" on the main operation screen.
Step 5: After completing email authentication, on the home screen, go to the "Verify now" button to verify your account.
Step 6: Check the personal information that has been registered. Then select "Click to start verification".
Step 7: Prepare passport/ ID with chip.
If you are using your mobile phone to register, you can use your phone's camera to scan the QR code that appears on the screen and proceed to the next step.
Step 8: Perform the verification operations as instructed on the screen.
Note:
• The sheet should be clearly photographed, not blurred, flashy, or out of corner.
• Frontal shots also need to be in well-lit conditions, without hair covering the face.
Step 9: Fill in the Permanent Residence Address information.
Note: Fill in the Permanent Residence Address information that matches the information on the provided ID.
Step 10: Upload Proof of Address information.
Choose to upload one of the following documents:
• Bank statement (with current address, with the bank's red mark)
• Electricity and water bills (online or offline, with current address)
• Other documents (lease agreement, temporary residence certificate, temporary residence letter,...)
Documents must be made within the last 6 months.
Note: The current address information in the document does not have to match the permanent address information in the ID.
Step 11: Provide information about business activities. Select "Submit" to finish.
– Company type (Select from the below)
– Sole-Proprietorship
– Partnership
– Limited Partnership
– Limited Liability Company
– Company
About yourself: input your name and birthday on your identify document
Select “Submit”
Here you will see a screen that asks for Email Verification and Account Verification.
Check your email and select “Verify email” to complete
Select “Verify now” to start verify account
Input information about company like step 3
Proof of address: you can use one of the following document to submit
You can upload a photo of an e-invoice instead of a paper invoice, but you still need to make sure the image is unedited and clear, so that the system can recognize and check it.
Business certificate:
– Memorandum or Articles of Association (please upload all pages) and ANNUAL RETURN (please merge with Articles of Association)
Select “Next” to continue
Input Legal representative information:
Passport)
Upload photos of all kinds of documents in turn as required (Must be front and back)
Note: LianLian accept file types: PDF, PNG, JPG, XLSX, XLS, CSV and maximum file size is 10MB
Some note for uploading valid selfie documents:
+ Utility Bill: please upload a photo of the front of the entire invoice in a clear, un-angled, unedited, and low-light condition.
You can upload a photo of an e-invoice instead of a paper invoice, but you still need to make sure the image is unedited and clear, so that the system can recognize and check it.
+ Bank Statement: if you choose a bank statement, please take a photo of all bank statement documents in full, clear, unedited, two-sided, and then save all the pictures in a PDF file for uploading.
Select “Next” to continue
Input personal information of directors
Upload document about directors like step 5.2 (verify legal representative)
If there are any additional shareholders (own shares>25%), please provide the same documents as the legal representative.
Select “Submit” to complete
Select “Done” to complete to verify the account.
Before opening a new receiving account, please contact your Account Manager at LianLian Global for assistance in increasing the account creation limit. After your limit has been increased, you can operate on the account dashboard by following these steps:
Step 1: In the "Receive" section, select "Add new receiving account."
Step 2: Choose the currency you wish to transact in and click "Submit" to continue.
Step 3: Select the issuing bank address for the VBA and the category of the receiving account.
Step 4: Complete the activation of the receiving payment account.
After 2 working days, you will receive information about your payment receiving account, such as the account holder's name and account number. You can then add this information to the platform you are operating on, and the revenue will be directly received in your LianLian Global wallet.
Step 5: Manage your payment receiving accounts.
Once successfully activated, you can monitor your list of accounts and change account names for easier management across different platforms.
Step 6: Manage cash flow in the LianLian wallet.
Revenue from the VBA payment receiving account will be credited to your LianLian Global account balance. At this point, you can withdraw money to a Vietnamese bank, convert currencies, or perform other necessary transactions according to your needs.
Customers can download bank statements from LianLian and send them along with other documents to register for an Amazon account or for various other purposes.
Step 1: Select the “Receive” option on the toolbar.
Step 2: Click on “Details” for the receiving account from which you want to obtain the statement.
Step 3: In the “Bank Statement” section, choose the intended purpose and click “Generate.”
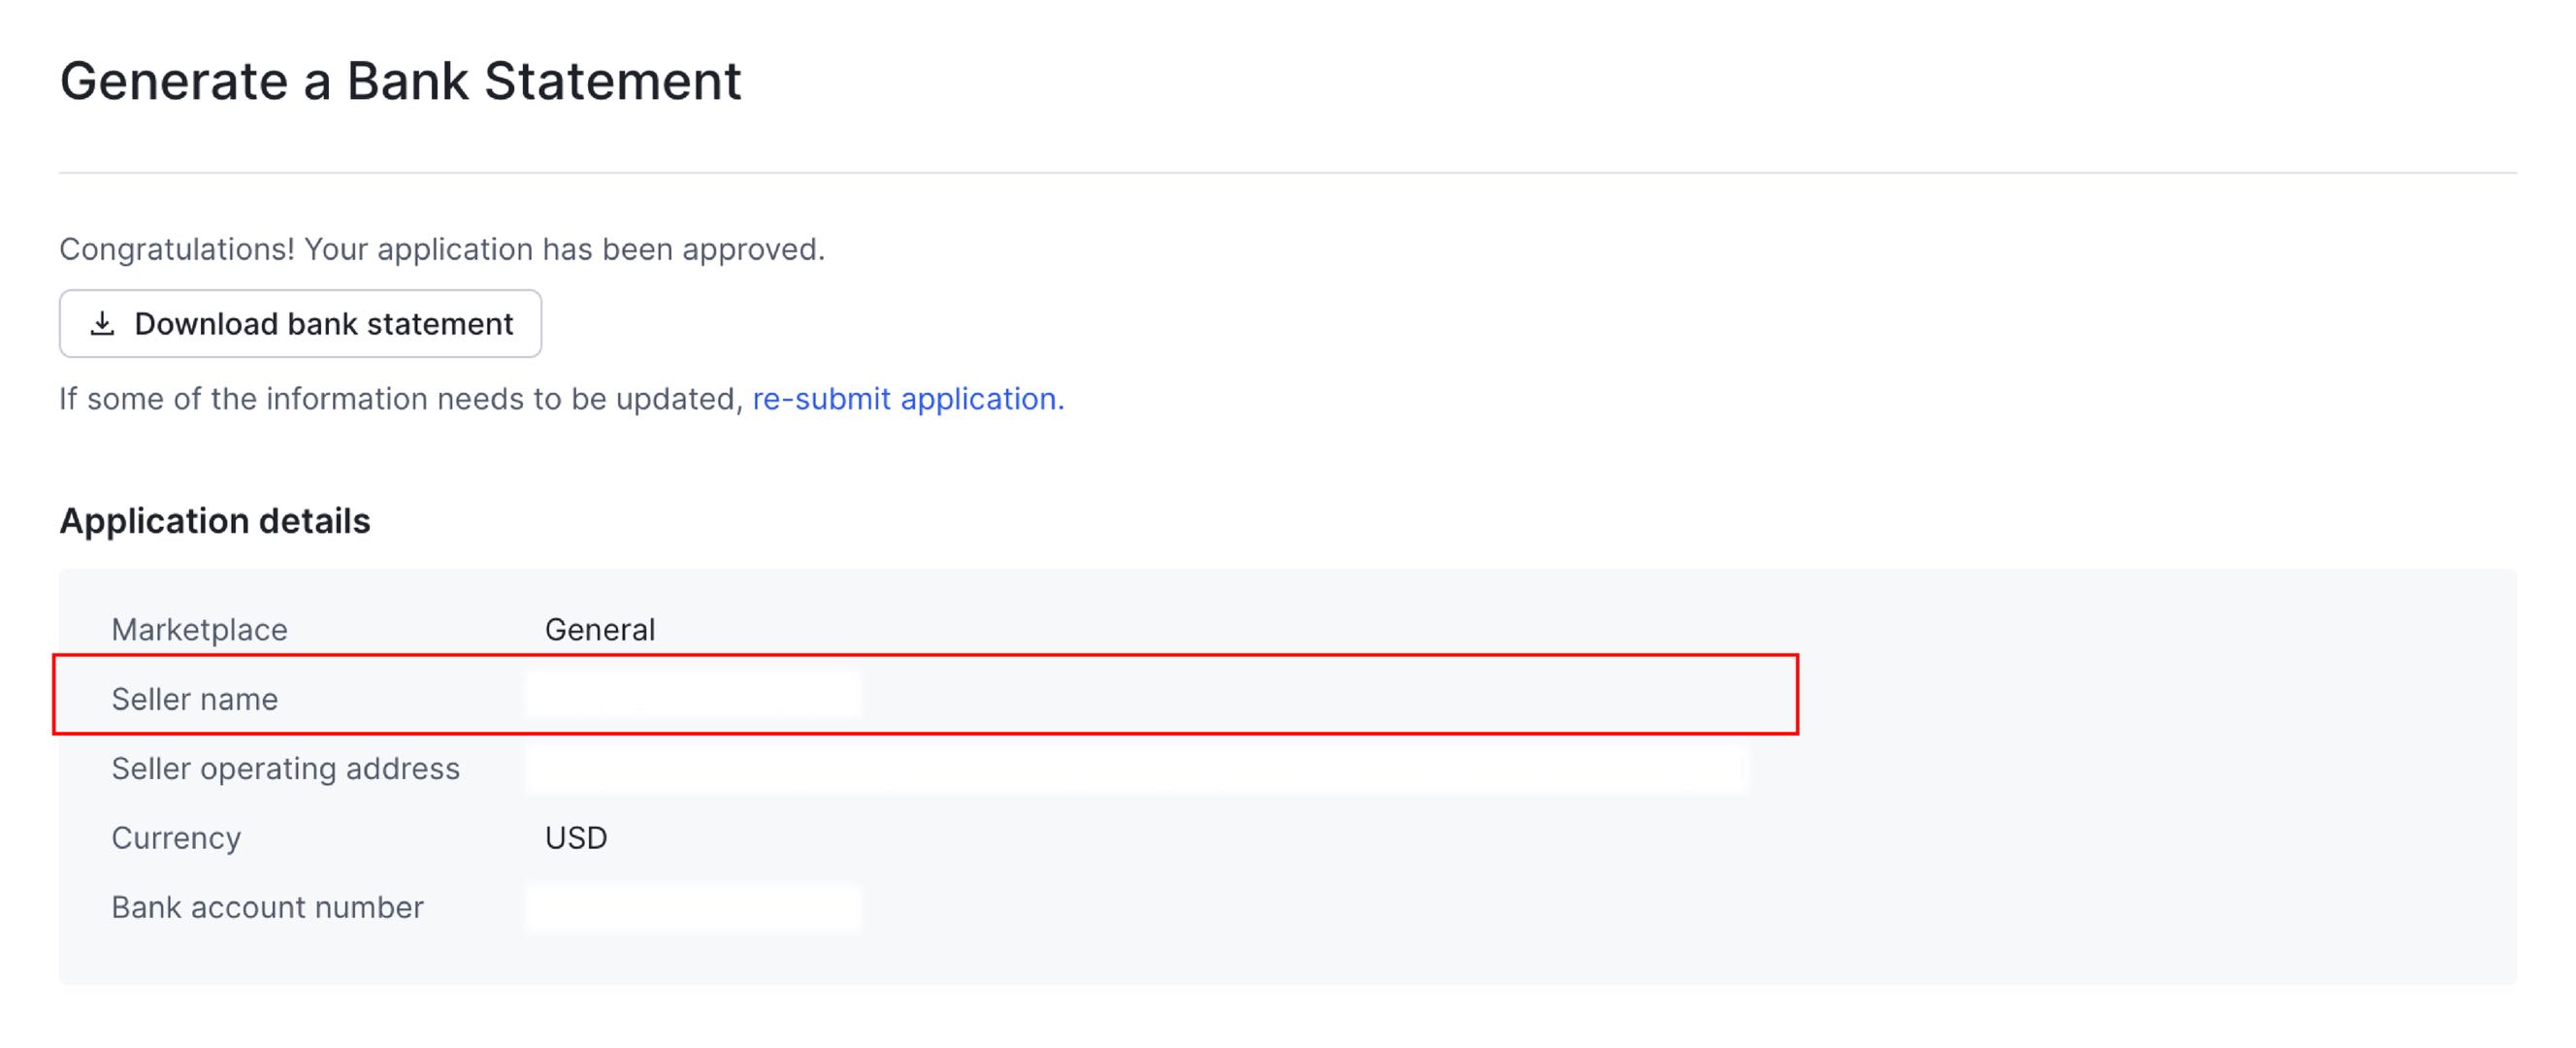
Step 4: Add the business address of the seller, check the confirmation box, and select “Create.”
The request will be approved within 1 to 2 working days and will be notified via email.
Step 1: Log in to your Amazon account and go to “Payment Information” > “Deposit Methods.”
Select “Add new deposit method.”
Step 2: Select “Amazon.com” as the marketplace where you want to add a deposit method.
Step 3: On the screen displaying the payment account details, fill in the receiving account information provided by LianLian Global, then select “Set Deposit Method” to complete the linking process with your Amazon account.
You can find the information for the VBA receiving account on the LianLian Global management page by accessing "Receive" > "Details."
Step 1: After creating a receiving account with the appropriate currency and corresponding country, go to the LianLian Global dashboard, select "Receive," and then view the "Details" of the VBA for PHP or IDR currency based on the country where you are operating your business on Shopee.
Step 2: In the "Funding Source" section, select "Add new funding source."
Step 3: Choose Shopee as the payment source.
Step 4: Add the link to your store on the Shopee platform and select "Submit." The funding source will be verified and approved by LianLian.
Step 5: On Shopee’s Seller Center page, click "My Orders" > "Completed."
Step 6: Select "Export" to download all the order details to your computer.
Step 7: Log into your LianLian Global account, select "Receive," and then view the "Details" of the VBA for PHP or IDR based on the country where you are operating your business on Shopee.
Step 8: In the "Funding Source" section, under the verified payment source for your Shopee store, click "Upload."
Step 9: Upload all the files you downloaded from Shopee Seller Center in Step 6. Click "Submit" and wait for the review of the "Receiving Limit" for your store.
The system will update the limit of funds you can receive from each payment source based on the order history files you have successfully uploaded. The "Available Amount" reflects the limit you can receive from the platform.
You can check the upload history of your order history files from the platform by selecting "Details" The "Supplements" section shows whether the upload of order history files was successful, and the "Transactions" section displays the history of changes in the receiving limit of the payment source.
Step 1: After creating a receiving account with the appropriate currency and corresponding country, go to the LianLian Global dashboard, select "Receive," and then view the "Details" of the VBA for PHP or IDR currency based on the country where you are operating your business on Lazada.
Step 2: In the "Funding Source" section, select "Add new funding source."
Step 3: Choose Lazada as the payment source.
Step 4: Add the link to your store on the Lazada platform and select "Submit." The funding source will be verified and approved by LianLian.
Step 5: On Lazada’s Seller Center page, click "Orders & Review" > "Orders."
Step 6: Select the "Delivered" option on the Orders Overview page.
Step 7: Choose "Export" > "Export all orders" > "Download" to save the detailed file to your computer.
Step 8: Log into your LianLian Global account, select "Receive," and then view the "Details" of the VBA for PHP or IDR based on the country where you are operating your business on Lazada.
Step 9: In the "Funding Source" section, under the verified payment source for your Lazada store, click "Upload."
Step 10: Upload all the files you downloaded from Lazada Seller Center in Step 7. Click "Submit" and wait for the review of the "Receiving Limit" for your store.
The system will update the limits you can receive from each payment source based on the order history files you have successfully uploaded. The "Available Amount" reflects the limit you can receive from the platform.
You can check the upload history of your order history files from the platform by selecting "Details" The "Supplements" section shows whether the upload of order history files was successful, and the "Transactions" section displays the history of changes in the receiving limit of the payment source.
Step 1: Use your Wayfair seller account to link your email address and send an email to supplyservicedesk@wayfair.com, requesting to link your ACH account. Please provide your Wayfair account number, email address, and company name, and then wait for a response.
Step 2: After receiving a response from Wayfair's SSD (Customer Management), fill out the form with your company name, VAT registration number (for the European region), contact information, etc. Please enter your LianLian Global receiving account information in the bank information section.
You can find your VBA information here
Step 3: After replying with the ACH form for the Wayfair platform, Wayfair's finance department will send a small payment (micro-deposit) to the designated LianLian Global receiving account.
Once you receive the micro-deposit, take a screenshot and respond to the platform. After successfully linking your receiving account, you can view the receiving account information in Wayfair's backend. In the Seller Dashboard, select "Manage Account" → "Supplier Account Details." If the “Documents, terms and configuration” section displays ACH/EFT, it means the linking process has been successful.
To provide seamless payment solutions and services to our valued customers, LianLian would like to remind customers to adhere to the following guidelines for using and managing cards to increase the success rate of transactions:
1. Error “Insufficient Balance”: VCC Card Has Insufficient Funds
Please regularly check your account balance to ensure that the payment process is not interrupted due to insufficient funds (the balance of the card is directly linked to the balance in your LianLian wallet).
2. Error “Exceeds Transaction Limit”: Exceeded Transaction Limit
For virtual cards where you have set a maximum limit for each transaction to manage card usage, please minimize transactions that exceed the transaction limit of these cards.
3. Carefully Check Card Information
Please carefully verify the card number, expiration date, and CVV code when linking the card to payment platforms.
4. Note the Card Expiration Date
Regularly check for notifications related to the card to ensure it is still valid (if the card is about to expire, you can request a new card).
5. Block Unused Cards
For cards you have previously linked for payments but no longer wish to use, please block the card to avoid repeated failed transactions.
In case you receive a notification stating “Payment Activity Not Supported (Unsupported Scenario),” please contact LianLian's Account Manager team to understand the cause and receive assistance in resolving the issue, or refer to the corresponding payment purposes for the card prefixes below:
Step 1: Select the “Cards” section on the navigation bar.
Step 2: Click the “Add New Card” button. If you have reached your card limit and cannot create a new card, please contact the Account Management Team for assistance.
Step 3: You can name each card for easier management. Then click “Submit.”
Step 4: Complete the card activation. We will send an email notification when your card is ready to use.
Step 1: Select the "Cards" section on the navigation bar.
Step 2: Click the three-dot button next to the card you want to obtain a statement for, and select "Add."
Step 3: Choose "Card Statement" > "Create Card Statement."
Step 4: Select the date range for the statement (maximum of 30 days). Click "Create" to submit the statement request.
Step 5: Click "Download" to download the statement for the selected card.
Step 1: On the homepage, navigate to the "Activity" section.
Step 2: Select "Transactions" to check the complete transaction history of your account.
The transaction history page allows you to check the following information:
To check your account balance report, select the "Balance Reports" section.
The balance report page will allow you to review the history of your account balance fluctuations:
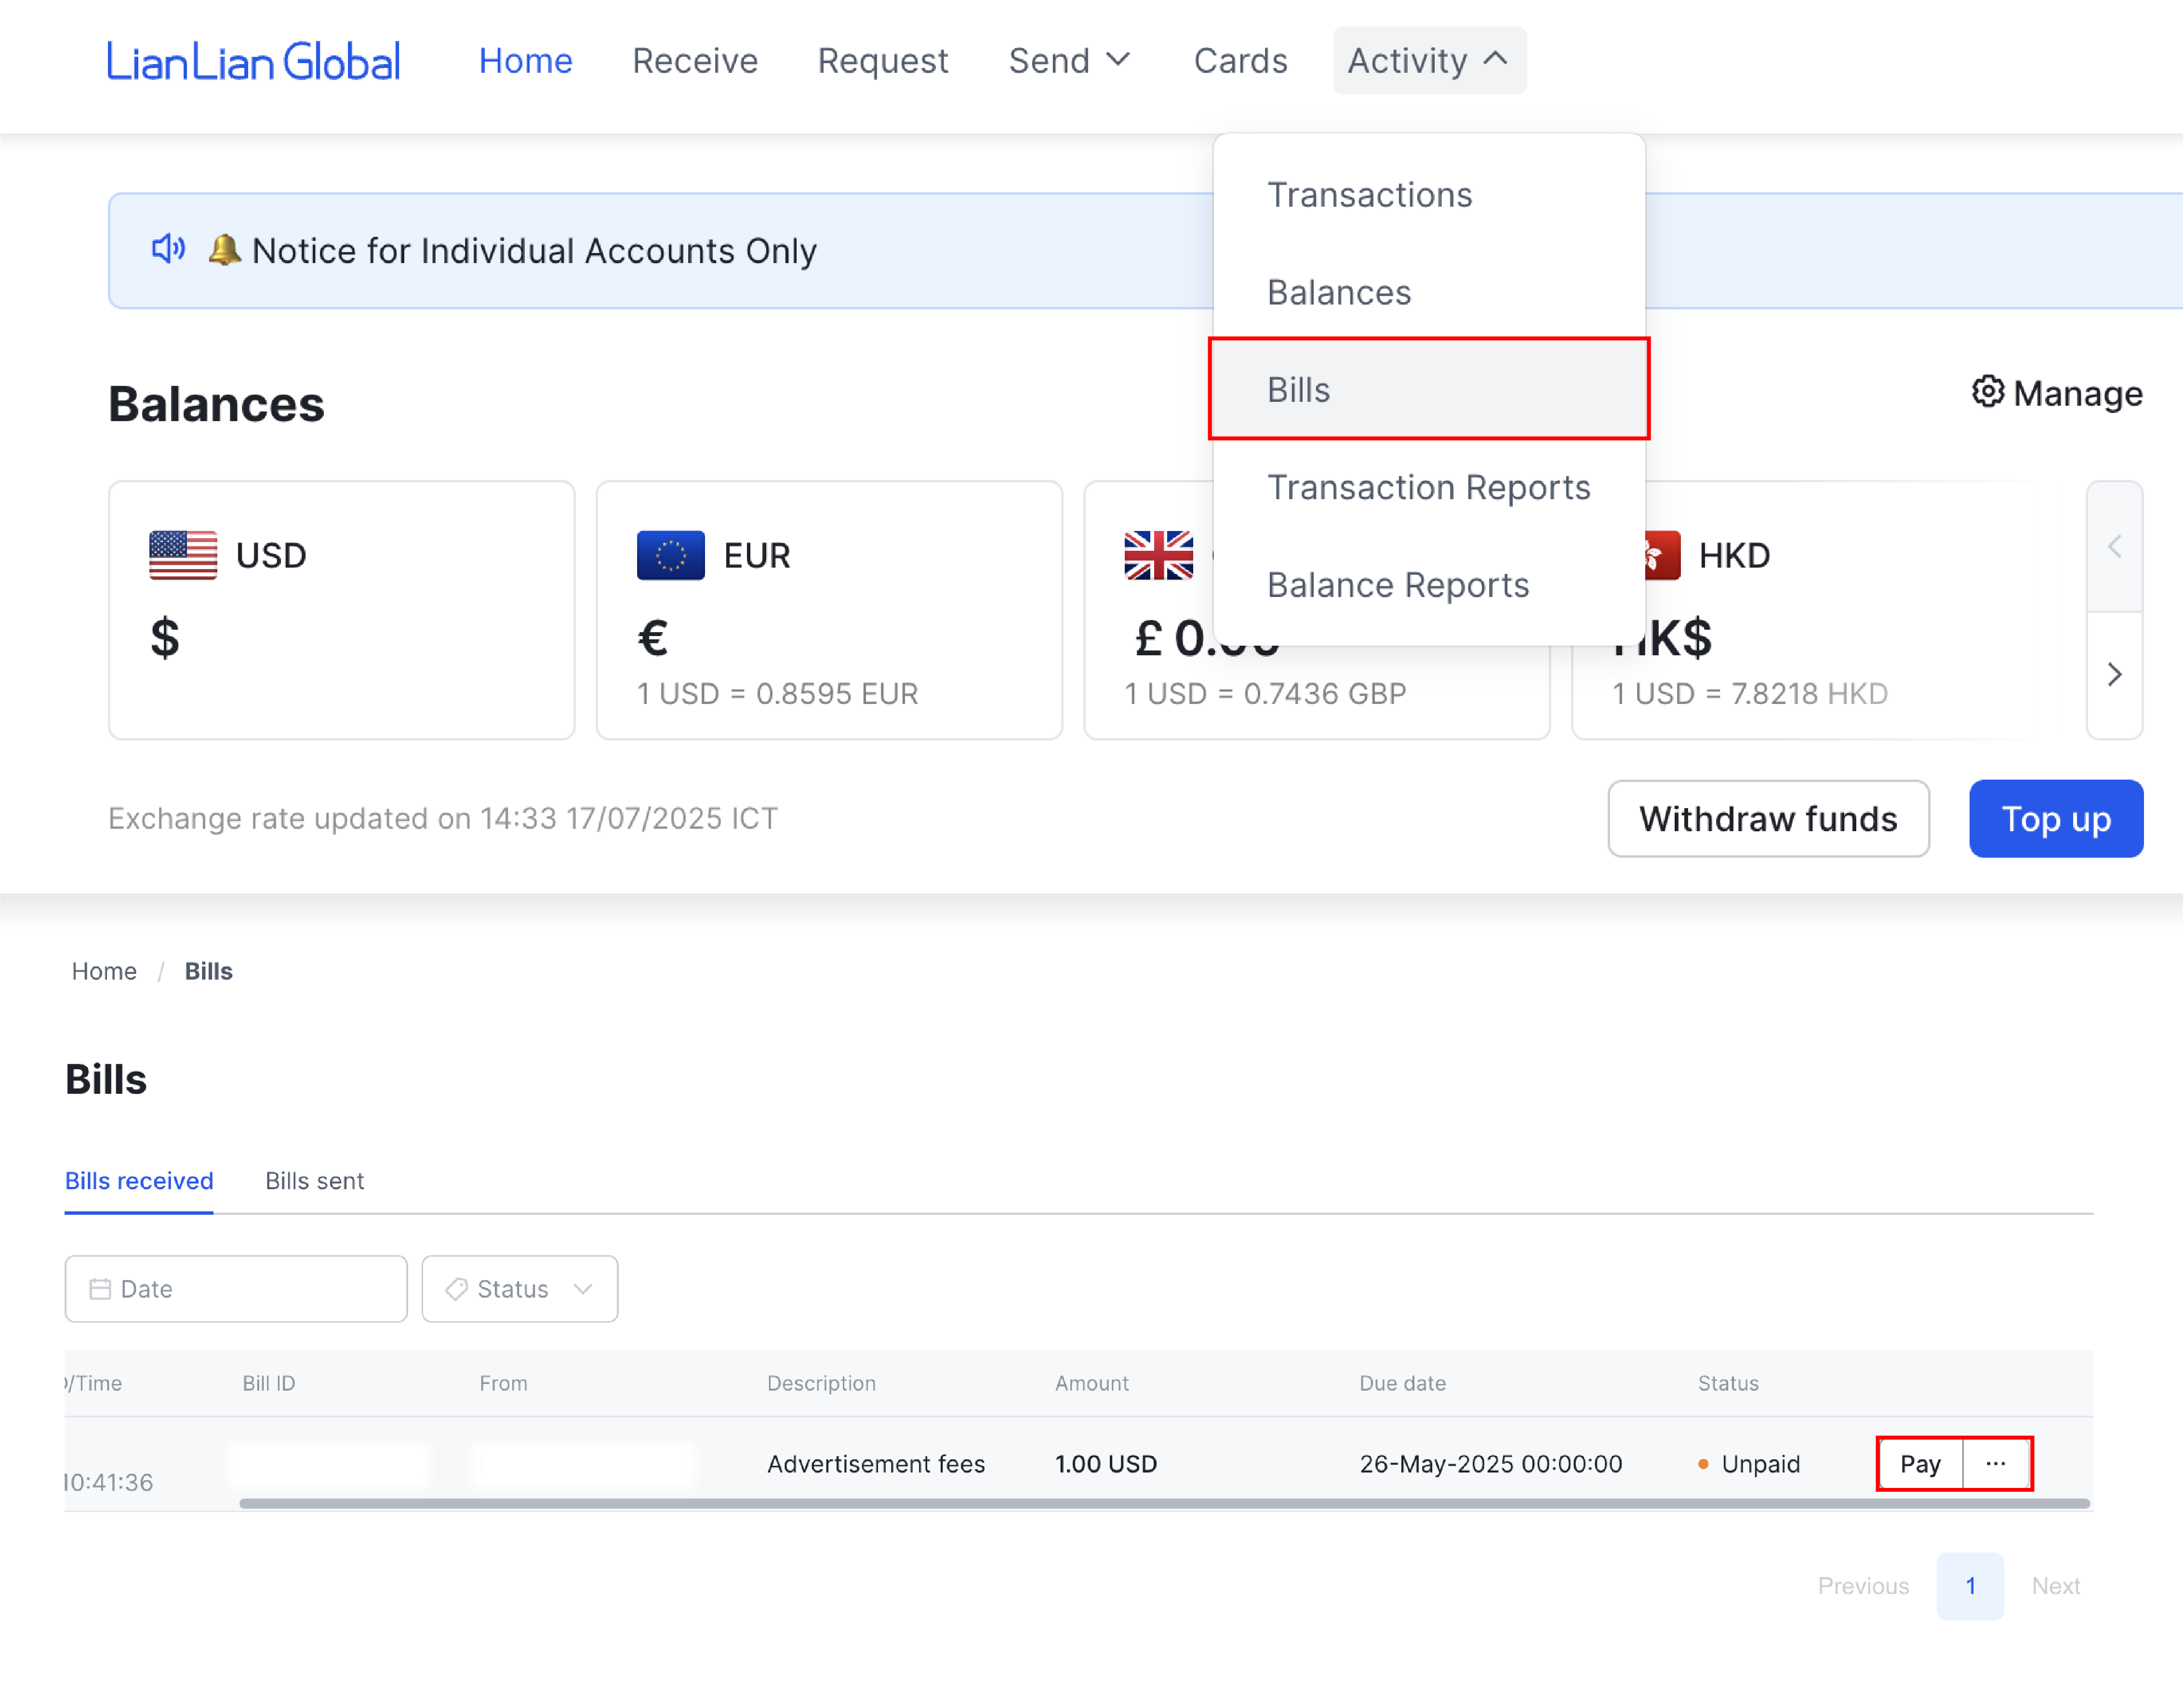
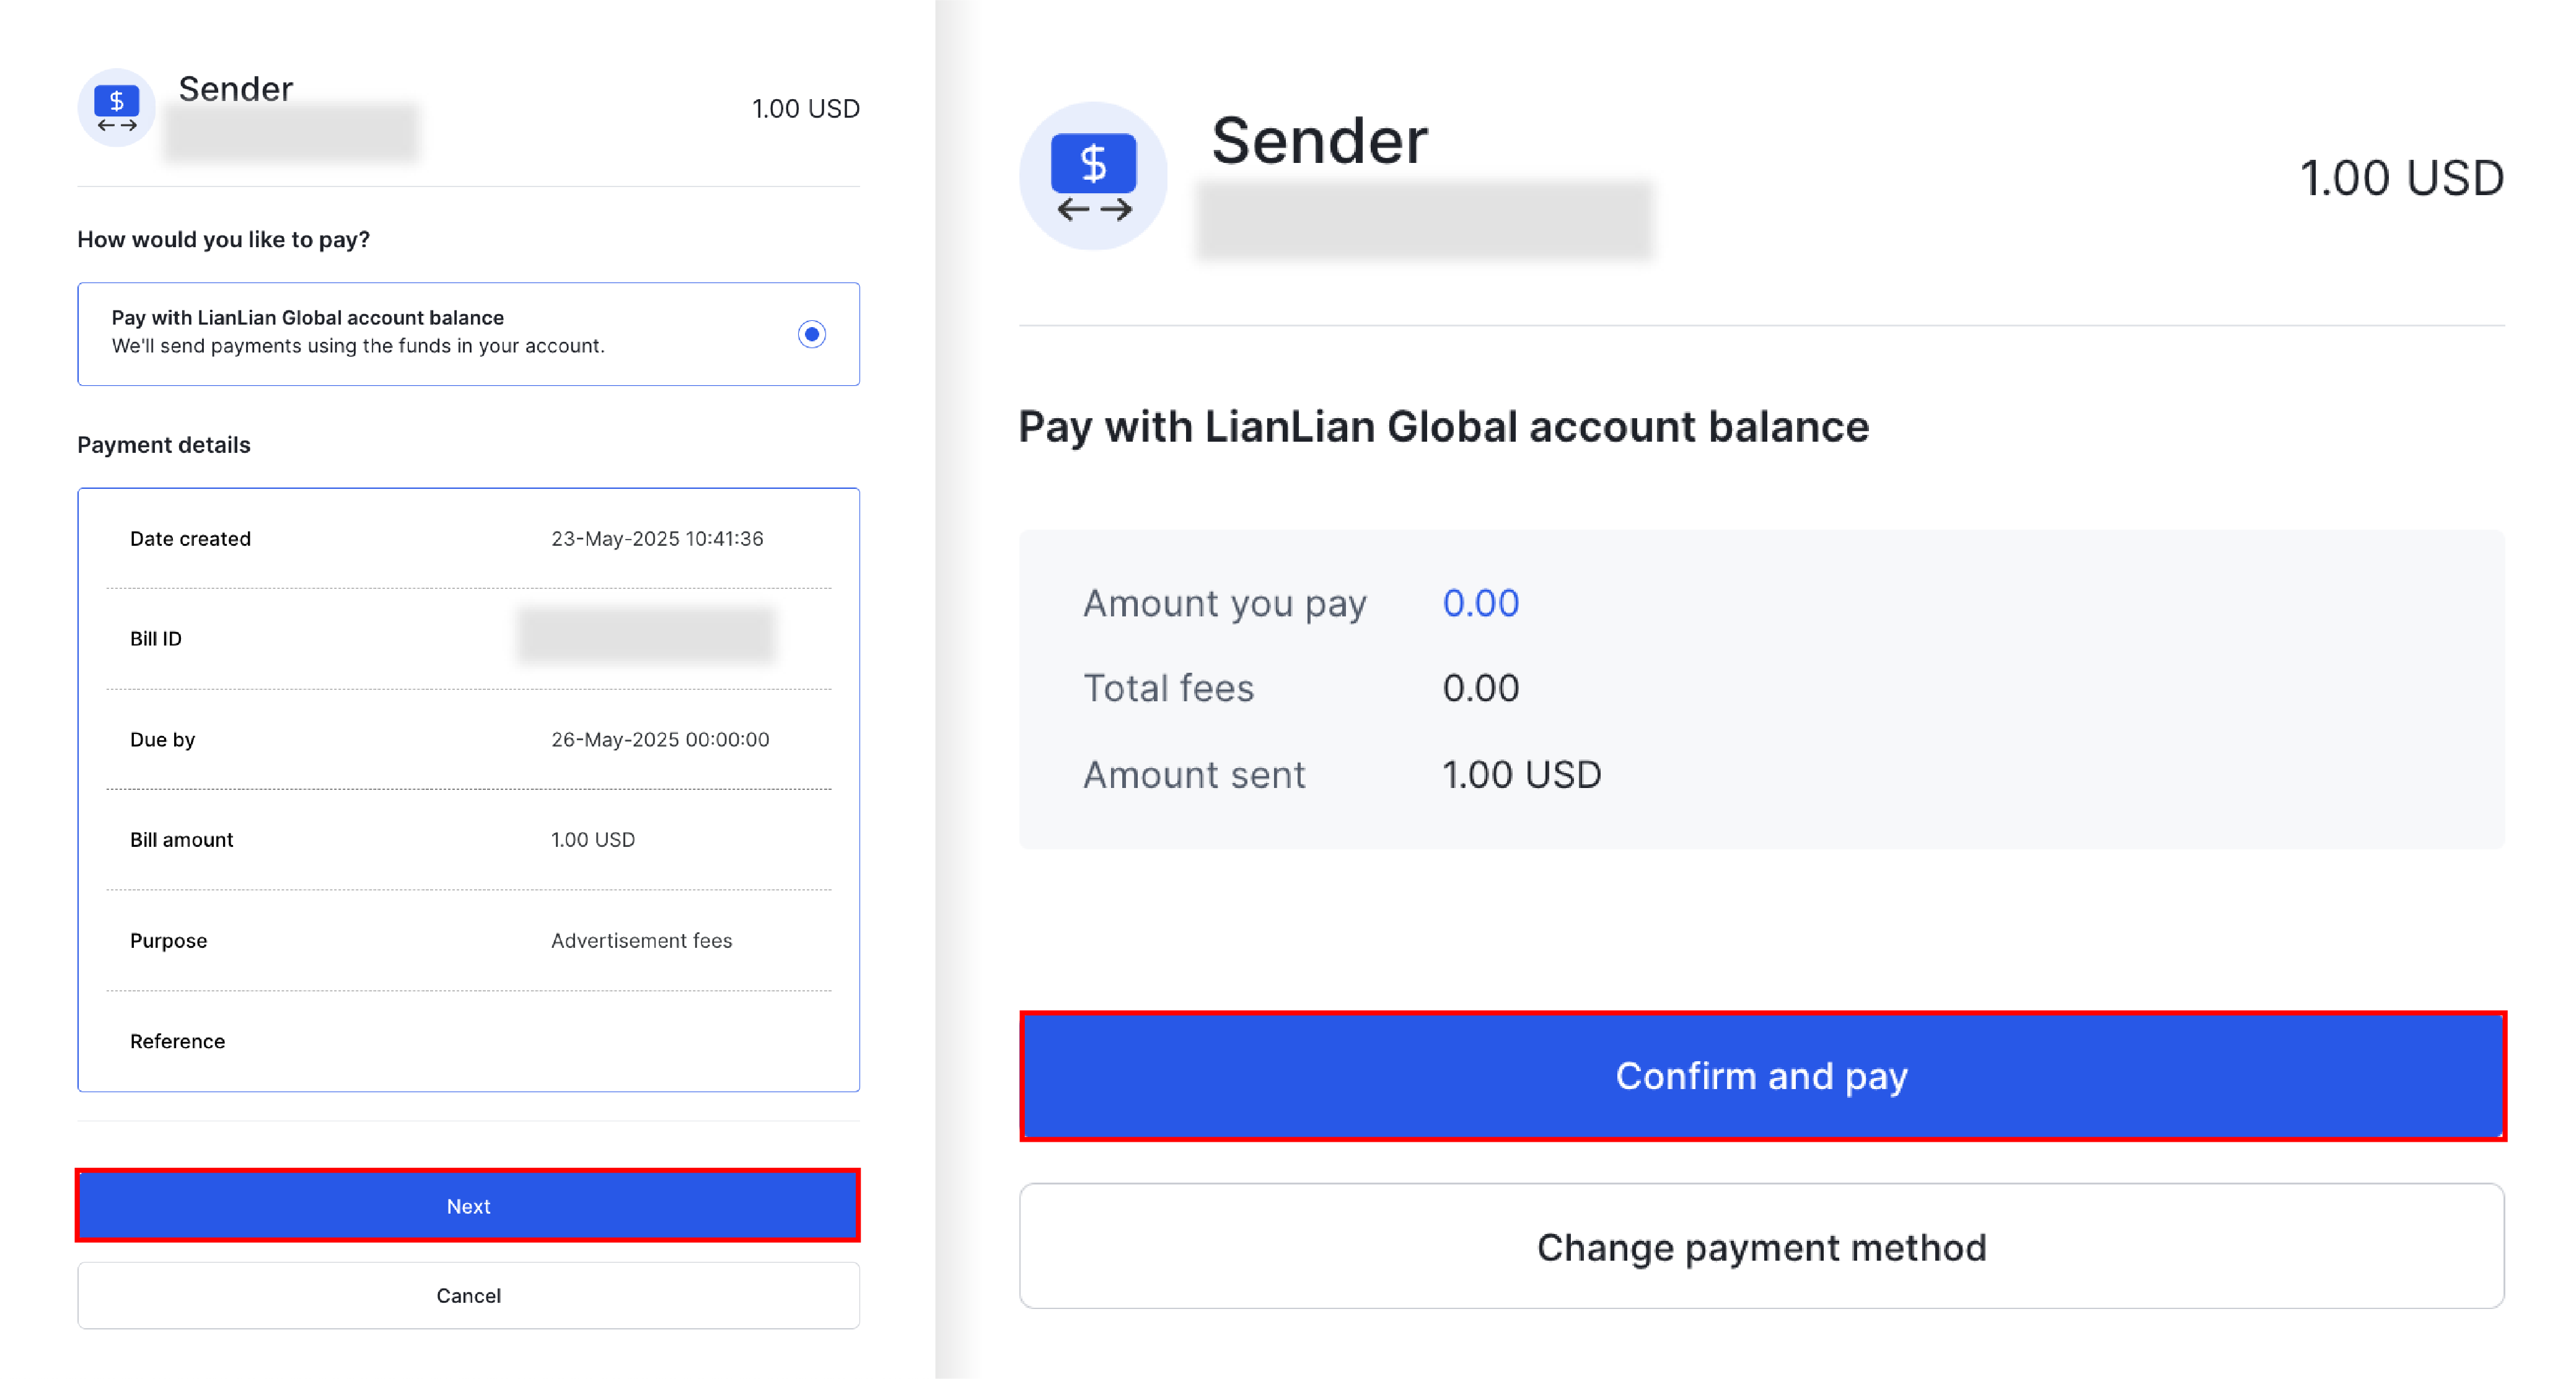
To check pending invoices, select the "Bills" section.
Step 1: Log in to your LianLian account and select “Manage.”
Step 2: Choose “Convert a currency.”
Step 3: Select the currency you wish to convert and click “Next.” The exchange rate will be automatically updated in real time by LianLian.
Step 4: Click “Confirm” to complete the currency conversion.
Step 1: On the homepage, go to your username and select "Settings".
Step 2: Click on the "Add" option in the "Authenticator App".
Step 3: Enter the OTP code sent to your registered phone number to proceed.
Step 4: Choose a 2FA (Two-Factor Authentication) method to replace the OTP. These 2FA methods can be used on mobile apps or web browsers.
Step 5: Use the QR scan feature from the 2FA app to scan the connection code displayed on your screen.
Alternatively, you can use a code provided by the 2FA app to link your LianLian account.
Step 6: Confirm the 2FA code from Step 5, and your account will be logged out of the LianLian website. When you log back in, you can use the new 2FA method for authentication activities.
We take the security of your account information very seriously. To change your account security settings, go to the "Home" page of your LianLian Global account. Click on your username in the upper right corner of the toolbar, then choose the "Settings" option.
Please follow the steps below to change your security information:
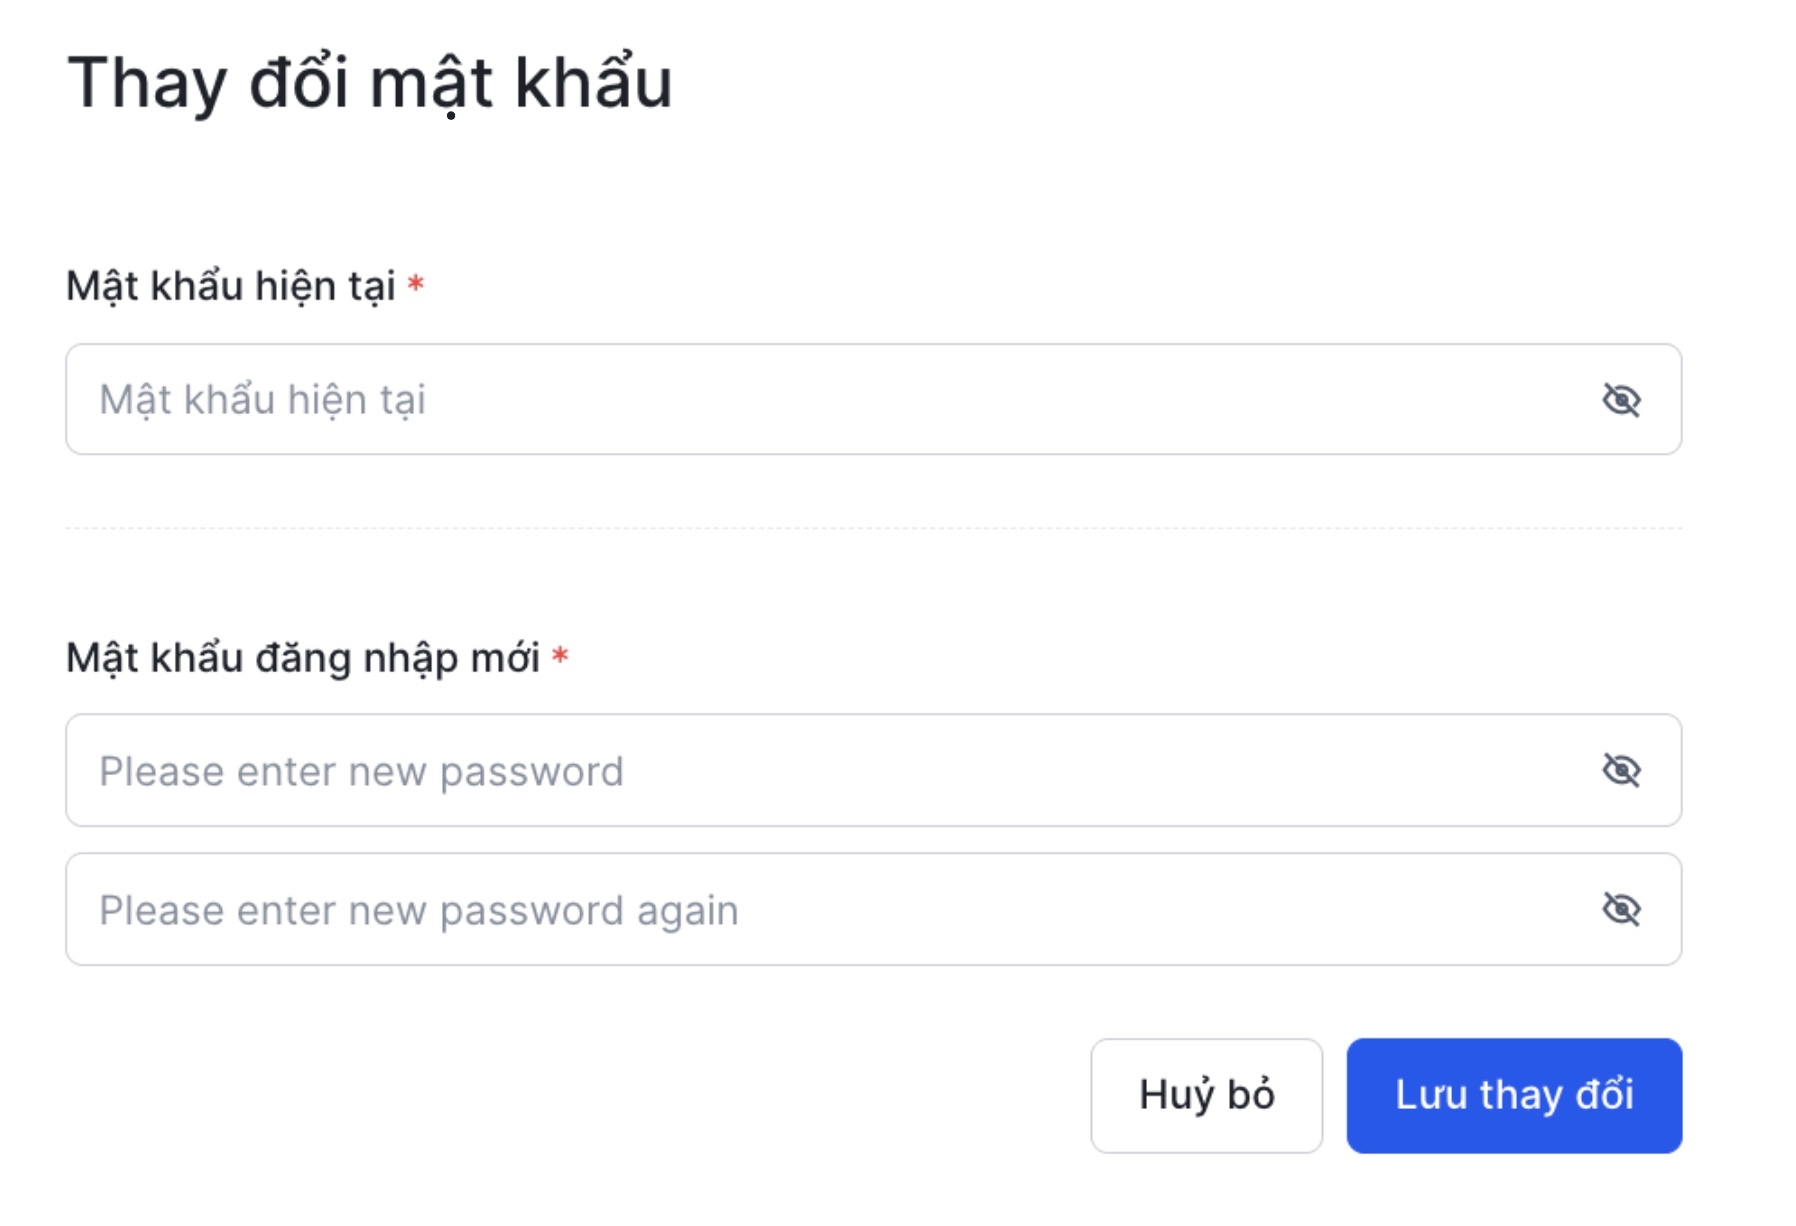
To change your "Password," click "Change" next to the "Login Password" section. You will need to enter your current password, the new password, and confirm the new password.
Note: The password must be at least 8 characters long and include 2 letters (a, A, B,...), numbers, and special characters (/,&,$,@,#,...).
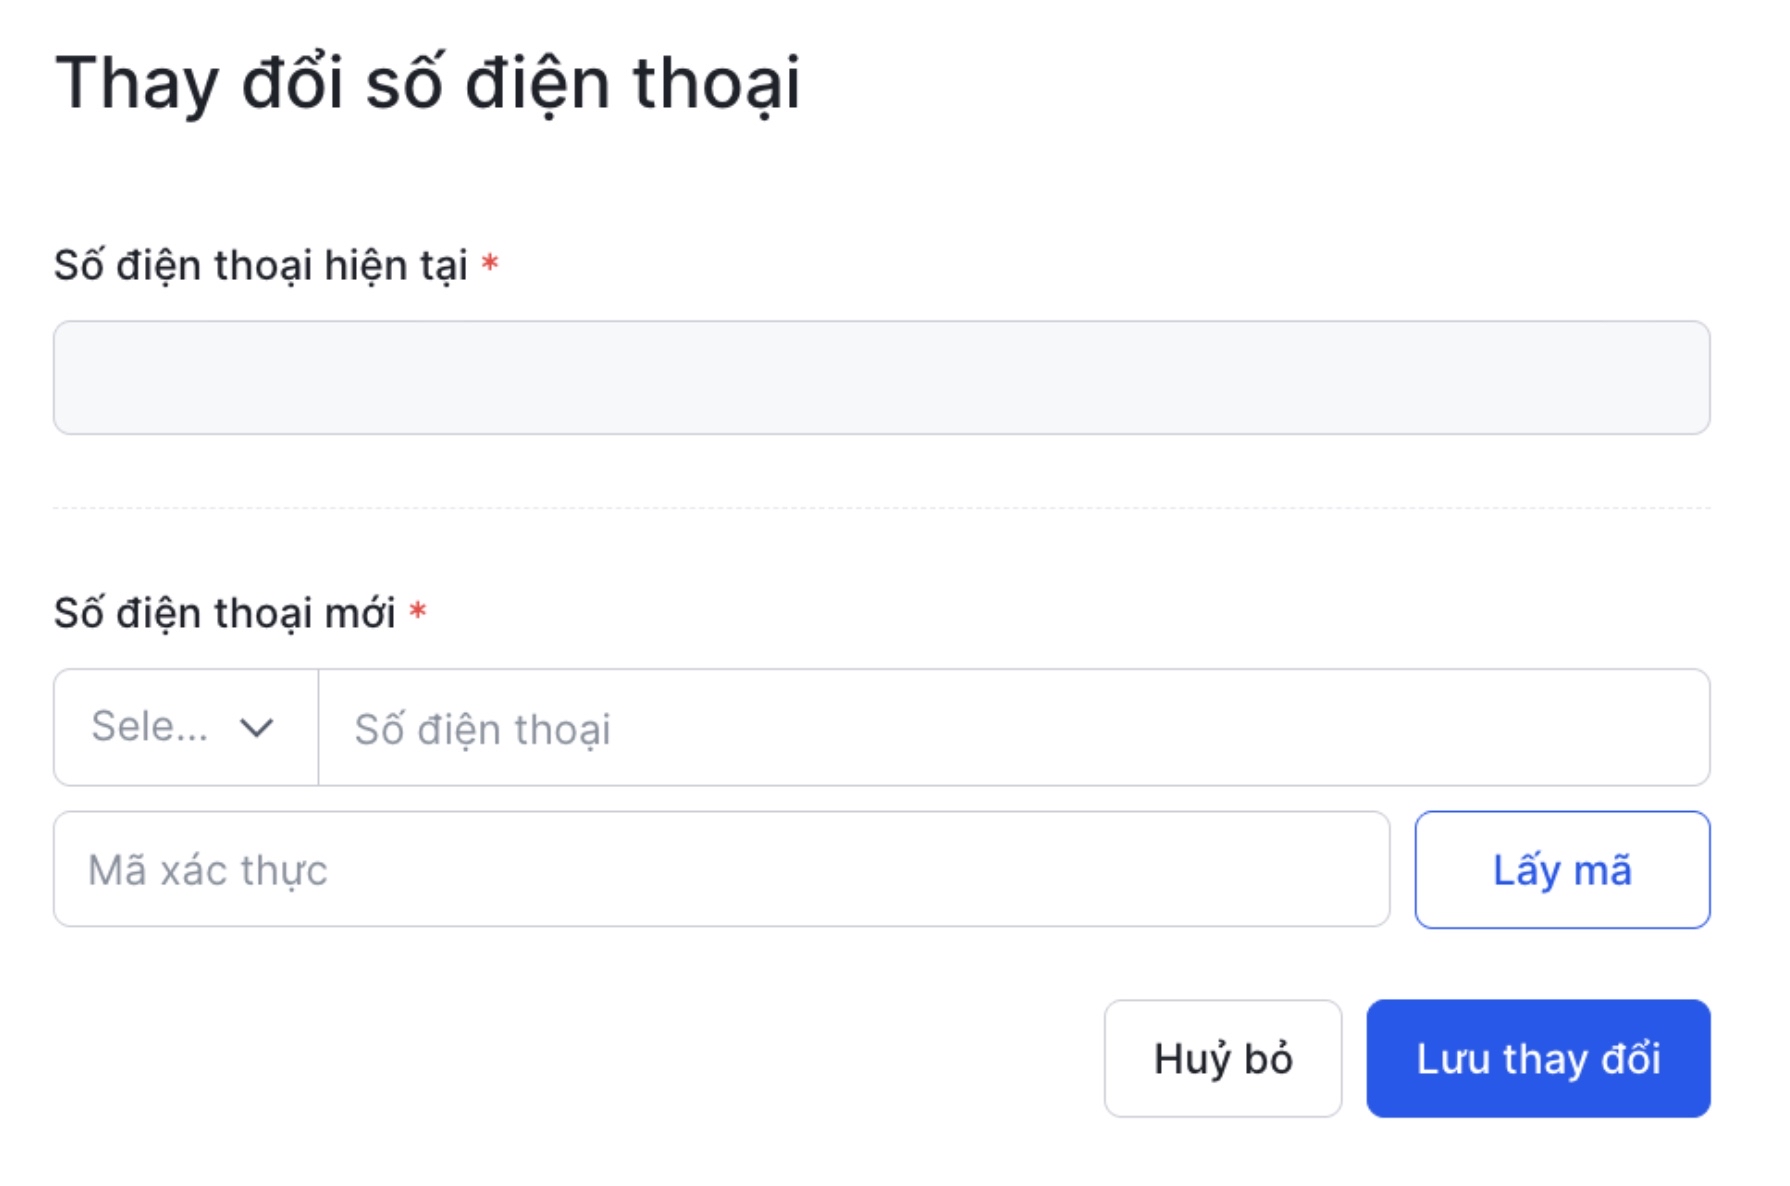
To change your "Phone Number," click "Change" next to the "Phone Number" section. First, you will need to use your current phone number to complete the "Two-Factor Authentication" step.
Note: Your phone number is used for "Two-Factor Authentication" for important transactions and to verify your identity.
To add an "OTP Code" as an additional security tool, click "Add" next to the "Authenticator" section and then enter your "Two-Factor Authentication Code."
Note: We may ask some questions to verify your identity, approve account operations, and assist in recovering lost/forgotten passwords.
Step 1: Access HERE to register or CONTACT LianLian Global Account Managers
Step 2: Select the nationality of the legal entity (business) and the method of registering an account (email/phone number)
Step 3: Click "Edit" and complete the required items one by one:
3.1: Complete the "Basic info" section
3.2: Complete the "Merchant info" section
3.3: Complete the "Director info" section
3.4: Complete the "UBO info" section
3.5: Upload the required documents in the "Upload relevant materials" section
3.6: Complete the "Operating site information" section
Step 4: Check the information again and click "Submit", the status of the application will be notified via email and the system
Step 1: Select the "Send", then enter the recipient's details.
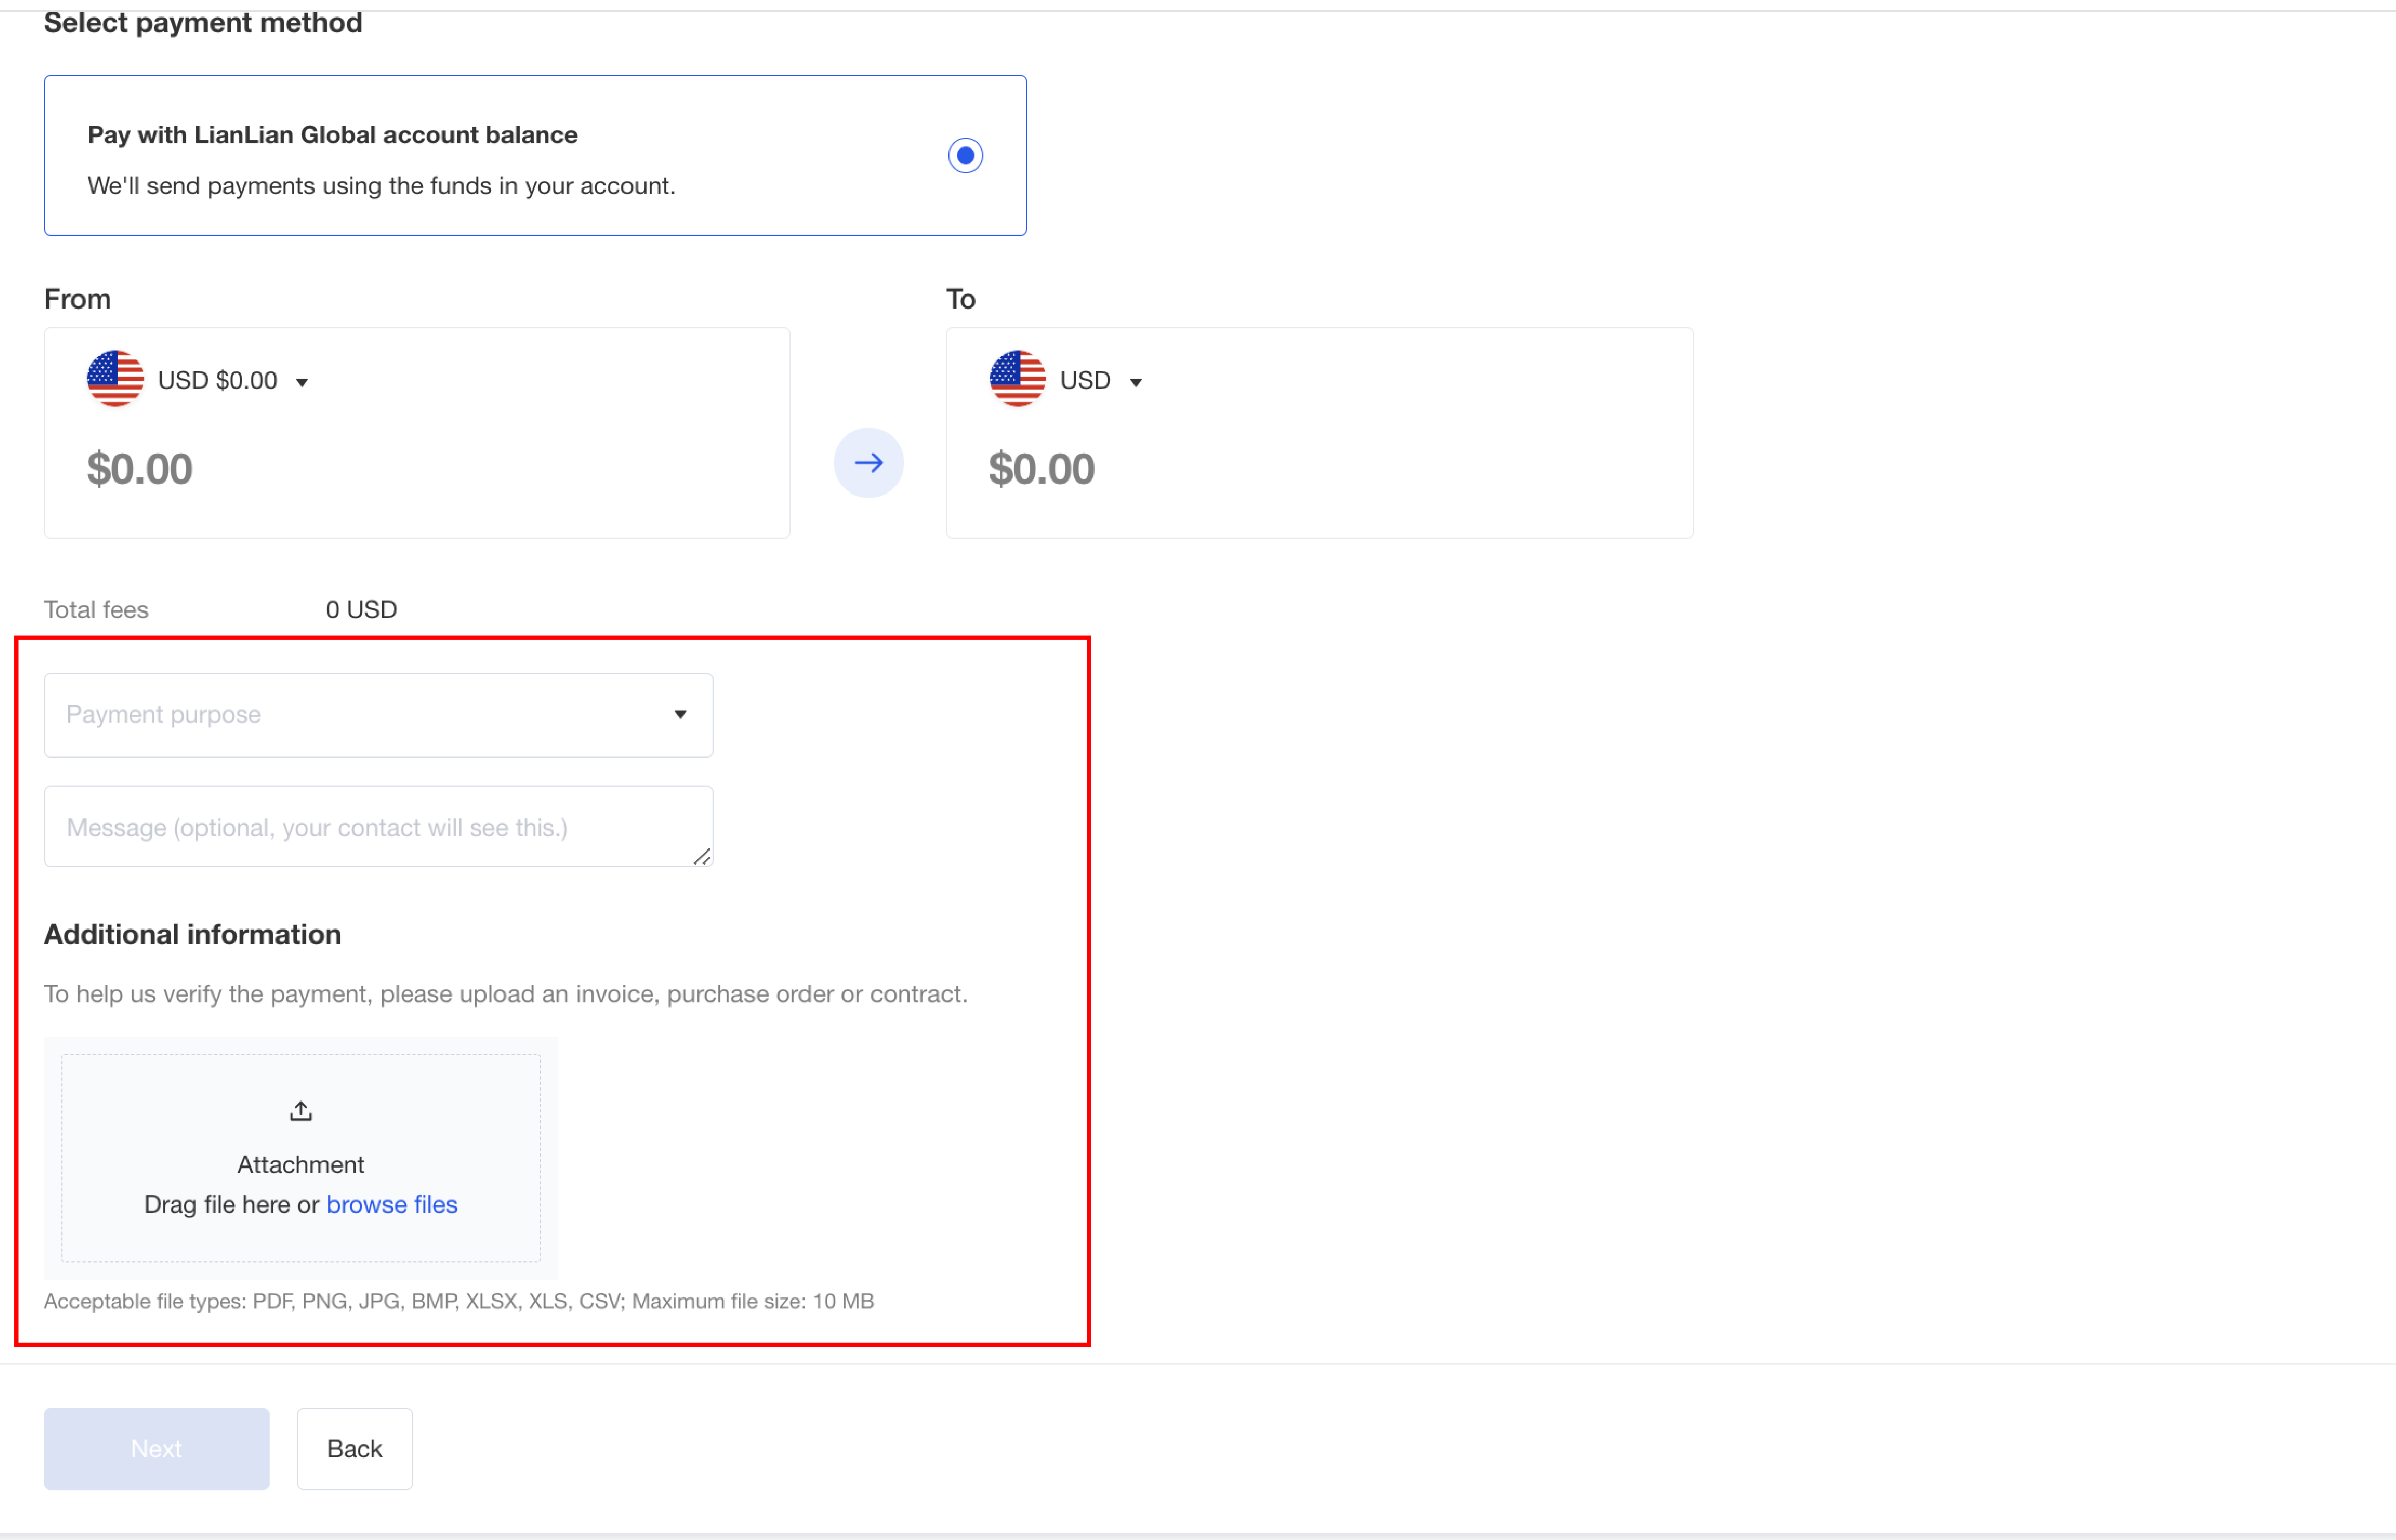
Step 2: Fill in the payment request details, including the amount, currency, purpose, message, and upload an image of the invoice or contract.
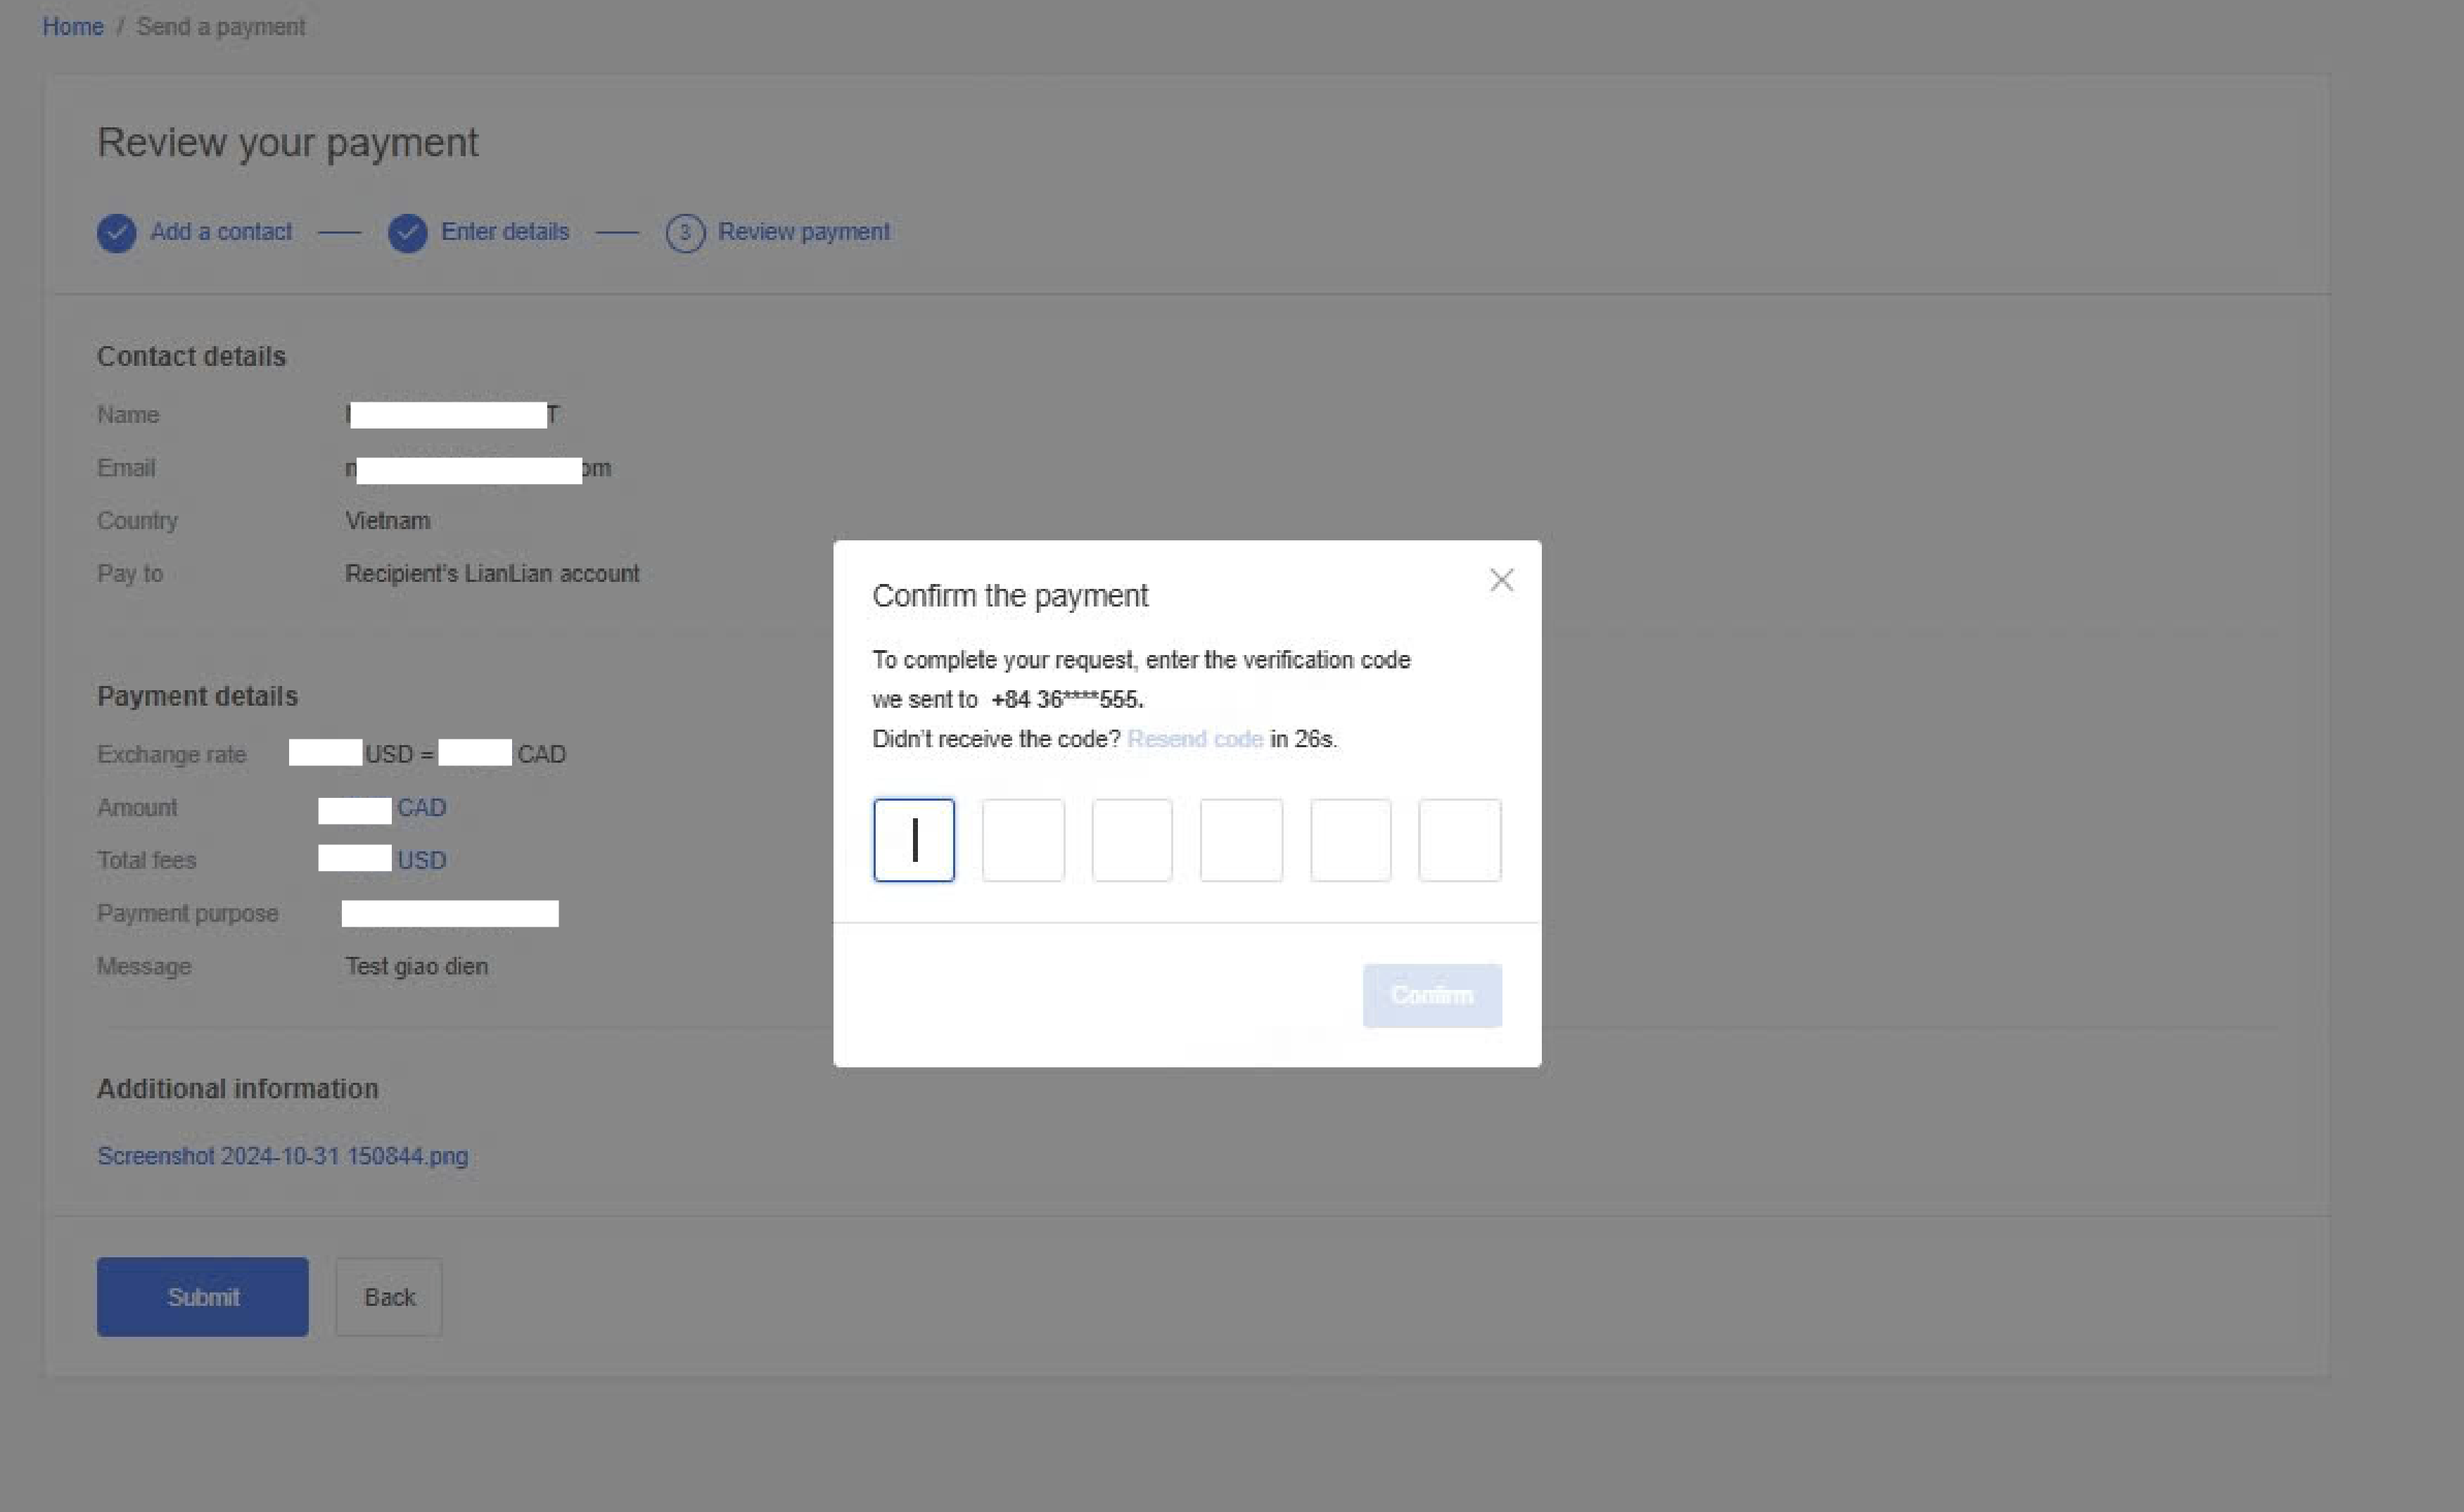
Step 3: Enter the verification code sent to your registered phone number.
Step 4: Review your transfer.
Step 1: Select "Send a payment" on the toolbar
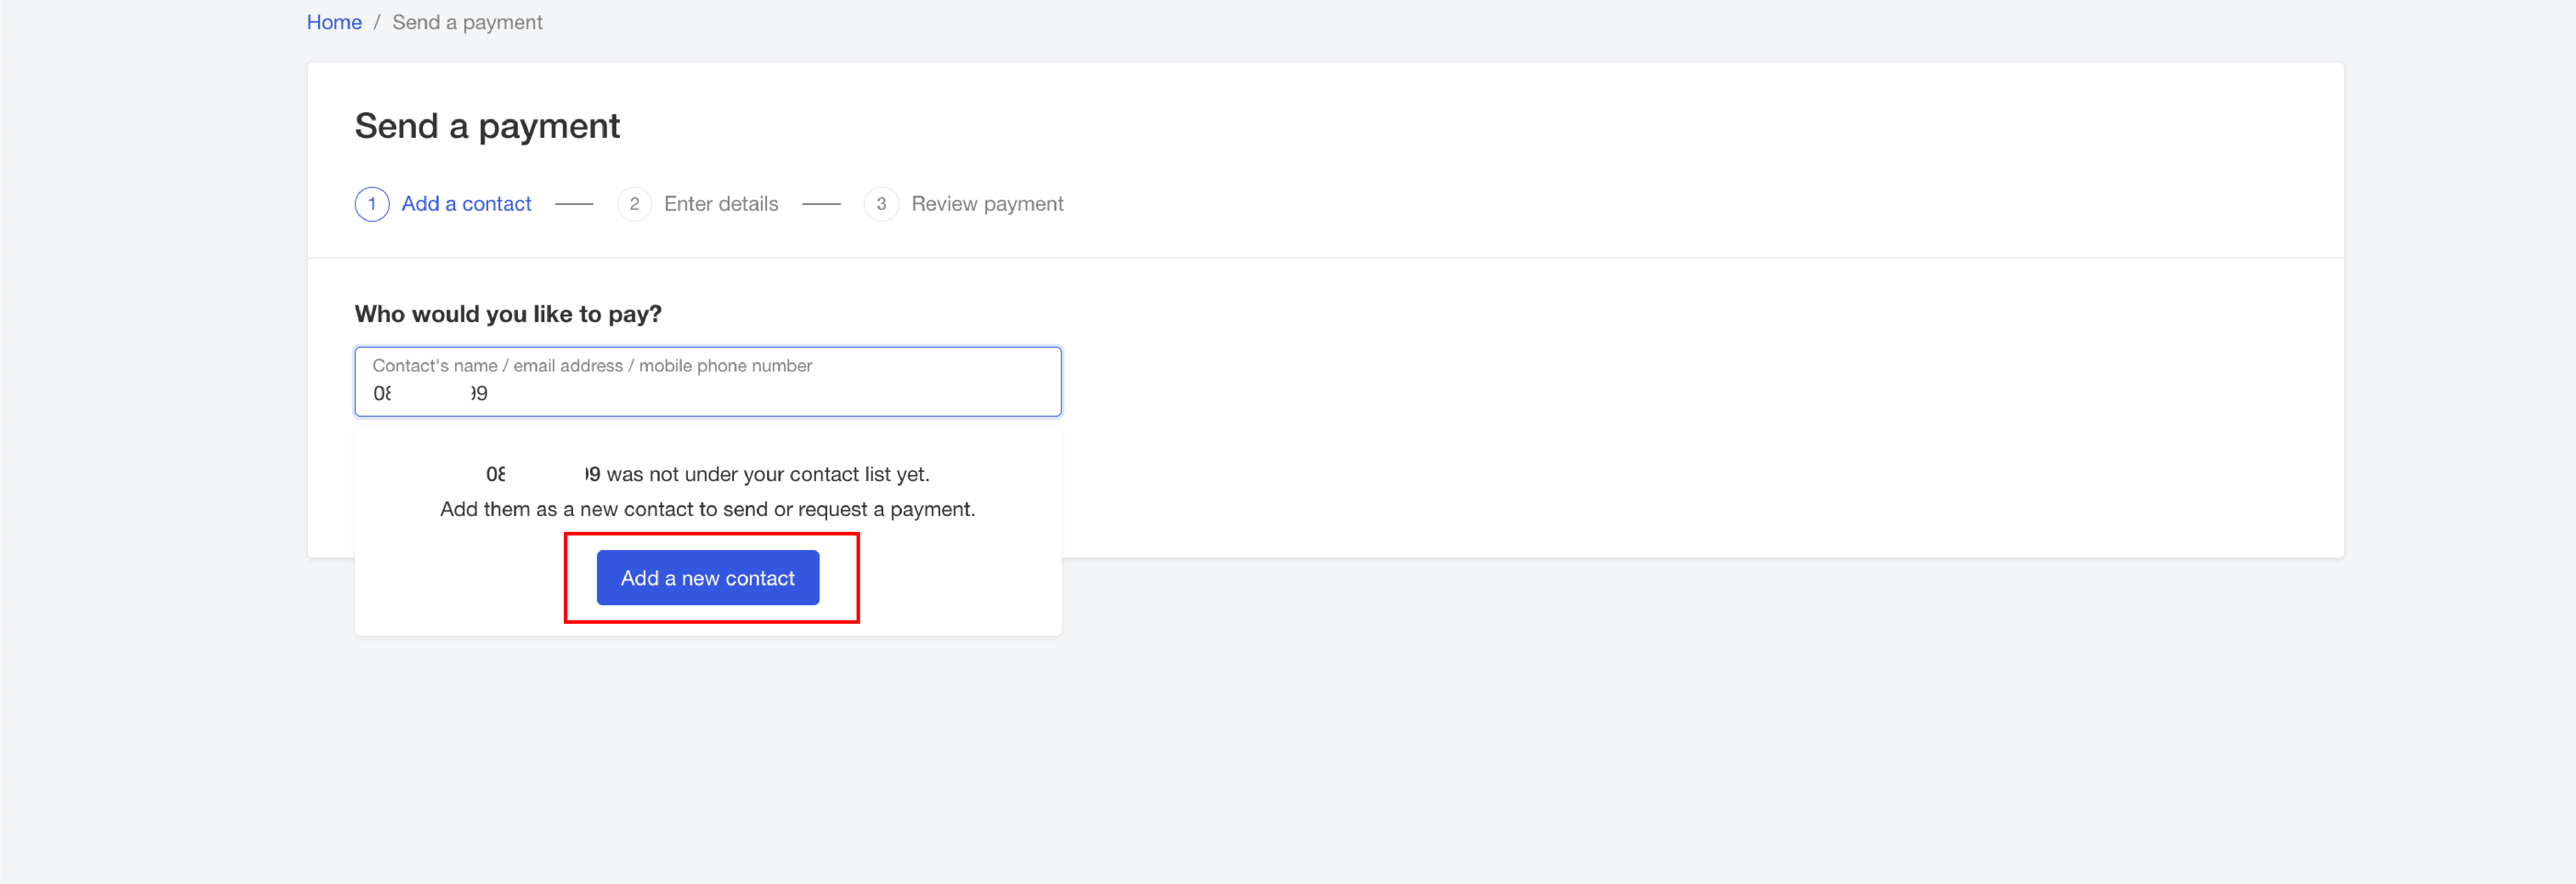
Step 2: Enter the Recipient's Name, Email Address, or Mobile Number. If the recipient isn't already in your contacts, select "Add a new contact"
Step 3: Select "Bank account transfer", fill in the required information then select "Send"
Step 4: Select "Send a payment" to make the transaction
Step 5: Enter the amount and currency you want to send
Step 6: Select "Payment Purpose", then enter a message to the recipient. Finally, upload Additional Information: invoice, purchase order, or contract... (clearly showing the recipient's name, invoice number, date, and receiving account number
Step 7: Check the information, then select "Submit"
Step 8: Enter the OTP code sent to the Sender Phone Number and Done!
Step 1: Select the "Request" option and enter the payer's email.
Step 2: Fill in the payment request details, including the amount, currency, purpose, due date, message, and upload an image of the invoice or contract.
Step 3: Review the payer's details and payment request information, then click "Send."
Step 4: Complete the process by sending the payment request.
Step 1: On the dashboard, select the "Withdraw funds" option.
Step 2: After adding your local bank account, enter the amount you wish to withdraw, choose the bank account for withdrawal, and select "Continue."
Step 3: Confirm the withdrawal transaction to complete the process.
Step 1: On the homepage, at the username, click the "Bank account" button. On the new page, select "Add a new bank account."
Step 2: Enter the details of the Vietnamese bank account where you want to withdraw funds.
Note: The "Account Holder's Name" must match EXACTLY with the name on the Vietnamese bank account. For example, if the account holder's name is “ABC LLC,” the user must enter “ABC LLC” in the account holder name field.
Step 3: Receive a confirmation email for your local bank account.
After you’ve entered all the information, LianLian will review it within one business day and send you an email to confirm that your local bank account has been successfully verified.
Step 1: Select "Send a payment" on the toolbar
Step 2: Enter the Recipient's Name, Email Address, or Mobile Number. If the recipient isn't already in your contacts, select "Add a new contact"
Step 3: Select "Bank account transfer", fill in the required information then select "Send"
Step 4: Select "Send a payment" to make the transaction
Step 5: Enter the amount and currency you want to sendsend
Step 6: Select "Payment Purpose", then enter a message to the recipient. Finally, upload Additional Information: invoice, purchase order, or contract... (clearly showing the recipient's name, invoice number, date, and receiving account number
Step 7: Check the information, then select "Submit"
Step 8: Enter the OTP code sent to the Sender Phone Number and Done!